


In memory of TosaInu. Friend, mentor, colleague.
This guide is entirely the work of frogbeastegg except where otherwise indicated. This may not be reproduced under any circumstances except for personal, private use. It may not be placed on any web site or otherwise distributed publicly without advance written permission. Use of this guide on any other web site or as a part of any public display is strictly prohibited, and a violation of copyright.
This guide is written for single player only. It does not cover multiplayer, and will not attempt to. Therefore all advice about units, battle tactics and so on come from a singleplayer perspective and may not be as effective in the multiplayer environment.
This guide is correct as of 14/08/11. It does not take into account any patches released after that. Nor does it cover the 'Sengoku Jidai' unit DLC, the 'Rise of the Samurai' campaign DLC, or any subsequent DLC. Whilst most of the information remains useful, there will be some differences in gameplay due to CA's balancing changes.
- Terminology.
- Getting started
- How not to die in the first 4 turns
- Province management
- The economy
- Religion
- Diplomacy
- Research: discovering the arts
- Agents
- Survival of the fittest: realm divide
- Battlefield units: an in-depth examination
- Putting it all together: some basic army templates
- Appendix 1: The Ikko-Ikki DLC
- Credits
Terminology.
As you might expect given the game's theme, Shogun 2 uses a lot of Japanese words. If you are not familiar with them it can be confusing. If you wish to dig deep into the various Japanese words used in the game, I recommend checking the game's encyclopaedia. There is a comprehensive list under manual -> glossary of terms. Here is a quick rundown of the most commonly used terms in the game and on discussion forums:
Ashigaru - a soldier who is not of samurai rank. Often termed a peasant soldier, this is misleading to most Westerners as we think of peasant soldiers being poorly equipped, poorly trained cannon fodder. By the Sengoku period an ashigaru was a disciplined, trained professional.
Bune - a type of warship. There are many different varieties of bune in the game.
Daimyo - a lord, one who holds land, has retainers, and is the head of his clan.
Dojo - a training area for martial arts.
Geisha - a high-class female entertainer, highly educated and cultured. In the game they are spies and assassins.
Ikko-Ikki - a rather complex set of rebels. While there were many different sects and flavours of ideology in this group, all of them believed that everyone was equally redeemed by Amida Buddha's grace. That meant they rejected the foundational principles of contemporary society.
Katana - the Japanese sword most Westerners are familiar with. The common sidearm for most units in the game. Its use was not exclusive to the samurai class during this period; that restriction was introduced as the Sengoku period came to a close. Wearing two swords at once, the katana and the wakizashi, was the mark of a samurai.
Koku - the unit of currency used by the game. Historically a koku is the measure of rice needed to feed a man for a year.
Metsuke - a member of the daimyo's secret police.
Mon - a clan's symbol, very similar to a European coat of arms.
Naginata - a polearm weapon. It consists of a long shaft with a sword blade socketed to the top, meaning it can be used like a sword with the benefit of longer reach, like a spear, or as a chopping weapon.
Nanban - translated most commonly as 'southern barbarian'. Along with 'gaijin' ('foreign country person') this is one of the terms commonly used to refer to the Europeans who visited Japan during the period.
No dachi - a large sword that is wielded with both hands. It was not a common battlefield weapon due to the need for the wielder to have a large amount of clear space around him. It was sometimes used against cavalry.
Ronin - a masterless samurai. Much like a mercenary.
Samurai - a member of the highest social class, almost always a warrior or trained to possess a warrior's skills. Women of this class were also termed samurai. Some samurai were wealthy and powerful, holding large areas of land. Others were much poorer, with little more than their swords to their name. They are roughly equivalent to European knights.
Sengoku, or Sengoku Jidai - 'The age of the country at war' is the most common English translation. This is the period the game is set in.
Seppuku - ritual suicide, performed by cutting open the stomach. When a major clan is defeated you will see their leader undertaking this if you choose to watch the event video contained in the news pop up.
Shogun - the military dictator, the real ruling force in Japan prior to the Meiji Restoration. The Emperor was more of a spiritual force than a political ruler.
Teppo - a gun, specifically a matchlock musket or arquebus. It uses gunpowder to fire a single bullet, and requires reloading after every shot. It has a short range and is inaccurate.
Wako - a group of pirates.
Yari - a spear. Historically this was the weapon of choice for all ranks during the Sengoku period.
Yumi - the traditional Japanese bow. Designed for use on horseback it is gripped off-centre, around one third of the way up the stave.
Getting started.
It is a lot easier to get started with Total War: Shogun 2 than with prior entries in the series. Your first starting point should be the tutorial campaign, even if you have played other games in the series. It's the best way to familiarise yourself with the interface and units. Unless you like a high octane style of learning, in which case feel free to skip the tutorial and figure out these basics during an actual campaign.
In the tutorial campaign you play as the Chosokabe, and will be guided through the process of conquering your starting island and gaining a foothold on the nearby mainland. The tutorial covers all of the basics as well as many intermediate areas, and does so well. You will also take part in several pre-set battles designed to teach you everything you need in order to have a reasonable idea of what to do in a normal battle. These tutorial battles can be accessed separately via the buttons surrounding the main tutorial button.
Your next step should be to familiarise yourself with the encyclopaedia. Do not attempt to read the entire thing in one go! For now it is enough to know that it is there, and to check the table of contents so you are aware of the topics. Refer back frequently as you play the game, for example when you gain access to a new unit type. The encyclopaedia can be accessed in many different ways. You can click the little lantern button on the top left side of the interface while on the campaign map or battle map. You can right click a unit or building and the encyclopaedia will open straight to the relevant page. There is a link on the game's opening menu screen. Finally, you can browse the encyclopaedia outside of the game by launching Shogun 2 in steam and then selecting 'Encyclopaedia' in the grey pop up box which appears. You can then navigate around the encyclopaedia in the same way you would in the game.
Setting up your campaign
There are a number of choices you need to make before you hit the campaign map and start playing. These choices will have significant impact on your experience, and due consideration should be given to each. Choose poorly and your game might not be as enjoyable as it could have been. There is no correct series of settings; you need to decide what is right for yourself as a player, and for the kind of campaign you wish to play. A little honesty at this point can save a lot of distress; there is no shame in choosing settings which will result in an easier game if that's what will give you the most fun, no point in forcing a long campaign if you always lose interest after you own 20 provinces, and no glory in setting out with easier settings when you want a stiff challenge.
The clans.
Your choice of clan is the first and most important decision you will make in your entire campaign. Each clan has a unique set of bonuses. Each starting position poses unique challenges and options.
On the clan selection screen they are arranged in order of difficulty, with the easier clans on the right. This difficulty rating is a general guideline, not a hard and fast rule. Other settings on the campaign set up screen will impact on the challenge level of a game. The most obvious of these settings is the difficulty level. Playing as a hard rated clan on easy will be a far less difficult game than playing as an easy rated clan on legendary. The second setting which will impact on a game is the campaign length. Both of these settings will be discussed in more detail further down.
All playable clans have a superior unit or units. This means that the unit is statistically better in some way compared to the basic version used by other clans, for example they may have higher morale or a better attack score. Some units have multiple special versions; you can tell which version belongs to which clan easily - they are all named after their owning faction. You can compare the statistics of a special unit against its basic counterpart in the unit section of the encyclopaedia, and can also snoop on the special units which belong to rival clans. This is highly recommended; familiarity with your army - and that of your enemy - is a core part of victory on the field of battle. If your clan has a special unit you will not have access to the regular version of that unit. It goes without saying that you should aim to incorporate your clan's special unit into your armies and battle strategy.
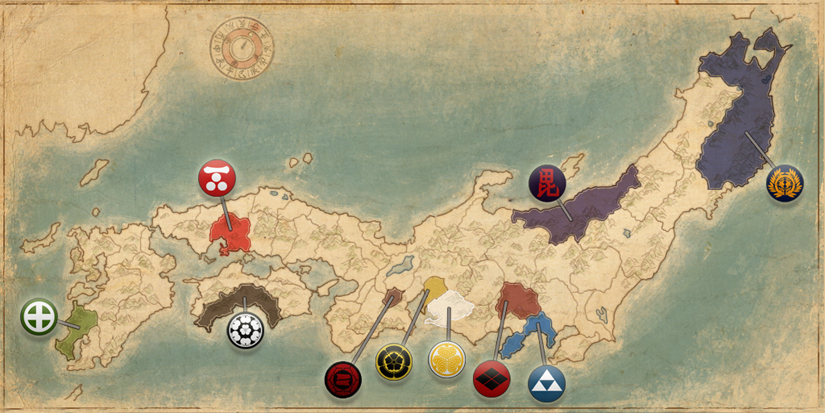
The map below shows the starting position of each clan:
Let's take a brief look at the clans. In alphabetical order we have:
The Chosokabe
The Chosokabe are rated easy. They are master archers, and have reduced purchase and upkeep costs for all bow infantry. They have access to slightly better version of all of the archer units whether ashigaru, samurai or hero level. The Chosokabe also have a slight bonus to income from farms. This gives a slightly stronger economy overall, and makes them somewhat less dependant on trade income.
The Chosokabe are the clan you play as in the tutorial campaign. For this reason - along with their safe island starting position - they are a solid choice for new players. I also find that they tend to have a much calmer early game than other clans due to their starting location. They are in an isolated position shared with a handful of minor clans, two of which are single province minors. These clans do not seem to be very aggressive either. Due to geography there are only two lines of approach to the Chosokabe capital, and they are the same lines you will expand out along. This means that the Chosokabe can expand at their own pace, gobbling up their neighbours one at a time, and remain reasonably secure without needing to think heavily about territorial defence. Wealth is in easy reach with the four western sea trade nodes a matter of turns away. Combine control of these with your increased farm income and your economy will boom.
If you are in search of a more lively or challenging campaign, I do not recommend starting with this clan unless you bump the difficulty up to 'hard'.
The Date
The Date are rated normal. Their bonuses are all very tightly tied in to a single concept: demolishing the enemy in a single glorious charge. To this end all of their units receive a small bonus to their charge stat, and they can recruit a superior and cheaper version of the no dachi swordsman, a unit that is born to charge.
The Date's main problem in the opening phases of the campaign is one of geography. They start in an area with sprawling big provinces which take multiple turns to walk through. This means rapid expansion is less possible, and by the time you work your way south-east you may find yourself up against larger AI controlled clans. It is also easy to place your army in a position where it cannot respond to a new threat in time. The opening moves of a Date campaign should be taken with extreme care with regards to positioning units and targeting other provinces.
The Hattori
The Hattori clan are part of the limited edition of the game and are not available to owners of the standard edition. They may become available as downloadable content at a later date. They are rated easy for difficulty.
The Hattori are the premier ninja clan: all of their bonuses are centred around the black-clad menaces. Their campaign map ninjas have slightly better odds of successfully completing a mission. Additionally, their battlefield units have kisho training, which enables them to deploy anywhere on the battlefield aside from right by the enemy general. The clan's specialist units are also slightly better at hiding than their default counterparts.
The Hattori start very close to Kyoto. This is a temptation which should be resisted; capturing the capital triggers the realm divide state no matter how few provinces you own. If you do this too early your chances of survival will be next to nil, as all of Japan will unite to destroy you. Instead you should expand around Kyoto, try to cut off the Eastern clans like the Oda, and then do the same with the Western Mori. When the centre of Japan is firmly in your grasp Kyoto beckons ...
The Hojo
The Hojo are all about castles. They benefit from reduced costs for each castle upgrade, and also find it cheaper to repair damaged castles. This makes it viable for them to play a more defensive game in the opening phases of the campaign. If you upgrade key castles you can encourage your enemies to break their armies on your walls, and then march out to take provinces from a weakened clan.
Hojo siege units are superior to those of others clans, and can be recruited and maintained at a reduced cost. They are rated normal for difficulty. If you want to use Hojo European cannons then you will need to convert to Christianity, otherwise this particular special unit will not be available.
The Takeda must be dealt with early on if the Hojo are to survive. It is possible to pay them for peace on the first turn, and then pursue trade with them. This gives you time to build your strength by taking some of the provinces to the east of your capital.
The Mori
The Mori are rated normal for difficulty. Those who played the original Shogun: Total War should note that the Mori have completely changed specialty. They are now a naval powerhouse, with cheaper and stronger ships compared to the other clans. Their navies can also move slightly further on the campaign map. Amongst their improved ship types, the Mori have an improved version of the ludicrously powerful Nanban trade ship. Keep in mind that, like the normal Nanban trade ship, they must convert to Christianity in order to access it.
Their position on the western end of the main island allows the Mori to choose one of two directions. They can head east, and focus on being a power on the mainland. Or they can turn west to strike at Shikoku and Kyushu. The latter allows you to utilise those stronger ships, and to set up some (relatively) safe island holdings. The former means you do not have to conquer in two different directions in order to reach the capital.
The Oda
The Oda are one of the two hardest clans in the game. They only have two bonuses and on the face of it neither is appealing. They can recruit superior ashigaru into their armies, and those ashigaru units cost less both to recruit and to maintain. The bonus is deceptively powerful. Ashigaru have a valid place in armies right up to the very last turn, and in the earlier phases of the game they will form the bulk of your armies. The Oda have a cheaper, stronger core for their armies - and they will need them!
Destroying the rebel army in your home province at the start of the game is a sound idea. Pursuing that army if it retreats invites your elimination on the very first turn! This example sums up the early Oda campaign very well: you must act with extra caution at all times. The Oda start in a very busy location with four of the other great clans nearby, and they will be expanding aggressively. More than the other clans, the Oda need to find a good ally or two on turn 1.
The Shimazu
The Shimazu are rated easy, and seem to be the popular choice for a first campaign. Their generals are more loyal than those of other factions, reducing a potential source of tension later on in the game. Aside from that their bonuses are with swords: they have superior katana samurai and katana hero units, and can recruit and maintain them at a lower cost. Note that the bonus is only applicable to those two named sword units; they do not gain any bonuses towards katana cavalry or no dachi.
While they are rated easy, the Shimazu early game is a different beast to that of the Chosokabe. The larger island is shared by multiple clans, most of which own multiple provinces. This makes it harder to knock out an enemy without retaliation, and means that more resources will be thrown against you. The clans can and will ally against you, so a top priority should be making and keeping allies of your own.
The Takeda
The Takeda are rated hard. They are the masters of cavalry, a fact which will come as no surprise to anyone familiar with the history of the period. In addition to a blanket morale bonus for cavalry, they can recruit superior versions of the cavalry units, and pay less in recruitment fees and upkeep costs than other factions.
If the Hojo need to remove the Takeda in the early game, the reverse is true. Obtaining a peace treaty and trade with the Hojo will give you chance to gain strength before the inevitable confrontation, and this is vital as the Takeda capital is entirely surrounded by other provinces. Limiting your battles to a single front is necessary, else you could find yourself fighting in three or more directions! Other nearby clans may also be amiable to trade, and could be converted into military allies if you play the diplomatic game well. Heading West will all but cut the Hojo off and allow you to gain strength from their weakness.
The Tokugawa
The Tokugawa are battling Oda for the crown of most difficult clan. That is a battle they may well be winning! Unlike the other clans, the Tokugawa do not begin the game as an independent clan. They are vassals of the Imagawa, which means half of their income goes to their masters. They must win their freedom before they can stand tall and take their place alongside the other warring clans.
The Tokugawa bonuses are a varied set. They receive a small bonus to the success of metsuke actions. Diplomatically they also have an edge, receiving a small relationship boost during negotiations. Their final bonus set relates to the kisho battlefield ninja unit; they have a superior version which they can recruit and maintain for a lower price.
The Uesgui
The Uesugi are rated hard. If there is a single word which applies to them that word is "Monks!" They have access to superior versions of the warrior monks, and can recruit and maintain them for less. To help support those expensive units, the Uesugi have a small bonus to trade income. Their campaign map monks have a slightly higher chance of success in their missions compared to other clans.
If the Uesugi expand to the west they encounter the same problem the Date start out with: sprawling provinces which take multiple turns to cross. This can tie their armies up and leave them vulnerable. Expanding east or south leaves them running into other 'great' clans like the Takeda. If the player has the Ikko-Ikki DLC installed then the Uesugi will have to battle a strong rebel cult a mere two provinces away from their capital. The Uesgui player should use diplomacy to the utmost, and let that influence his direction. If you can get an ally to secure one direction it is safer to expand in another. Uniting with the Takeda to destroy the Hojo is a sound choice if you can manage it.
The difficulties.
There is one very important thing that players of past Total War games need to take note of. The AI has had a bucket of cold water tipped over it and is up on its feet outraged. No longer is it passively snoozing away, making the occasional questionable move as it stirs in its slumber.
Shogun II's AI is very good. Personally I feel that it is the best in the series by a good way. The developers responsible for it had stated that it aims to win; this means it is playing with the same goals as you. It will expand, it will use diplomacy, and it will try to take Kyoto to proclaim itself shogun. If you get in its way it has no qualms with crushing you. In fact many of the early reactions to the game I saw came from stunned players who had been crushed in the opening turns! Excellent.
This means that players should not expect to select very hard and then cruise through a reasonably mild campaign, as they have grown accustomed to doing in the older games. If you select very hard it will be very hard, especially if you do not know the game very well. For those who enjoy learning with a challenge, this is perfect. For everyone else, adjust your difficulty setting accordingly.
Now, some notes on the specific difficulties.
Easy.
Easy is the difficulty that the tutorial campaign uses, or so I assume as it awards the "Easy Campaign Completion" steam achievement. If you have played through that and found it to be about right for you, then there's no reason to not select it for your first campaign. Alternatively, if you want a laid back, relaxing game where you can admire the scenery and indulge in evil laughter as you mow down your foes, easy is a good choice.
The AI is quite generous towards the player at this level. It seems more likely to direct its aggression at other computer controlled clans, although that is not to say it ignores the player altogether. It will deliberately make mistakes, or fail to follow up on opportunities.
The AI has limitations at this level. Its production and building priorities are handicapped. On the battlefield the AI has limitations to its accuracy, morale and melee attack value, and the player has bonuses to them.
Normal
Normal is the level that most people will want to use for their first game. The AI is still capable of giving you a beating, especially in the perilous early turns and in the realm divide phase of the game. Certain clans, such as the Chosokabe, will be fairly easy and players will not need to worry overly about being trampled underfoot. Conversely the hardest clans, such as the Oda and the Tokugawa, will be quite a bit tougher and it may take a few false starts before a player feels that they have survived the opening satisfactorily.
On normal, the campaign AI has a small penalty to its production and building priorities. It seems quite balanced in its attitude towards the player; it will punish foolish moves more often, and appears to have no preference between player or AI controlled clans when it comes to aggression. It will do as it sees fit without biasing towards or away from humans.
On the battlefield the AI still receives slight penalties to accuracy, morale and attack, and the player receives a slight boost to those areas.
Hard.
Exactly as the name implies, this mode will offer a stiffer challenge. New players with a lot of strategy experience may wish to start on this mode, in which case they should expect to gather some nasty bruises before they triumph! For most players this is a mode they might like to look at after they have won a campaign.
On this level, the AI is no longer handicapped, and instead it receives a small boost to recruitment. I am not sure if this means it can occasionally recruit samurai units a bit faster, or if it has an extra recruitment slot or two. As yet, I have not seen any developer clarification. You should expect rival clans to be more aggressive towards you. Diplomacy and peaceful options will still be possible - and indeed form part of a winning strategy - but the AI knows you are the greatest potential threat and will be watching you more closely.
On the battlefield the tables have now turned: the AI begins to get bonuses to its accuracy, morale and melee attack values. The player receives nothing.
Very hard
On this mode you should expect no holds barred, no mercy, and no kindly little sleights of hand where the computer says "Ah, humans cry so much when they lose. I'll let them off ... this time." Again, diplomacy is still a valid and important part of strategy, so don't expect an anti-human free for all. The recruitment boost is a bit more significant at this level.
The battlefield AI bonuses of hard mode still apply, and now the AI gets a larger boost. The player still receives neither boost nor penalty.
Legendary
Legendary is the mode where you should pretty much expect to die unless you play an absolutely exceptional game, and quite possibly even then. This is a new difficulty mode, combining very hard mode with a series of extras to create the ultimate Total War challenge. Some of these extras were available as optional modes in prior titles, such as restricting the camera so it could not move past a set distance from your troops. Others are entirely new. The AI does not gain any new bonuses or capabilities compared to very hard; this mode focuses on curbing the god-like abilities normally available to the player. Once you commit to legendary difficulty you cannot alter the difficulty for that campaign, neither on the campaign map nor on the battle map.
On legendary mode you are only permitted a single save. Each time you save your game your old save will be overwritten. If things go pear shaped, tough! No winding the clock back. The game is saved before and after every battle; if you lost your entire army, live with it! You may find yourself developing a degree of sympathy to the AI, which can never reload.
The remainder of the changes affect the battle map, and are as follows:
- No radar map for land and sea battles
- While the game is paused no orders can be given
- The camera cannot be moved while the game is paused
- You cannot move your camera more than 200 meters from the centre of any of your units. The camera will be "rubber banded" to the nearest unit
- Enemy units more than 600 meters from your units are treated as hidden
- Enemy Tooltips have minimal information
- Enemy Unit IDs are removed
Even if you are not keen on tough games it is worth trying this mode at least once, just to see how different the experience is.
Did you know that you can set campaign and battle difficulty separately? It's true, and the game is strangely determined to conceal this fact. Although the campaign set up screen is missing the now traditional pair of difficulty sliders, the option to change battle difficulty appears once you have started your campaign. To do this press escape while on the campaign map, select game settings, then move the slider that's in the upper middle part of the options list. Simply set the campaign difficulty you wish to use on the campaign set up screen, then change the battle difficulty to your preference. This does not apply to legendary mode; you have to be totally legendary, not mostly legendary.
A couple of interesting developer comments relating to difficulty.
There are two particular developer comments which struck me as important to understanding the way the higher difficulties work. They made me appreciate what we have in Shogun II's AI. Both of these developers know the AI inside out.
The first comes from Jack Lusted:
So the AI is giving far better results on the battlefield than the older games, and it is doing that with half as much help. Those bonuses have been in place since the very first game in the series, the original Shogun: Total War.The bonuses to the AI on hard and very hard are half the bonuses in previous Total War games.
The second comes from Watcher on the official forums.
That one is important for two reasons. Some players were convinced that most of the challenge came from highly artificial means, such as magically creating armies in positions where they could threaten the player. The above means that this is not the case. You can wear the AI down with attrition. It also means that the AI is using advanced campaign map features such as concealment and reinforcement to very good effect!There has recently been a lot of discussion about the possibility that the Campaign AI is spawning armies to increase the difficulty to the player.
To be clear, the Campaign AI does not spawn additional forces except under the following four circumstances:
· The Ashikaga faction. To represent the idea that the Shogun could place a levy upon his subjects and to improve game play the Ashikaga gets some free units.
· Rebellions, these troops are the result of a spontaneous (or incited) uprising.
· Wako pirates, they are pirates and not subject to normal rules!
· European Traders, the Black Ship.
Any other forces you encounter are the result of the AI's recruitment through normal channels.
On harder difficulty levels the AI gets some (minor) recruitment bonuses that may allow it to field armies more quickly than the player.
On easier difficulty levels the AI is penalised and you should be able to out produce it.
Besides normal troop recruitment the AI can also acquire forces through the normal defection and bribery mechanics.
Also note that the AI has a tendency to hide forces and that Ninjas and other agents are not 100% effective in revealing ambushing armies. Don't assume that because an agent can see some location that an army isn't there waiting to ambush.
I hope this clarifies things!
As an aside, it's worth noting that comment about agents not always seeing hidden armies. Previously scouting has been pretty much infallible. That's no longer the case and you should plan accordingly.
Campaign length.
The campaign has 3 different victory conditions. The difference is the number of provinces you need to control and the date on which the game ends. You need to take and hold Kyoto on all campaign lengths. Campaign length is a subtler flavour of difficulty, and to a large degree it is going to be personal as to what is easier or harder.
On short campaign you need to collect 25 provinces by winter 1575. On long mode you need 40 provinces by winter 1600. Domination requires 60 provinces by winter 1600.
Please note that on the short campaign setting the Shimazu and Date clans have an additional 5 years (20 turns) to complete their goals, meaning their campaign ends in winter 1580. This is because they start so far away from Kyoto.
On the longer settings you are more likely to encounter problems with having an overstretched empire, and you will need to fight against clans which have become more advanced and very probably consolidated into significant forces. You will see - and use - the more advanced units and buildings, and your later turns will take place in a more developed Japan. It is more likely that you will manage to field mainly or purely samurai armies in the late phases of long games. In domination mode particularly, you will need to put your conquering hat on and get hopping. While there is a degree of momentum, meaning that it is easier to take multiple provinces per turn in the later phases of the game than in the earlier, you will not really have time to amble in the sun smelling the flowers.
On shorter games you will need fewer provinces to win, which means you are more likely to have trade partners available to buoy up your economy. You will not have as much time to develop your armies and provinces, and so are more likely to spend most of your play time using mixed samurai/ashigaru armies. On short campaign mode you have relatively few provinces to take but also the shortest number of turns in which to achieve victory. Depending on where your clan starts the game you may need to conquer more than the required number of provinces in order to reach and properly secure Kyoto, unless you want to try holding on to a fairly isolated province.
For players who enjoy a more relaxed pace of expansion, or who hate to feel like they are under time pressure, medium campaign length is currently the sweet spot, as that provides the best ratio of turns to required number of provinces.
If you run out of time you can choose to keep playing, although you will no longer be able to win even if you satisfy the victory requirements.


 Reply With Quote
Bookmarks