Results 1 to 13 of 13

Thread: Tutorial: Head Swapping Tutorial (3D units)

  1. #1
    Senior Member Senior Member hoggy's Avatar
    Join Date
    Feb 2004
    Location
    Adel, Britannia
    Posts
    565

    Default Tutorial: Head Swapping Tutorial (3D units)

    Modding Resource Header
    Title: Head Swapping Tutorial (3D units)
    Posted by: hoggy
    Modding area: Units (appearance)
    Required programmes: 3DS Max 5 or above, Vercingetorix's CAS extractor, Vercingetorix's X-Pak, an image editor capable of editing .DDS files (such as Photoshop or Paintshop Pro), Notepad (or other text editor)
    Related links: xpak Tutorial, How to Model New 3D Units, 3DSMax and tool tutorials
    Summary: This is a relatively simple modelling tutorial that allows you to create a new soldier simply by swapping the head from one to another. It requires some knowledge of modding the game and modelling. Like all modelling in Rome it requires 3ds max.


    Head Swapping Tutorial (note: process applies for any body part that is part of the mesh):

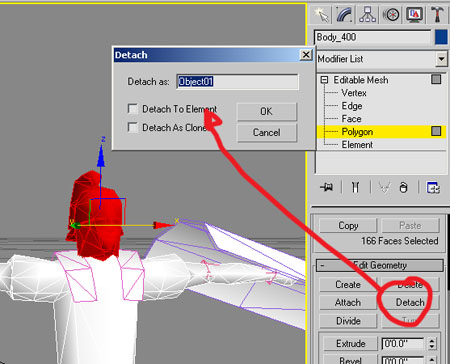
    - Import CAS number one. In Poly or Element mode (element better for this job) select all the polys you want to swap up to a nice clean break where the neck joins the shoulders. Be sure to get all the hair etc. In the options on the right hit ‘Detach’ and call your new object ‘head’(or whatever) * See illustration below

    - Select the new object and click ‘Attach’ on the options and click on the plume or any other separate head-related objects. In File - ‘Save Selected’ save your new head out where you can find it.

    - Close this scene, get a new one and import CAS number two. Select the Polys down to the same neck line as you did on CAS number one. Delete the polys. Delete any other head-related objects on the model (plumes etc)

    - File - ‘Merge’ to merge in your head from CAS number one. Browse to your head, select ‘Use Scene Material’ and merge it into the scene. It should drop into place nicely.

    - Select the body of CAS number two. In the options on the right hit ‘Attach’ and attach the new head.

    - Now unfortunately this will mess up the skinning a bit so you need to reskin the head (and possibly areas of the body too)

    - Edit the texture of CAS number two so it has face/head of CAS number one

    - Export (best to create a new unit for it or you’ll overwrite existing CASs)

    Hope this helps. Any problems let me know.
    Last edited by Epistolary Richard; 07-26-2005 at 23:06.

  2. #2
    J-23 Member Hans Kloss's Avatar
    Join Date
    Oct 2003
    Location
    Richmond upon Thames
    Posts
    245

    Default Re: Head Swapping Tutorial (3D units)


    getting there slowly

    Thx for another great tutorial Hoggy

  3. #3
    Member Member flip's Avatar
    Join Date
    Jan 2003
    Location
    Portucalense
    Posts
    452

    Default Re: Head Swapping Tutorial (3D units)

    Hi hoggy,

    i followed your tutorial, but I'm having a problem.
    All is nice till the end when I have to export the CAS unit. It gives a error about a 298 vertice not conected to a bone. I also noticed that the mesh is no more conected to the skeleton structure. I thing vertex must have a weight and it seems they had lost them.

    thanks
    CHIEF DESIGNER

    Hellenic Total War

  4. #4
    Senior Member Senior Member hoggy's Avatar
    Join Date
    Feb 2004
    Location
    Adel, Britannia
    Posts
    565

    Default Re: Head Swapping Tutorial (3D units)

    Quote Originally Posted by hoggy
    - Now unfortunately this will mess up the skinning a bit so you need to reskin the head (and possibly areas of the body too)
    It's unfortunate but unavoidable sadly, bringing in the new vertices with the head means you have unskinned vertices.

  5. #5
    Member Member flip's Avatar
    Join Date
    Jan 2003
    Location
    Portucalense
    Posts
    452

    Default Re: Head Swapping Tutorial (3D units)

    Any solution to make the CAS workable? If you mean skinned by texture I'm not concerned, I need that the vertices go connected with a bone, in this case bone_head.
    CHIEF DESIGNER

    Hellenic Total War

  6. #6
    Member Member flip's Avatar
    Join Date
    Jan 2003
    Location
    Portucalense
    Posts
    452

    Default Re: Head Swapping Tutorial (3D units)

    Ok, got it, in Skin/ edit envelopes and weighting vertices, also link them to bone_head.
    CHIEF DESIGNER

    Hellenic Total War

  7. #7
    Senior Member Senior Member hoggy's Avatar
    Join Date
    Feb 2004
    Location
    Adel, Britannia
    Posts
    565

    Default Re: Head Swapping Tutorial (3D units)

    Yes, skinning in max is different from the modding term skinning. You'll need to make the verts in the head 1.0 to the head bone but the verts around the neck 1.0 to the torso. There's a chance you might have to reskin the whole model but it's not too bad if you do it in simple steps. make the whole model 1.0 to one bone then do one bone at a time. (see tutorial here: https://forums.totalwar.org/vb/showt...t=39733&page=1)

  8. #8
    Member Member flip's Avatar
    Join Date
    Jan 2003
    Location
    Portucalense
    Posts
    452

    Default Re: Head Swapping Tutorial (3D units)

    Hoggy you're right,I put my bronze age model in game, all fine, but the poor guys when twisting they're heads seems aliens, must conect neck to torso.
    CHIEF DESIGNER

    Hellenic Total War

  9. #9

    Default Re: Head Swapping Tutorial (3D units)

    is it possible to get a spartan modeling tutorial where i can change his helmet because this is confusing the hell outta me and i'm on a Mod team for a world war II theme and gotta learn how to model..something before i can go from there..

    so is it possible if sombody could teach me how to model because this tutorial is confusing cause i'm new at this

  10. #10
    The Lion Prince Member Sundjata Keita's Avatar
    Join Date
    Oct 2004
    Location
    England
    Posts
    505

    Default Re: Head Swapping Tutorial (3D units)

    Re-weighting the vertices is actually avoidable and is quite easy to do. When you have your first model you want to copy the skin by right clicking on it on the modifiers stack and clicking copy. Then you can collapse the modifiers and merge in (following the options that Hoggy said) the body of the other model you want. Attatch the body and right click on the editable mesh in the modifiers panel and click paste. This will paste in the skin modifier and you should be done without having to re-weigh vertices. You will however have to UV map the model's head again but you can get round this by unwrapping it in the first model and saving the map to load up later. This can make merging body parts extremely easy!

    Regards,

    Sundjata Keita

  11. #11
    Member Member Sfwartir's Avatar
    Join Date
    May 2005
    Location
    Norvegia Superior
    Posts
    146

    Default Re: Tutorial: Head Swapping Tutorial (3D units)

    Hrm..never noticed the screeching women looked that good before
    Orgia bona hic in his septem diebus?
    //Any good orgies here this week?//

  12. #12
    Proud Knight of the AMC Member RTW King's Avatar
    Join Date
    Jul 2005
    Location
    Dal Riada, Scotland
    Posts
    327

    Default Re: Tutorial: Head Swapping Tutorial (3D units)

    How do I reskin the head, and what does that actually mean. I mean the modelling term skinning, not the Photoshop style skinning.
    Join the AMC. Down with rappers!

  13. #13
    Member Member blindfaithnogod's Avatar
    Join Date
    Jan 2005
    Location
    Lawrence, KS USA
    Posts
    175

    Default Re: Tutorial: Head Swapping Tutorial (3D units)


    Blue Lotus Total War
    --------------------------------------------------------------------------------------
    Byzantium Total War

Bookmarks

Posting Permissions

  • You may not post new threads
  • You may not post replies
  • You may not post attachments
  • You may not edit your posts
  •  
Single Sign On provided by vBSSO