


Turn 2 feedback
Turn 2 feedback to the Imperialists
Originally Posted by GeneralHankerchief
Turn 2 feedback to the Republicans
Orders
Imperialist Orders
(Note: Four in-game screenshots sent to me to clarify positions. Since it was sent to me via email, I didn’t bother uploading them to an image hoster just to put them here.)
No orders from Elite Ferret. Late orders from Ignoramus but I let them in.
Republican orders
(note: map was included in an additional PM. It was the same as the others I was sent by the Republicans.)
No orders from Warmaster Horus.
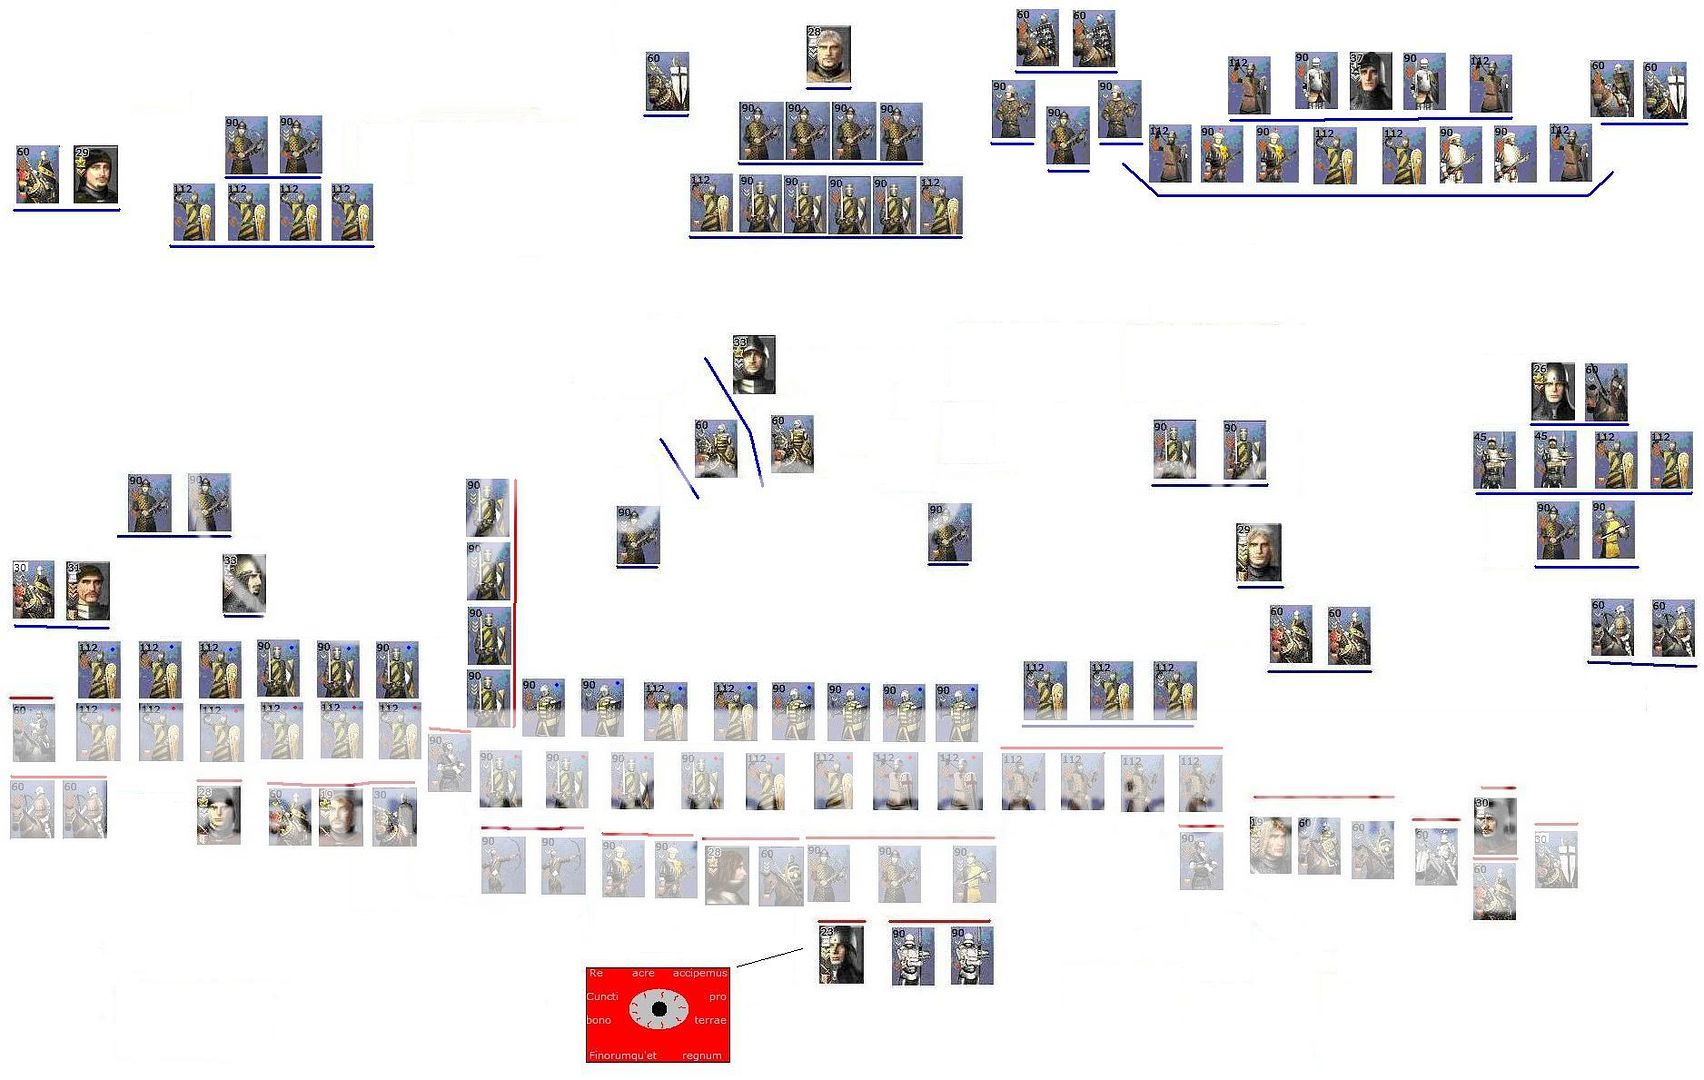
Umpire notes for Turn 3
Units failing orders test: Peter’s crossbows, Ruppel’s DFKs, Hugo’s Zweihanders (nullified – closest to general), Lothar’s mounted Xbows. No orders from Warmaster Horus, but since AG is Overall Commander and it falls under his responsibilities, I allowed him to give minor orders for Bernhard’s cavalry (complete with orders test, of course – it passed).
I put Hapsburg’s escort closer to his cavalry, since Ignoramus only has three divisions, and Hapsburg’s escort alone would count for one.
Interpreted Dutch_guy’s orders as if he was hanging back and counter-flanking. FH’s cavalry was trickier (see below). Decided that since deguerra was getting close but decidedly not charging, FH’s cav would remain inert this turn.
Engagements taking place this turn: Peter in the center vs. Jan and Arnold. Bohmen/Bernhard vs. Ruppel. Hugo attacking Peter’s west flank, Tancred attempting to counter-flank but being checked by Lothar.
Center in-depth:
Peter’s crossbows don’t fire, infantry on both sides advance. Jan’s spears take the fight to Peter’s dismounted IKs to the east. Gunners get in a couple of shots at Peter’s cav, then are charged by dismounted IKs to the west. They fall back and Arnold’s DFKs engage. Jan’s Balkan archers and Arnold’s Xbows concentrate their fire on Peter’s cav. To the west, Hugo’s cavalry slams into Peter’s western flank. Already being pushed to the limit by Arnold’s DFKs, the Kaiser’s men can’t take the extra blow. Removed one regiment of dismounted IKs to account for this. Peter’s cavalry countercharges and win easily. Removed Hugo’s heavy cav. Removed one unit of Imperial Knights to represent losses in the charge as well as attrition due to Republican archer fire.
East in-depth:
Bohmen’s men even out and advance. However, he does not give the explicit order to attack and the only units of Ruppel’s that are given that order are the DFKs (inactive this turn). Both sides are extremely close to each other, but neither takes the initiative (most of FH’s orders are only in response to if deguerra, esp. his cavalry, makes the first move. The only actual combat this turn is Ruppel’s mounted Xbows shooting at Bernhard’s cavalry (Teutonic Knights reduced to ½ strength to reflect this).
West in-depth:
General advance on both sides. Tancred’s archers move up past the spearmen but quickly retire as Hugo’s and Lothar’s move up. Tancred looks to counter-flank but cannot as he is engaged by Hugo’s spearmen and Lothar’s (despite TinCow’s orders of “don’t engage them unless they engage you”, I decided to make it a full line engagement due to Xbows being present and Hugo engaging to the right). Tancred’s cavalry does not attack (no express orders to). Pretty even combat, will be resolved next turn. Ranged skirmishes: Imperial Xbows target Lothar’s foot Xbows and remove them easily (removed 1 regiment from each – Imperial due to archer fire and some getting caught in the initial spear charge; Republican due to overwhelming archer fire). Republican Reiters skirmish the flank of Imperial FKs and drop ½ of them. Lothar’s DFKs slip through a gap to the right and are in a very good position to flank Peter’s infantry next turn.
Overall losses:
Imperialists: 1 unit each of mounted and dismounted IKs, ½ of Tancred’s FKs, 1 of Tancred’s pavise Xbows.
Republicans: Hugo’s heavy cav, Lothar’s pavise Xbows, ½ of Bohmen’s mounted knights.
Roll for Matthias (needs 4-6): gets a two.
Matthias will have a 67% chance of arriving Turn 5.
Public feedback for Turn 3
The killing started.
Edmund Becker isn't exactly sure how it began; all he knows is that one moment the Republicans were advancing and the next, both sides were charging at each other and beginning the melee.
In the center, it is an all-out slugfest between Kaiser Peter's Imperial Knights and various Republican forces, belonging to Duke Arnold, Jan Zirn, Hugo de Cervole, and Lothar Steffen. The Kaiser's men began marching up front, appearing to protect his crossbowmen which, oddly, weren't firing. Arnold, anticipating a cavalry charge, substituted his dismounted Feudal Knights for Jan Zirn's various spearmen. However, when it became clear that it would be an infantry fight, he recalled his gunners after they had only gotten a couple of shots off and put his DFKs back in the front. The match was even for a while, but then Becker noticed events happening to the west.
Athalwolf von Salza and Tancred von Tyrolia's men were advancing, although now it definitely appeared as if Tancred was in command. Perhaps the Kaiser didn't trust von Salza, loser of the Battle of the Flemish Crossroads, over one of his oldest friends? In any case, Tancred was advancing his men, but not fast enough to catch a fierce cavalry charge done by Hugo de Cervole's knights aimed at the Kaiser's flank. As the Imperialists feared, Hugo's charge did serious damage, wrecking one regiment of dismounted Imperial Knights before Peter and the rest of his cavalry countercharged, destroying the flankers.
Further to the west, a similar melee took place between the spearmen of Lothar Steffen and Hugo de Cervole and Tancred's infantry, who attempted to counter-flank but were checked. It was an even contest and would not be decided quickly, but there was a big enough between Tancred's and Peter's men for four regiments of Lothar's dismounted Feudal Knights to slip through, offering a far more serious threat to the Kaiser's flank. Peter's cavalry, spent after their last countercharge and suffering due to what seemed like every Republican missile firing at them, could not do anything until the next turn.
To the east, Becker notes, the forces, while extremely close to each other, have not yet begun engaging. Neither commander took the initiative to begin the attack, with Ehrhart Ruppel's DFKs strangely being left behind. Instead, most of the work that was done was beefing up the extreme flanks, as Bernhard Steffen moved up to provide a serious challenge to the Imperialists, and Maximilian Zirn reinforced Ruppel.
Becker turns his head and takes note of the various missile engagements taking place. Most notable is to the east, where two regiments of Ruppel's mounted crossbowmen have begun picking off Bernhard Steffen's Teutonic Knights. To the west, a long-range duel took place between Tancred's and Lothar's pavisemen. Tancred's had the numbers and thus the advantage, eliminating Lothar's men with one regiment casualties of their own, due to counter-fire and being caught by an initial spear charge. Hugo's Reiters, much like Ruppel's men on the other side of the battlefield, began skirmishing with Tancred's cavalry, dropping about half of Athalwolf's former Feudal Knights.
With most of the infantry either locked in or about to be locked in combat, Becker realizes that the reserves will most likely decide it. And right now, that definitely looks in the Imperialists' favor, with Maximilian von Hapsburg belatedly delaying to the west, Max Zirn still not engaged to the east, and, most frighteningly for the Republicans, Fritz von Kastilien to the center-east.
Matthias Steffen is nowhere to be found for the Republicans, but there is one event behind their lines that draws Becker's notice: A member of Arnold's retinue draws a massive red flag and begins waving it for the entire battlefield to see. Even from this distance, Becker can see the silver Illuminati logo of the all-seeing eye on it, as well as an inscription in Latin. As for what the inscription or even what the flag itself signifies, that's anyone's guess. Many of the soldiers, even the generals, have bigger problems to worry about. The critical moment may be approaching.
Map:
(note about the map: All units locked in combat do not have a colored line next to them and cannot be ordered around for Turn 4. Due to the central location of the melee, all divisions not engaged will be able to reach the fight the next turn, though Dieter, Hapsburg, and Fritz will arrive near the end of the turn.)
DEADLINE FOR TURN 4 ORDERS: April 3rd, 16:00 GMT-5.


 Reply With Quote
Bookmarks