General:
The Battle of the Iron Bridge will be your standard Throne Room Tabletop PvP battle, umpired by me in the style of the Battle of Trent and the more recent Battle of Edessa. Unlike the forementioned battles, retreat is an option for both sides. The Tagarian Alliance can fall back to Antioch and Andronikos Komnenos can retreat into the mountains of Asia Minor. However, I would personally prefer it if this battle was decided without a follow-up effort being required (PvP is quite time-consuming).
As this battle involves several commanders, I am going to bring back some mechanics from the Battle of Trent, but modified in order to serve this battle. The main thing to know is that The troops the character brings with him are under that character’s direct control.
Orders and resolution:
Players are to draft concise, in-character orders every turn and send them to me along with a map diagramming their movements. If orders are too complicated they run a risk of confusing the division commander and causing inaction. All divisions, unless being one of the two nearest the commanding general, are subject to an orders test (my rolling the die). 2-6, orders are executed, 1, they are not and the units are inactive for that turn.
To properly simulate medieval combat, orders will be given on a divisional level rather than a regimental one. Refer to the Word document (see below) to see a list of proposed divisions. Division commanders are generally experienced people and know how to execute operations such as wheeling, pivoting, and flanking. If you tell them to flank the left side of the line, they don’t need more information, such has how to do it in detail.
I sent an example of how orders could look like to both sides at the Battle of Trent, which also applies here:

Originally Posted by
GeneralHankerchief
BILLYBOB'S ORDERS
Infantry: Advance in line with the rest of the army and attack the enemy's infantry in front of you. We outnumber them by one regiment of DFKs so I want them to wrap around and hit them on the flank.
Archers: All fire is to be concentrated on the enemy general unit. If you are charged then fall back to the spearmen.
Spearmen: Guard the archers, but if it becomes apparent that the enemy cavalry is going to make an attack then shadow them and respond as necessary.
Cavalry: Once the enemy flank is engaged then swing around and hit the enemy's rear.
~~~~~~~~~
include the map of course as well.
Should combat arise, either TinCow or I, depending on real-life schedules, will resolve it via playing both sides from a custom battle in M2TW and sending the results to me, where they will be implemented at my discretion. We will be using the custom PvPMod that I mentioned in the Edessa thread that gives Egypt (a dead faction in-game) Byzantine units to make things fairer. All combat, unless it is a large infantry engagement, usually along the main battle line, will only take one turn to resolve. This includes operations that unbalance the line, such as throwing in reserves or a flank/rear attack. Losing units will be removed from the map, and victorious units, if necessary, will face a fractional reduction of their numbers.
The battle for the bridge itself will be a different case and will take longer to resolve, due to the giant pileup of units that will take place. For the first turn of engagement, I will include only the frontmost units included in combat, resolve it, and then we'll move from there.
Battle structure:
First, I will show both sides and approximately what turns they can begin to influence the battle.
The sides:
The Tagarian Alliance:
- Ioannis Tagaris (TheFlax) - available immediately - Overall Commander
- Aleksios ek Kerkiras (Ibn-Khaldun) - available immediately
- Georgios Angelos (Tristan de Castelreng) - available immediately
- Vartholomaios Ksiros (Rowan) - possibility of reinforcement starting Turn 2
- Iosef ek Artas (mini) - possibility of reinforcement starting Turn 3
Andronikos Komnenos and friends (one may deploy immediately, the other may do so on Turn 1):
- Andronikos Komnenos (woad&fangs) - Overall Commander
- Nikitas Moschos (Ituralde)
For the two reinforcing Tagarian armies, they each have a 50% chance of entering the battle on the turn indicated above. If the die roll fails, they have a 5-in-6 of doing so the following turn. If the die hates their souls and still won't cooperate, they will deploy two turns after indicated.
Overall Commanders:
Those of you who participated in the Battle of Trent will be familiar with this role. Essentially, the Overall Commander coordinates all in-battle actions and covers for people who do not send in orders by providing skeleton, vague orders that will be implemented in the stead of the absent commanders. Unlike in Trent, the role of Overall Commander has been assigned to each side's respective would-be Basileus.
If the Overall Commander dies, is captured, moves off the map, or is incapacitated in any way, another one may not be appointed.
The other crossing:
As mentioned in the story above, there is a second crossing that will be present in the battle. As it is not present on the battle map I will be using (Po River) to simulate all combat, the crossing will be off the map, to the east. As such, no combat may take place over there and the Tagarians may not dispatch troops to defend it. However, it will take a while to properly execute the flank since it will take place in a very roundabout manner.
It will take three turns from the time the order to use the side crossing is given until the time where the flanking force is a threat to the defense. For cavalry, it will be two, but only if they are pushed, and they will definitely be tired afterwards.
For clarification, I'll break down exactly the turn order if Andronikos and his men decide to flank. This is assuming the initial order is given on Turn 1:
Turn 1: Initial order given, flanking infantry marches off the map.
Turn 2: Crossing initiated. Flanking forces still off the map.
Turn 3: Flanking forces reappear on the right edge of the map.
Turn 4: Flanking forces can attack.
In addition, if a general is not dispatched to lead the flank attack, every individual regiment performing the attack has a one-in-six chance of getting lost and not returning to the battlefield. If the Overall Commander personally leads the flanking attack, he may not perform his duties until he arrives. Any general leading the attack will also be cut off from communication of any kind until he returns to the battlefield; thus, if this occurs, I will not be posting public feedback until he returns and will ask that any Quicktopics that are formed to discuss tactics not be used until the flanking march is complete.
The Bridge:
The Iron Bridge will naturally play a major feature in the battle. To assist you in sending in your maps, the maximum number of regiments that the bridge can hold, width-wise, is two. For length-wise, just ignore my MS Paint map as I'm sure all of you know that bridges can hold an entire army if you work at it.
The map:
Divisions and deployment:
Attached in the Word Document below is a list of pre-created divisions for every army. You may rearrange these as you see fit, however, there are restrictions as you will see in the document. You will be copy-pasting these regiments directly from the Document onto the map and sending it to me along with your orders for every turn.
The turn schedule and respective deployment list is as follows:
Turn 0: Initial deployments (All initial Tagarian armies and one of Andronikos's two armies)
Turn 1: Early morning (The other one of Andronikos's armies)
Turn 2: Mid-morning (Vartholomaios Ksiros's first chance of entering)
Turn 3: Late morning (Iosef ek Artas's first chance of entering)
Turn 4: Early afternoon (absolute latest Vartholomaios will enter)
Turn 5: Mid-afternoon (absolute latest Iosef will enter)
Turn 6: Late afternoon
Turn 7: Early evening
A night turn and additional day turns will be added as needed.
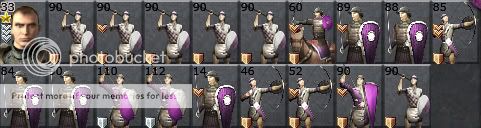
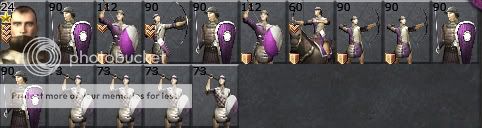
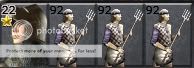
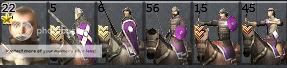
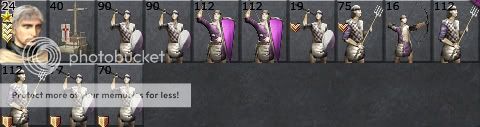
The forces:
These are the forces each side has entered the battle with. However, due to ease of resolution's sake, I have consolidated and manipulated several army compositions. If you want to see each general's actual composition, refer to the Word Document below.
Andronikos Komnenos (woad&fangs):
Nikitas Moschos (Ituralde):
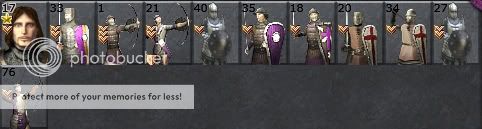
Ioannis Tagaris (TheFlax):
Aleksios ek Kerkiras (Ibn-Khaldun):
Georgios Angelos (Tristan de Castelreng):
Vartholomaios Ksiros (Rowan):
Iosef ek Artas (mini):
DEPLOYMENT INSTRUCTIONS FOR TURN 0: Please refer to IronBridge_units and let me know if you wish to rearrange things or keep them as they are. The Tagarians must send me deployment instructions for their three initial commanders as well as where they wish to place their rudimentary defenses which will slow the enemy down somewhat and give all units placed directly behind the defenses a one-chevron bonus. The Komnenians must inform me which army will be deploying on Turn 0 and naturally give me their deployment map.
ALL ORDERS ARE DUE BY MARCH 27TH, 20:00 GMT-5.


 Reply With Quote
Bookmarks