Ok, done.

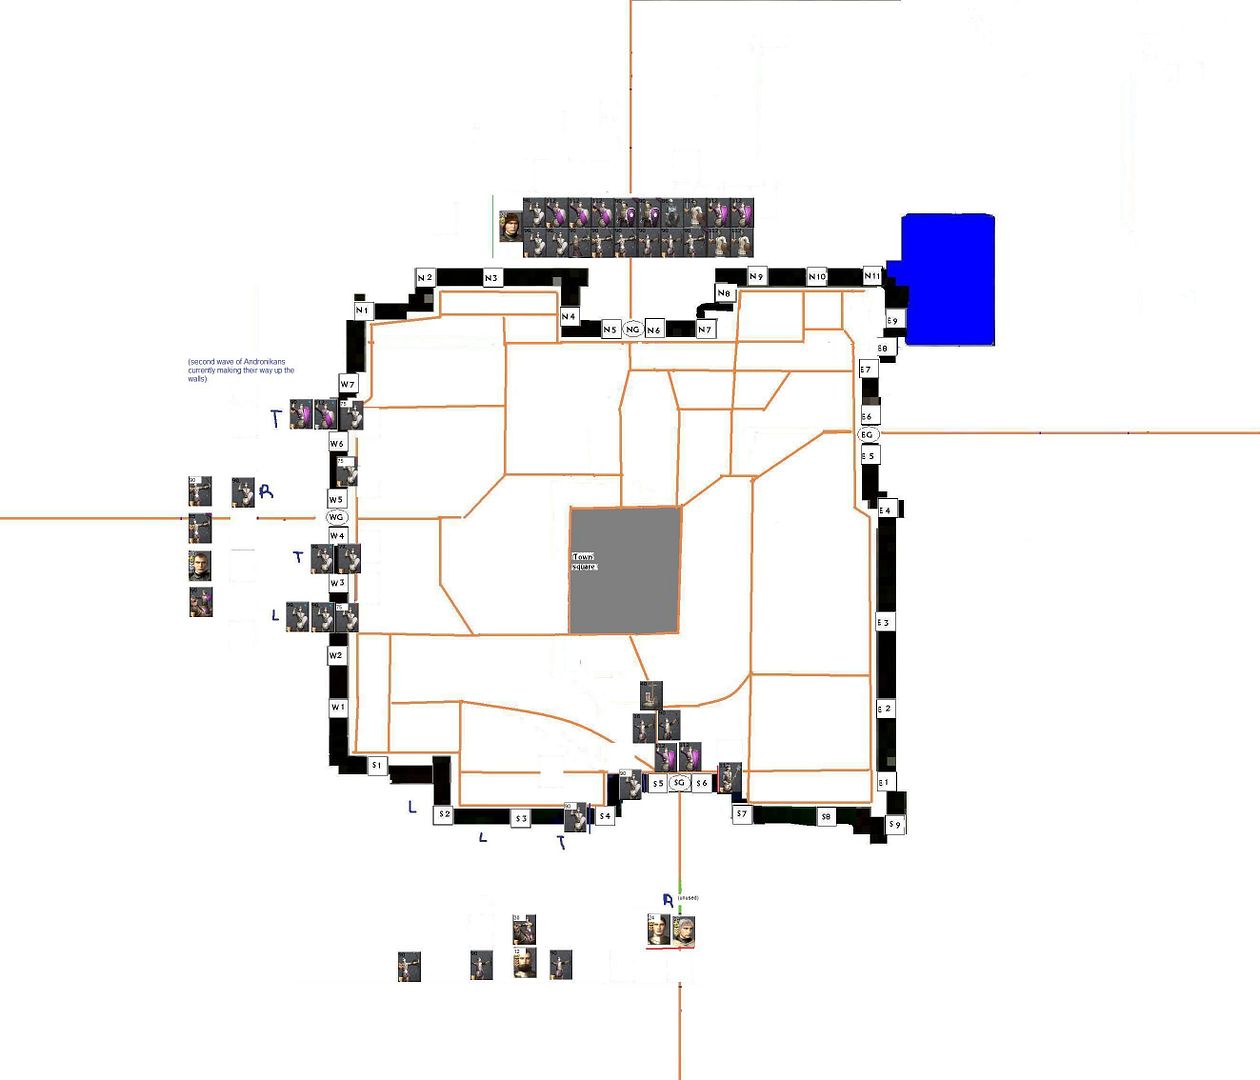
I'll spare you the intimate details. In summary, I ended up simulating it in three separate battles. The west wall assault, the south wall assault, and the south sally. The setups were pretty standard, except that in order to simulate the double size Basileus bodyguard, I used two identical general's bodyguard units in the battle, since that's about the same thing.
West Wall Assault:
The town militia do a surprisingly good job of defending the walls in all scenarios, probably due to the lack of swords for the attacking units. Spears just aren't good at storming defended walls. All three units up the ladders/rams in the first wave are destroyed for the loss of less than 1 full defending town militia unit. However, the gate is broken down about the same time as the first wave is routed, and the gate is undefended. It's sensible to assume that at least some of the nearby second wave units would thus use the gate instead of going up the defended walls. Thus, infantry use the gate and then go up the towers to flank the wall defenders while they remain engaged with the remnants from the first wave and the second wave attackers who do choose the wall. This results in a quick destruction of all defenders. Flanking is king on walls.
End result: All defending units are destroyed. For the attackers, all first wave units are destroyed, plus the equivalent of 1 more town militia unit in the subsequent fighting. Gatehouse and all of the western wall is captured.
South Wall Assault:
The unit that unloads into the defending peasants actually takes decent losses, proving yet again that defended walls are a significant obstacle to overcome. However, the unopposed ladders are a huge move. Since they are ladders, they get up the walls quickly and can flank on the walls quickly. It doesn't take long to reach the fight on the walls, and the remaining peasants are quickly destroyed. With that part of the wall secure, it makes sense to move on to the next bit, and those peasants are also destroyed relatively easily, since their defensive wall bonus is lost.
End result: Tower town militia unit is destroyed, along with the two westernmost peasant units on the wall. Time in this phase runs out before the third unit can be engaged. Thus, end position is two attacking town militia on the wall to the west of the gatehouse and one defending peasant on the wall to the east of the gatehouse. Gatehouse is not captured.
South Wall Sally:
This is the one bright spot for the defenders of Antioch. Despite it only being a sally by two units, they are very beefy units. One is a double sized bodyguard, and the other has triple gold chevrons. Given the proximity of the horse archers and Nikitas to the ram unit, I assumed they would get involved when they saw what was happening. Not only is it wise to defend their best infantry unit, but they have an opportunity to kill an enemy Basileus right there.
However, the sheer power of the sallying bodyguards is immense. A third of the ram unit evaporates in the charge, and the rest is quickly cut down with little loss. The horse archers get off a couple volleys during the charge (well within range) then they too charge into melee into the rear of the engaged bodyguards, as does Nikitas. However, the size of the Basileus' unit and the experience of the other general's unit are decisive, and the battle is clearly theirs.
As I see it, Nikitas and the horse archers are very mobile and near friendly units. The infantry unit cannot escape, but they can. After a few minutes of melee with the sallying bodyguards, they realize their situation and get the hell out of there. I would say they move west to take some shelter behind the ranged missile power of the archers.
End result: Ram infantry unit is destroyed. Nikitas' bodyguards and the nearby horsearcher units are both reduced to half strength. For the sallying bodyguards, the doublesized Basileus unit is reduced to half strength, but the triple gold unit remains intact.
Does that all make sense?


 Reply With Quote


 Ideally I would like the Grandmaster (Rowan, right?) to confirm this, but at the moment, consider communication cut off unless it comes through me. If everything goes according to plan, I'll reduce (or eliminate, haven't decided yet) the possibility of friendly fire.


Bookmarks