Page 1 of 5 12345 LastLast
Results 1 to 30 of 125

Thread: Frogbeastegg's Guide to Total War: Shogun II

  1. #1

    Lightbulb Frogbeastegg's Guide to Total War: Shogun II


    In memory of TosaInu. Friend, mentor, colleague.

    This guide is entirely the work of frogbeastegg except where otherwise indicated. This may not be reproduced under any circumstances except for personal, private use. It may not be placed on any web site or otherwise distributed publicly without advance written permission. Use of this guide on any other web site or as a part of any public display is strictly prohibited, and a violation of copyright.

    This guide is written for single player only. It does not cover multiplayer, and will not attempt to. Therefore all advice about units, battle tactics and so on come from a singleplayer perspective and may not be as effective in the multiplayer environment.

    This guide is correct as of 14/08/11. It does not take into account any patches released after that. Nor does it cover the 'Sengoku Jidai' unit DLC, the 'Rise of the Samurai' campaign DLC, or any subsequent DLC. Whilst most of the information remains useful, there will be some differences in gameplay due to CA's balancing changes.


    • Terminology.
    • Getting started
    • How not to die in the first 4 turns
    • Province management
    • The economy
    • Religion
    • Diplomacy
    • Research: discovering the arts
    • Agents
    • Survival of the fittest: realm divide
    • Battlefield units: an in-depth examination
    • Putting it all together: some basic army templates
    • Appendix 1: The Ikko-Ikki DLC
    • Credits


    Terminology.

    As you might expect given the game's theme, Shogun 2 uses a lot of Japanese words. If you are not familiar with them it can be confusing. If you wish to dig deep into the various Japanese words used in the game, I recommend checking the game's encyclopaedia. There is a comprehensive list under manual -> glossary of terms. Here is a quick rundown of the most commonly used terms in the game and on discussion forums:

    Ashigaru - a soldier who is not of samurai rank. Often termed a peasant soldier, this is misleading to most Westerners as we think of peasant soldiers being poorly equipped, poorly trained cannon fodder. By the Sengoku period an ashigaru was a disciplined, trained professional.

    Bune - a type of warship. There are many different varieties of bune in the game.

    Daimyo - a lord, one who holds land, has retainers, and is the head of his clan.

    Dojo - a training area for martial arts.

    Geisha - a high-class female entertainer, highly educated and cultured. In the game they are spies and assassins.

    Ikko-Ikki - a rather complex set of rebels. While there were many different sects and flavours of ideology in this group, all of them believed that everyone was equally redeemed by Amida Buddha's grace. That meant they rejected the foundational principles of contemporary society.

    Katana - the Japanese sword most Westerners are familiar with. The common sidearm for most units in the game. Its use was not exclusive to the samurai class during this period; that restriction was introduced as the Sengoku period came to a close. Wearing two swords at once, the katana and the wakizashi, was the mark of a samurai.

    Koku - the unit of currency used by the game. Historically a koku is the measure of rice needed to feed a man for a year.

    Metsuke - a member of the daimyo's secret police.

    Mon - a clan's symbol, very similar to a European coat of arms.

    Naginata - a polearm weapon. It consists of a long shaft with a sword blade socketed to the top, meaning it can be used like a sword with the benefit of longer reach, like a spear, or as a chopping weapon.

    Nanban - translated most commonly as 'southern barbarian'. Along with 'gaijin' ('foreign country person') this is one of the terms commonly used to refer to the Europeans who visited Japan during the period.

    No dachi - a large sword that is wielded with both hands. It was not a common battlefield weapon due to the need for the wielder to have a large amount of clear space around him. It was sometimes used against cavalry.

    Ronin - a masterless samurai. Much like a mercenary.

    Samurai - a member of the highest social class, almost always a warrior or trained to possess a warrior's skills. Women of this class were also termed samurai. Some samurai were wealthy and powerful, holding large areas of land. Others were much poorer, with little more than their swords to their name. They are roughly equivalent to European knights.

    Sengoku, or Sengoku Jidai - 'The age of the country at war' is the most common English translation. This is the period the game is set in.

    Seppuku - ritual suicide, performed by cutting open the stomach. When a major clan is defeated you will see their leader undertaking this if you choose to watch the event video contained in the news pop up.

    Shogun - the military dictator, the real ruling force in Japan prior to the Meiji Restoration. The Emperor was more of a spiritual force than a political ruler.

    Teppo - a gun, specifically a matchlock musket or arquebus. It uses gunpowder to fire a single bullet, and requires reloading after every shot. It has a short range and is inaccurate.

    Wako - a group of pirates.

    Yari - a spear. Historically this was the weapon of choice for all ranks during the Sengoku period.

    Yumi - the traditional Japanese bow. Designed for use on horseback it is gripped off-centre, around one third of the way up the stave.


    Getting started.

    It is a lot easier to get started with Total War: Shogun 2 than with prior entries in the series. Your first starting point should be the tutorial campaign, even if you have played other games in the series. It's the best way to familiarise yourself with the interface and units. Unless you like a high octane style of learning, in which case feel free to skip the tutorial and figure out these basics during an actual campaign.

    In the tutorial campaign you play as the Chosokabe, and will be guided through the process of conquering your starting island and gaining a foothold on the nearby mainland. The tutorial covers all of the basics as well as many intermediate areas, and does so well. You will also take part in several pre-set battles designed to teach you everything you need in order to have a reasonable idea of what to do in a normal battle. These tutorial battles can be accessed separately via the buttons surrounding the main tutorial button.

    Your next step should be to familiarise yourself with the encyclopaedia. Do not attempt to read the entire thing in one go! For now it is enough to know that it is there, and to check the table of contents so you are aware of the topics. Refer back frequently as you play the game, for example when you gain access to a new unit type. The encyclopaedia can be accessed in many different ways. You can click the little lantern button on the top left side of the interface while on the campaign map or battle map. You can right click a unit or building and the encyclopaedia will open straight to the relevant page. There is a link on the game's opening menu screen. Finally, you can browse the encyclopaedia outside of the game by launching Shogun 2 in steam and then selecting 'Encyclopaedia' in the grey pop up box which appears. You can then navigate around the encyclopaedia in the same way you would in the game.


    Setting up your campaign

    There are a number of choices you need to make before you hit the campaign map and start playing. These choices will have significant impact on your experience, and due consideration should be given to each. Choose poorly and your game might not be as enjoyable as it could have been. There is no correct series of settings; you need to decide what is right for yourself as a player, and for the kind of campaign you wish to play. A little honesty at this point can save a lot of distress; there is no shame in choosing settings which will result in an easier game if that's what will give you the most fun, no point in forcing a long campaign if you always lose interest after you own 20 provinces, and no glory in setting out with easier settings when you want a stiff challenge.


    The clans.

    Your choice of clan is the first and most important decision you will make in your entire campaign. Each clan has a unique set of bonuses. Each starting position poses unique challenges and options.

    On the clan selection screen they are arranged in order of difficulty, with the easier clans on the right. This difficulty rating is a general guideline, not a hard and fast rule. Other settings on the campaign set up screen will impact on the challenge level of a game. The most obvious of these settings is the difficulty level. Playing as a hard rated clan on easy will be a far less difficult game than playing as an easy rated clan on legendary. The second setting which will impact on a game is the campaign length. Both of these settings will be discussed in more detail further down.

    All playable clans have a superior unit or units. This means that the unit is statistically better in some way compared to the basic version used by other clans, for example they may have higher morale or a better attack score. Some units have multiple special versions; you can tell which version belongs to which clan easily - they are all named after their owning faction. You can compare the statistics of a special unit against its basic counterpart in the unit section of the encyclopaedia, and can also snoop on the special units which belong to rival clans. This is highly recommended; familiarity with your army - and that of your enemy - is a core part of victory on the field of battle. If your clan has a special unit you will not have access to the regular version of that unit. It goes without saying that you should aim to incorporate your clan's special unit into your armies and battle strategy.

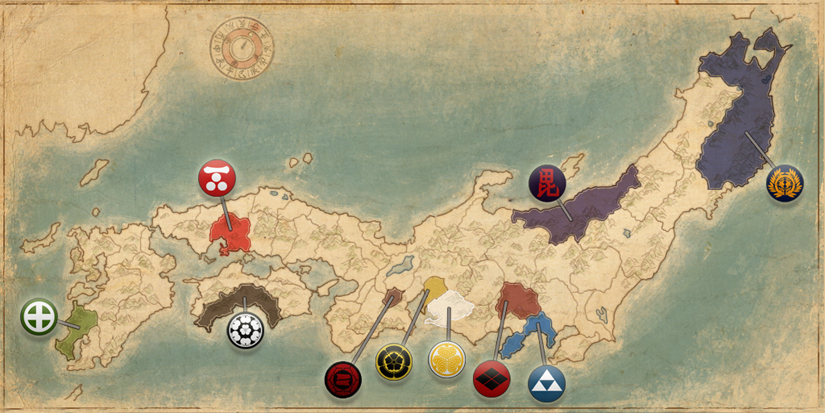
    The map below shows the starting position of each clan:


    Let's take a brief look at the clans. In alphabetical order we have:

    The Chosokabe

    The Chosokabe are rated easy. They are master archers, and have reduced purchase and upkeep costs for all bow infantry. They have access to slightly better version of all of the archer units whether ashigaru, samurai or hero level. The Chosokabe also have a slight bonus to income from farms. This gives a slightly stronger economy overall, and makes them somewhat less dependant on trade income.

    The Chosokabe are the clan you play as in the tutorial campaign. For this reason - along with their safe island starting position - they are a solid choice for new players. I also find that they tend to have a much calmer early game than other clans due to their starting location. They are in an isolated position shared with a handful of minor clans, two of which are single province minors. These clans do not seem to be very aggressive either. Due to geography there are only two lines of approach to the Chosokabe capital, and they are the same lines you will expand out along. This means that the Chosokabe can expand at their own pace, gobbling up their neighbours one at a time, and remain reasonably secure without needing to think heavily about territorial defence. Wealth is in easy reach with the four western sea trade nodes a matter of turns away. Combine control of these with your increased farm income and your economy will boom.

    If you are in search of a more lively or challenging campaign, I do not recommend starting with this clan unless you bump the difficulty up to 'hard'.

    The Date

    The Date are rated normal. Their bonuses are all very tightly tied in to a single concept: demolishing the enemy in a single glorious charge. To this end all of their units receive a small bonus to their charge stat, and they can recruit a superior and cheaper version of the no dachi swordsman, a unit that is born to charge.

    The Date's main problem in the opening phases of the campaign is one of geography. They start in an area with sprawling big provinces which take multiple turns to walk through. This means rapid expansion is less possible, and by the time you work your way south-east you may find yourself up against larger AI controlled clans. It is also easy to place your army in a position where it cannot respond to a new threat in time. The opening moves of a Date campaign should be taken with extreme care with regards to positioning units and targeting other provinces.

    The Hattori

    The Hattori clan are part of the limited edition of the game and are not available to owners of the standard edition. They may become available as downloadable content at a later date. They are rated easy for difficulty.

    The Hattori are the premier ninja clan: all of their bonuses are centred around the black-clad menaces. Their campaign map ninjas have slightly better odds of successfully completing a mission. Additionally, their battlefield units have kisho training, which enables them to deploy anywhere on the battlefield aside from right by the enemy general. The clan's specialist units are also slightly better at hiding than their default counterparts.

    The Hattori start very close to Kyoto. This is a temptation which should be resisted; capturing the capital triggers the realm divide state no matter how few provinces you own. If you do this too early your chances of survival will be next to nil, as all of Japan will unite to destroy you. Instead you should expand around Kyoto, try to cut off the Eastern clans like the Oda, and then do the same with the Western Mori. When the centre of Japan is firmly in your grasp Kyoto beckons ...

    The Hojo

    The Hojo are all about castles. They benefit from reduced costs for each castle upgrade, and also find it cheaper to repair damaged castles. This makes it viable for them to play a more defensive game in the opening phases of the campaign. If you upgrade key castles you can encourage your enemies to break their armies on your walls, and then march out to take provinces from a weakened clan.

    Hojo siege units are superior to those of others clans, and can be recruited and maintained at a reduced cost. They are rated normal for difficulty. If you want to use Hojo European cannons then you will need to convert to Christianity, otherwise this particular special unit will not be available.

    The Takeda must be dealt with early on if the Hojo are to survive. It is possible to pay them for peace on the first turn, and then pursue trade with them. This gives you time to build your strength by taking some of the provinces to the east of your capital.

    The Mori

    The Mori are rated normal for difficulty. Those who played the original Shogun: Total War should note that the Mori have completely changed specialty. They are now a naval powerhouse, with cheaper and stronger ships compared to the other clans. Their navies can also move slightly further on the campaign map. Amongst their improved ship types, the Mori have an improved version of the ludicrously powerful Nanban trade ship. Keep in mind that, like the normal Nanban trade ship, they must convert to Christianity in order to access it.

    Their position on the western end of the main island allows the Mori to choose one of two directions. They can head east, and focus on being a power on the mainland. Or they can turn west to strike at Shikoku and Kyushu. The latter allows you to utilise those stronger ships, and to set up some (relatively) safe island holdings. The former means you do not have to conquer in two different directions in order to reach the capital.

    The Oda

    The Oda are one of the two hardest clans in the game. They only have two bonuses and on the face of it neither is appealing. They can recruit superior ashigaru into their armies, and those ashigaru units cost less both to recruit and to maintain. The bonus is deceptively powerful. Ashigaru have a valid place in armies right up to the very last turn, and in the earlier phases of the game they will form the bulk of your armies. The Oda have a cheaper, stronger core for their armies - and they will need them!

    Destroying the rebel army in your home province at the start of the game is a sound idea. Pursuing that army if it retreats invites your elimination on the very first turn! This example sums up the early Oda campaign very well: you must act with extra caution at all times. The Oda start in a very busy location with four of the other great clans nearby, and they will be expanding aggressively. More than the other clans, the Oda need to find a good ally or two on turn 1.

    The Shimazu

    The Shimazu are rated easy, and seem to be the popular choice for a first campaign. Their generals are more loyal than those of other factions, reducing a potential source of tension later on in the game. Aside from that their bonuses are with swords: they have superior katana samurai and katana hero units, and can recruit and maintain them at a lower cost. Note that the bonus is only applicable to those two named sword units; they do not gain any bonuses towards katana cavalry or no dachi.

    While they are rated easy, the Shimazu early game is a different beast to that of the Chosokabe. The larger island is shared by multiple clans, most of which own multiple provinces. This makes it harder to knock out an enemy without retaliation, and means that more resources will be thrown against you. The clans can and will ally against you, so a top priority should be making and keeping allies of your own.

    The Takeda

    The Takeda are rated hard. They are the masters of cavalry, a fact which will come as no surprise to anyone familiar with the history of the period. In addition to a blanket morale bonus for cavalry, they can recruit superior versions of the cavalry units, and pay less in recruitment fees and upkeep costs than other factions.

    If the Hojo need to remove the Takeda in the early game, the reverse is true. Obtaining a peace treaty and trade with the Hojo will give you chance to gain strength before the inevitable confrontation, and this is vital as the Takeda capital is entirely surrounded by other provinces. Limiting your battles to a single front is necessary, else you could find yourself fighting in three or more directions! Other nearby clans may also be amiable to trade, and could be converted into military allies if you play the diplomatic game well. Heading West will all but cut the Hojo off and allow you to gain strength from their weakness.

    The Tokugawa

    The Tokugawa are battling Oda for the crown of most difficult clan. That is a battle they may well be winning! Unlike the other clans, the Tokugawa do not begin the game as an independent clan. They are vassals of the Imagawa, which means half of their income goes to their masters. They must win their freedom before they can stand tall and take their place alongside the other warring clans.

    The Tokugawa bonuses are a varied set. They receive a small bonus to the success of metsuke actions. Diplomatically they also have an edge, receiving a small relationship boost during negotiations. Their final bonus set relates to the kisho battlefield ninja unit; they have a superior version which they can recruit and maintain for a lower price.

    The Uesgui

    The Uesugi are rated hard. If there is a single word which applies to them that word is "Monks!" They have access to superior versions of the warrior monks, and can recruit and maintain them for less. To help support those expensive units, the Uesugi have a small bonus to trade income. Their campaign map monks have a slightly higher chance of success in their missions compared to other clans.

    If the Uesugi expand to the west they encounter the same problem the Date start out with: sprawling provinces which take multiple turns to cross. This can tie their armies up and leave them vulnerable. Expanding east or south leaves them running into other 'great' clans like the Takeda. If the player has the Ikko-Ikki DLC installed then the Uesugi will have to battle a strong rebel cult a mere two provinces away from their capital. The Uesgui player should use diplomacy to the utmost, and let that influence his direction. If you can get an ally to secure one direction it is safer to expand in another. Uniting with the Takeda to destroy the Hojo is a sound choice if you can manage it.


    The difficulties.


    There is one very important thing that players of past Total War games need to take note of. The AI has had a bucket of cold water tipped over it and is up on its feet outraged. No longer is it passively snoozing away, making the occasional questionable move as it stirs in its slumber.

    Shogun II's AI is very good. Personally I feel that it is the best in the series by a good way. The developers responsible for it had stated that it aims to win; this means it is playing with the same goals as you. It will expand, it will use diplomacy, and it will try to take Kyoto to proclaim itself shogun. If you get in its way it has no qualms with crushing you. In fact many of the early reactions to the game I saw came from stunned players who had been crushed in the opening turns! Excellent.

    This means that players should not expect to select very hard and then cruise through a reasonably mild campaign, as they have grown accustomed to doing in the older games. If you select very hard it will be very hard, especially if you do not know the game very well. For those who enjoy learning with a challenge, this is perfect. For everyone else, adjust your difficulty setting accordingly.

    Now, some notes on the specific difficulties.

    Easy.

    Easy is the difficulty that the tutorial campaign uses, or so I assume as it awards the "Easy Campaign Completion" steam achievement. If you have played through that and found it to be about right for you, then there's no reason to not select it for your first campaign. Alternatively, if you want a laid back, relaxing game where you can admire the scenery and indulge in evil laughter as you mow down your foes, easy is a good choice.

    The AI is quite generous towards the player at this level. It seems more likely to direct its aggression at other computer controlled clans, although that is not to say it ignores the player altogether. It will deliberately make mistakes, or fail to follow up on opportunities.

    The AI has limitations at this level. Its production and building priorities are handicapped. On the battlefield the AI has limitations to its accuracy, morale and melee attack value, and the player has bonuses to them.

    Normal

    Normal is the level that most people will want to use for their first game. The AI is still capable of giving you a beating, especially in the perilous early turns and in the realm divide phase of the game. Certain clans, such as the Chosokabe, will be fairly easy and players will not need to worry overly about being trampled underfoot. Conversely the hardest clans, such as the Oda and the Tokugawa, will be quite a bit tougher and it may take a few false starts before a player feels that they have survived the opening satisfactorily.

    On normal, the campaign AI has a small penalty to its production and building priorities. It seems quite balanced in its attitude towards the player; it will punish foolish moves more often, and appears to have no preference between player or AI controlled clans when it comes to aggression. It will do as it sees fit without biasing towards or away from humans.

    On the battlefield the AI still receives slight penalties to accuracy, morale and attack, and the player receives a slight boost to those areas.

    Hard.

    Exactly as the name implies, this mode will offer a stiffer challenge. New players with a lot of strategy experience may wish to start on this mode, in which case they should expect to gather some nasty bruises before they triumph! For most players this is a mode they might like to look at after they have won a campaign.

    On this level, the AI is no longer handicapped, and instead it receives a small boost to recruitment. I am not sure if this means it can occasionally recruit samurai units a bit faster, or if it has an extra recruitment slot or two. As yet, I have not seen any developer clarification. You should expect rival clans to be more aggressive towards you. Diplomacy and peaceful options will still be possible - and indeed form part of a winning strategy - but the AI knows you are the greatest potential threat and will be watching you more closely.

    On the battlefield the tables have now turned: the AI begins to get bonuses to its accuracy, morale and melee attack values. The player receives nothing.

    Very hard

    On this mode you should expect no holds barred, no mercy, and no kindly little sleights of hand where the computer says "Ah, humans cry so much when they lose. I'll let them off ... this time." Again, diplomacy is still a valid and important part of strategy, so don't expect an anti-human free for all. The recruitment boost is a bit more significant at this level.

    The battlefield AI bonuses of hard mode still apply, and now the AI gets a larger boost. The player still receives neither boost nor penalty.

    Legendary

    Legendary is the mode where you should pretty much expect to die unless you play an absolutely exceptional game, and quite possibly even then. This is a new difficulty mode, combining very hard mode with a series of extras to create the ultimate Total War challenge. Some of these extras were available as optional modes in prior titles, such as restricting the camera so it could not move past a set distance from your troops. Others are entirely new. The AI does not gain any new bonuses or capabilities compared to very hard; this mode focuses on curbing the god-like abilities normally available to the player. Once you commit to legendary difficulty you cannot alter the difficulty for that campaign, neither on the campaign map nor on the battle map.

    On legendary mode you are only permitted a single save. Each time you save your game your old save will be overwritten. If things go pear shaped, tough! No winding the clock back. The game is saved before and after every battle; if you lost your entire army, live with it! You may find yourself developing a degree of sympathy to the AI, which can never reload.

    The remainder of the changes affect the battle map, and are as follows:

    • No radar map for land and sea battles
    • While the game is paused no orders can be given
    • The camera cannot be moved while the game is paused
    • You cannot move your camera more than 200 meters from the centre of any of your units. The camera will be "rubber banded" to the nearest unit
    • Enemy units more than 600 meters from your units are treated as hidden
    • Enemy Tooltips have minimal information
    • Enemy Unit IDs are removed


    Even if you are not keen on tough games it is worth trying this mode at least once, just to see how different the experience is.

    Did you know that you can set campaign and battle difficulty separately? It's true, and the game is strangely determined to conceal this fact. Although the campaign set up screen is missing the now traditional pair of difficulty sliders, the option to change battle difficulty appears once you have started your campaign. To do this press escape while on the campaign map, select game settings, then move the slider that's in the upper middle part of the options list. Simply set the campaign difficulty you wish to use on the campaign set up screen, then change the battle difficulty to your preference. This does not apply to legendary mode; you have to be totally legendary, not mostly legendary.

    A couple of interesting developer comments relating to difficulty.

    There are two particular developer comments which struck me as important to understanding the way the higher difficulties work. They made me appreciate what we have in Shogun II's AI. Both of these developers know the AI inside out.

    The first comes from Jack Lusted:
    The bonuses to the AI on hard and very hard are half the bonuses in previous Total War games.
    So the AI is giving far better results on the battlefield than the older games, and it is doing that with half as much help. Those bonuses have been in place since the very first game in the series, the original Shogun: Total War.

    The second comes from Watcher on the official forums.
    There has recently been a lot of discussion about the possibility that the Campaign AI is spawning armies to increase the difficulty to the player.

    To be clear, the Campaign AI does not spawn additional forces except under the following four circumstances:
    · The Ashikaga faction. To represent the idea that the Shogun could place a levy upon his subjects and to improve game play the Ashikaga gets some free units.
    · Rebellions, these troops are the result of a spontaneous (or incited) uprising.
    · Wako pirates, they are pirates and not subject to normal rules!
    · European Traders, the Black Ship.

    Any other forces you encounter are the result of the AI's recruitment through normal channels.
    On harder difficulty levels the AI gets some (minor) recruitment bonuses that may allow it to field armies more quickly than the player.
    On easier difficulty levels the AI is penalised and you should be able to out produce it.

    Besides normal troop recruitment the AI can also acquire forces through the normal defection and bribery mechanics.

    Also note that the AI has a tendency to hide forces and that Ninjas and other agents are not 100% effective in revealing ambushing armies. Don't assume that because an agent can see some location that an army isn't there waiting to ambush.

    I hope this clarifies things!
    That one is important for two reasons. Some players were convinced that most of the challenge came from highly artificial means, such as magically creating armies in positions where they could threaten the player. The above means that this is not the case. You can wear the AI down with attrition. It also means that the AI is using advanced campaign map features such as concealment and reinforcement to very good effect!

    As an aside, it's worth noting that comment about agents not always seeing hidden armies. Previously scouting has been pretty much infallible. That's no longer the case and you should plan accordingly.


    Campaign length.


    The campaign has 3 different victory conditions. The difference is the number of provinces you need to control and the date on which the game ends. You need to take and hold Kyoto on all campaign lengths. Campaign length is a subtler flavour of difficulty, and to a large degree it is going to be personal as to what is easier or harder.

    On short campaign you need to collect 25 provinces by winter 1575. On long mode you need 40 provinces by winter 1600. Domination requires 60 provinces by winter 1600.

    Please note that on the short campaign setting the Shimazu and Date clans have an additional 5 years (20 turns) to complete their goals, meaning their campaign ends in winter 1580. This is because they start so far away from Kyoto.

    On the longer settings you are more likely to encounter problems with having an overstretched empire, and you will need to fight against clans which have become more advanced and very probably consolidated into significant forces. You will see - and use - the more advanced units and buildings, and your later turns will take place in a more developed Japan. It is more likely that you will manage to field mainly or purely samurai armies in the late phases of long games. In domination mode particularly, you will need to put your conquering hat on and get hopping. While there is a degree of momentum, meaning that it is easier to take multiple provinces per turn in the later phases of the game than in the earlier, you will not really have time to amble in the sun smelling the flowers.

    On shorter games you will need fewer provinces to win, which means you are more likely to have trade partners available to buoy up your economy. You will not have as much time to develop your armies and provinces, and so are more likely to spend most of your play time using mixed samurai/ashigaru armies. On short campaign mode you have relatively few provinces to take but also the shortest number of turns in which to achieve victory. Depending on where your clan starts the game you may need to conquer more than the required number of provinces in order to reach and properly secure Kyoto, unless you want to try holding on to a fairly isolated province.

    For players who enjoy a more relaxed pace of expansion, or who hate to feel like they are under time pressure, medium campaign length is currently the sweet spot, as that provides the best ratio of turns to required number of provinces.

    If you run out of time you can choose to keep playing, although you will no longer be able to win even if you satisfy the victory requirements.


    Last edited by frogbeastegg; 04-21-2012 at 16:03.
    Frogbeastegg's Guide to Total War: Shogun II. Please note that the guide is not up-to-date for the latest patch.

    Members thankful for this post (11):

    + Show/Hide List


  2. #2

    Default Re: Frogbeastegg's Guide to Total War: Shogun II

    How to not die in the first 4 turns.

    This section does not fit easily anywhere in the guide. It does not logically follow on from or link to one set of information, but instead results from quite a few points all of which will be investigated separately and in detail further down. I have placed it here as an introduction instead of using it as a conclusion later, as in many ways it acts to illustrate the game on a microcosm.

    It is alarmingly and gratifyingly easy to "Oops!" your campaign in the opening turns. Sometimes this fact cannot be missed: the AI's armies are drinking your personal supply of sake while you stare at the game over screen in shock. Other times it is less obvious until some turns later; for example you may have made poor decisions with your economy and did not realise until you learned something new and a little lightbulb came on.

    This section of the guide is intended to gather up some of the most useful snippets of early game information. Taken together they should give you a very good chance of surviving those opening turns, and ending up in a good position to continue your game without that face and palm interface moment. Note that it is not guaranteed to make you survive; particularly on the highest difficulties there is no one sure set of moves which will see you through. Sometimes the AI throws an army at you which you cannot match, or you make a move and then realise that it leaves you open and there's no way to cover the gap in time. That's life; it happens. It's half the fun. Sometimes the AI is very aggressive from the start, others it is much more relaxed. I have seen games where multiple clans are destroyed each turn, and one where barely anyone died in the first two years.

    If anything mentioned here doesn't make full sense, don't worry. The in-depth sections will cover terminology, explain the reasoning, and generally dig in.

    The first survival tip is to think of your economy right from the word go. Money is considerably tighter in this game, and you need to be planning for that from turn 1 if you want any hope of becoming rich. To this end start looking for trade opportunities. If you start near the trade nodes consider how you can claim them ASAP. Do you have a port? Get the capacity to build a ship of some sort and park it on the trade node. It's true that only trade ships will generate money from nodes but military ships will prevent other clans from placing a ship on the node without a battle, giving you more time to get trade ships in place. If you are not on the coast and/or your coastal province cannot house a port, can you expand to seize one with your early conquests? Who can you use as trading partners? Don't consider any clans with whom you may be at war with in the near future. Do consider sending out a cheap ship as a scout early on in order to make contact with more clans. Remember that you can trade via land routes provided you share a border with the other clan. Trade agreements are also a good way to begin lasting friendships, meaning that this early effort can springboard your diplomacy and get you a friend or two to stand with you in the vicious scrum which is about to start. Aside from trade, consider your farms. Farming income is not vast but every koku counts and basic farm upgrades are cheap. More than that, they will give you surplus rice. More on why that is good later; for now merely take it as accepted. Level 1 markets are one of the best boosts to an early economy; the fly in the ointment is that you need to research them. The necessary art is 'Way of chi', the very first art in the chi side. Keep this in mind, and think about where you can fit that research in. It's best to look at markets as a second step. Firstly because some of those early bushido arts give your armies a big boost in the day to day business of conquest, thus making your survival and expansion easier with fewer men in the field. Secondly because you need to have castles with the slots to construct the markets, and for most clans that means conquering a few other provinces.

    Basically you want to identify as many cheap ways of expanding your income as possible, and get them into practice.

    The next most important point is one which ties the economy to the army, and this introduces one of the factors which determines how well you 'get' the game. Samurai units are expensive. They are a military elite, very effective in battle. Also expensive. That bears repeating. A basic samurai unit, such as the yari samurai, costs so much to maintain that you could have 2 units of yari ashigaru instead. The upfront cost is worse, nearly 3 times as expensive. Furthermore, that samurai unit will take you 2 turns to recruit whereas an ashigaru unit will take only 1. When replenishing battle damaged units, an ashigaru unit will replace its losses faster, especially when you are fighting in undeveloped provinces at the start of the game. Quality costs. You cannot now field an entire army made out of elite units. You can try but you will get crushed by sheer numbers, costs and recruitment times. Secondly, ashigaru units are not rubbish. Yes, they are not as good as samurai. Yes, they require a bit more work to use successfully, and can't manage some of the feats their expensive superiors can. But they are not rubbish. These men are the equivalent of rank and file soldiers, not peasants dragged from their fields and told to attack the foe with a spoon. Accept these two facts, and get to work. Your capital has 2 recruitment slots so you can pump out ashigaru units quickly, and you can afford to do so. Get some yari and a few archers; 3 yari to 1 archer is a good rule of thumb until you have a better feel for the army composition you like. As you become more familiar with the game you may like to increase the number of archers. After a couple of turns of recruiting, your new units will combine with those you started with to give you a decent force with which you can attack or defend as necessary. Once your army has reached a decent size, and your treasury is able to take the added strain, recruit a couple of samurai units to act as support for your ashigaru. Katana samurai are the best overall choice for your first samurai as they excel in melee combat against infantry, and your opponents will mainly be fielding infantry at this point. Yari ashigaru are more than capable of dispatching any cavalry you encounter, meaning that yari samurai are a bit wasted at this point.

    Next comes a point which has already been brushed upon. Friends. Choose them, get them, keep them. Allies in this game are very useful, and they can be the difference between victory and being overrun. If you choose well and utilise the diplomacy engine properly you have a good chance of keeping a friend from turn 1 all the way up to the end game, sometimes to the very end.

    Research should be started on turn 1. If you forget to assign a choice the game will not prompt you. Your early choices are limited, and you should aim for the early bushido arts which best support your army. If you intend to use a lot of spear troops head towards strategy of defence. If you intend to rely more heavily on katana samurai then head towards strategy of attack. Once you have snagged two arts you will likely be in a position to research that first chi art, 'way of chi' and unlock markets. Having done that you can then return to bushido and pick up the third tech on your chosen path, the one which unlocks a unit and gives an experience bonus to all newly recruited units of that type.

    Having reached this point, let's take several steps back to that very first turn. There's something you need to do at the very beginning, and that's a series of decisions which are easier when you are aware of what sort of supporting actions (i.e. the above) you will be taking. You need to decide which way you are going to expand, and roughly where - if anywhere - you want to try and stop to catch your breath.

    For some clans this decision is made for you, for all practical purposes. If you start at war with a neighbouring clan you can be sure they will be coming for you so your early strategy should be to neutralise the threat they pose, and to expand at their expense. You should look to see what shape your lands will take if you capture all of that clan's provinces; sometimes going for the full set of holdings will leave you stretched out and struggling to guard your borders effectively. Other times it is as simple as swallowing a couple of provinces which form a natural little block for easy defence. You should be looking further afield, seeing if there are any clans likely to jump into this war. Perhaps the enemy clan has friends who are not yet allies; you may be able to woo them to your side and prevent them taking the field against you. Perhaps there are other clans in the area who hate your enemy. If expansion is going to leave your resources stretched, are there any clans in a position to take advantage? If so, you need to take steps to prevent that, either by refusing to become overstretched in the first place, or by other means such as diplomacy. The last thing you need this early in the game is a new clan jumping in and rampaging through your capital unopposed because the single army you can afford is 3 turns march away on the other side of your lands. The AI can and will take advantage of your weakness, and on the higher difficulties it can be merciless. Never forget this.

    The diplomacy screen is also useful for checking the lay of the land. You can see the diplomatic relations of all clans, including who they are allied with and who they are currently fighting. Needless to say, it isn't the smartest choice to declare war on a clan with dangerous allies. Alliances can sometimes be broken if the relationship between the two allies in weak, and if you offer the AI an appealing enough offer. Perhaps there is an on-going war you can join to take advantage of a distracted foe?

    Other clans have the dubious luxury of choice, and need to select the most promising target out of a selection of clans. In this case you need to be thinking hard about what you want. If nearby provinces offer specialisations or bonuses, are they ones you need? There's no point in rushing out the gate in order to get a warhorse province if you lack the research, funds and castle levels to use advanced cavalry, and so will not be able to benefit until many turns into the game. Conversely, a province which allows you to build a blacksmith soon gives you results and no supporting research or castle construction is necessary in order to access the bonus. Is there a particularly rich province nearby? Is there a province which offers an excellent border due to geography? Is there a nearby province which will allow you to build trading ports, particularly if you're a land bound clan? Is there a vulnerable little one-province clan you can swallow up in a single, swift gulp before one of the bigger clans gets it? Lots of things to consider.

    The final key to survival is the battlefield. Pick your battles wisely! Do not waste men in futile battles, instead use the retreat option and hope for the best. Do not leave tiny armies in exposed positions. Try to keep your main army in good terrain as much as possible; do not attack an enemy army in terrain which will give your army a massive disadvantage, e.g. loads of forest for archer heavy armies. Always assign a general to your army; the bonuses provided by even a level 1 general are substantial. Field balanced, large armies - better 8 yari ashigaru, a katana samurai and 4 bow ashigaru than 3 yari samurai, two yari ashigaru and a samurai archer. Use units to their advantage, particularly your few samurai as they will be acting as your main killers. Your katana samurai can mow down hundreds of infantry, or they can be mown down with barely a whimper by the enemy general's cavalry bodyguard. Which sounds better to you?

    If battlefield strategy isn't your preference you should not be afraid to use the auto-resolve option. It is quite fair for the most part, and the results it gives are credible. Experienced players will get better results in some battles. In others, particularly sieges, it can do better than a human. Overall it balances out well enough provided you field decent armies.

    And that is it, a rough guide to the basics of surviving the opening in good shape. Now on to the in-depth stuff ...

    Frogbeastegg's Guide to Total War: Shogun II. Please note that the guide is not up-to-date for the latest patch.

    Members thankful for this post (4):


  3. #3

    Default Re: Frogbeastegg's Guide to Total War: Shogun II

    Province management.

    Whether you call them settlements, provinces, castles or cities, the sections of land you control are the single most important aspect of the game. On the large scale they are the object: you need to own a set collection of provinces in order to win. On the mid-level they are the obsession you will chase throughout the game: expanding, controlling, defending, building up. On the low level they are your income, your recruitment slots, a large proportion of your research, your populace. The number of provinces you control and the state they are in acts as a quick indicator of your success. A glance at the number of provinces owned by a rival clan will give you a fair indication of their strength.

    When you lose control of your final province the game is over. You can lose control of your capital and remain in the game provided you have another province to fall back to. As the capital is typically one of your richest and most developed provinces its loss is devastating; in the early game you should always keep it well defended.

    Let's start by seeing what information the game gives you about your provinces, how you can obtain it, and how you can interact with your provinces. The tutorial does a good job of teaching you how to use these screens so I'm only going to give them a quick run-through. Most of the time I will not be discussing the interface or how to do basic things in the game but understanding these screens is very important to success so a little bit of space is merited.

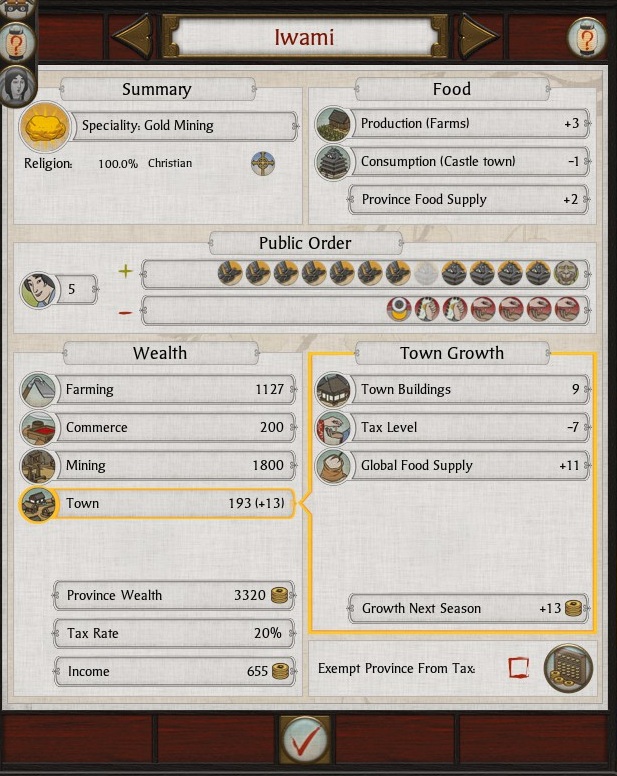
    This is the province information panel. It tells you everything you need to know about the state of your province. You can access this by clicking on a province, then clicking on it's name in the white box below the portrait to the bottom left of the screen. Starting at the top we have the province name. The arrows to the left and right cycle you through your provinces, meaning you can check your entire empire province by province without needing to close this screen.

    Below that on the left hand side we have the province specialty, in this instance gold. Most provinces do not have specialities and so this top half will appear blank. Below that we see a breakdown of the religious situation. If the province was split between the two religions both would have entries, along with an arrow pointing up or down to let you tell at a glance which religion is in the ascendant. If you hover your cursor over those arrows you will get a detailed breakdown of the factors affecting that religion. In the box to the right we can see a breakdown of the local food situation. It's self explanatory.

    Beneath that we have a long, thin box for public order, which is also sometimes referred to as happiness. The face with the number next to it on the left is the final status. A positive number is good; a negative one means the province may rebel. The face changes between smiling with a green background for a safe happiness level, looking anxious with a yellow background for a happiness level which is close to trouble, and an angry face on a red background when rebellion is possible. To the right we can see a detailed breakdown of what is affecting happiness in this province. Positive factors go on the top row, negative ones on the bottom. The two are added up and total unhappiness subtracted from total happiness to obtain the final standing. We will look at the factors which affect happiness a bit later on.

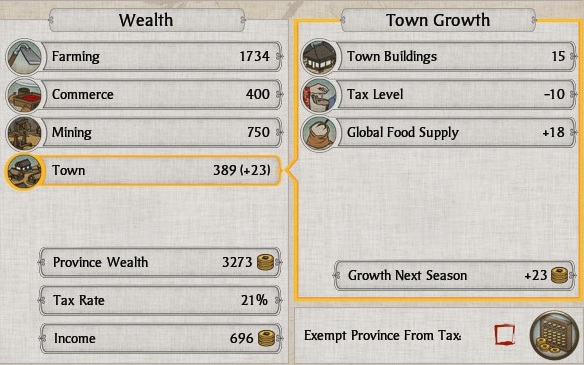
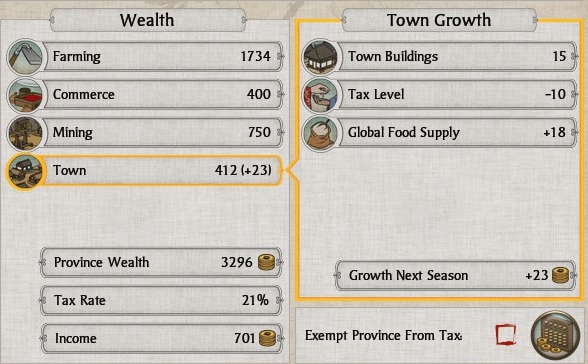
    Beneath that we have two big boxes. The box on the left is the summary of the province's wealth. Everything here is added up and then your tax rate is used to deduct an amount from that total, giving you the amount you actually make from the province. In this example a 20% tax rate is leaving me with just 655 koku out of the 3320 koku the province makes. That's not as bad as it sounds. The box to the right of this breaks down town growth. You want this to end in a positive number as that means the town will gain some wealth that turn. Towns stockpile wealth and your taxes are deducted as a percentage off that wealth, so a richer town means more taxes for you. We will go into detail about this in the economy chapter.

    At the bottom right of the panel we have the 'exempt from taxes' option. Ticking this will do as the label suggests, reducing your income but providing a large boost to happiness and town growth. Clicking on the abacus icon will take you to the main taxation and income screen, same as when you click on the matching icon above the end turn button.


    This is a screenshot of the province bar. This appears every time you click on a province on the campaign map.

    This screenshot was taken using a very developed province. It has the second highest level of castle possible, and so it has a lot of building slots open in the 'castle town' section. This section grows as you upgrade your castle, up to a maximum of 5 slots. If a building can be upgraded you will see a little golden arrow on its picture. Place your cursor over it and a list of your options will appear on the bottom row. In this example I am doing that with the encampment and am being shown the range of upgrades. many buildings will only have a single upgrade option. Selecting an empty space will present a similar menu with all of the possible basic buildings in it. To the right you can see 4 boxes in the 'province' section. These slots are locked; you can only build the specified type of building in them. The left hand box is always a farm, and the next one over is always a road. If the province has a coastal town then the third box from the left will be the port, and if it has a speciality then the final box will always be for that. If a province lacks a specialty (and most of them do) then the box will be missing. If a province lacks a port but possesses a speciality then the third box will contain the speciality.

    Now we know how to look at a province, let's look at what we can do with them.


    Province development


    In terms of province development - adding and upgrading buildings - a single word sums up the best approach: restraint. You cannot build everything everywhere and should not attempt to. If you do not specialise your provinces you will quickly end up bankrupt, starved for rice, lacking access to a strong advantage such as an agent or samurai unit, and with far fewer upgraded buildings. Your position will be as weak as delicate china and the AI will shatter you. During most of the game your treasury will not allow you to build everything you wish to. Prioritising which buildings are constructed first is a necessity. Sometimes it is best to restrain the urge to buy a cheaper building now and save for a turn or two in order to afford a more expensive building. Other times it is best to save your koku to buy new units. Finally, there is the all important matter of rice. Upgrade too many castles and your rice will be eaten as soon as it is harvested, leaving you with no surplus.

    Rice.

    Rice is tasteless unless you cook it with something and it's infuriating how some grains always spill all over your kitchen no matter how careful you are when pouring it into a pan, but we shall forgive it: rice is the root of province development. You can see how much surplus rice you have each turn by looking at the little sack of rice icon at the bottom right of the screen, underneath the end turn button. Rice has two effects. The first effect is that it allows you to support castles. A basic fort consumes 1 unit of rice, and each upgrade consumes an additional unit all the way up to a massive 5 units for the citadel. The highest level of farm upgrade, the land consolidation, will give you 4 units of rice. This means that even if you build the maximum farm upgrade in your province you will need to use some surplus from other provinces in order to support each citadel. You can build or capture castles beyond your ability to support them with rice; this is invariably a bad idea. Having negative rice means a food shortage and your populace will become very unhappy very quickly; you will be looking at riots in every single province you own. In short, no rice, no upgraded castle. No upgraded castle, no extra slots for buildings

    The second effect, which will be discussed in more detail in the economy chapter, is that each unit of surplus rice adds to your town growth, and so gives a small boost to your economy. The more rice you have surplus the more you gain. This effect applies equally to every province you own, so a large clan with a high surplus will be making quite a bit extra each turn.

    This means that you want to expand your farming capacity at every available opportunity unless you are short on money and another option provides a better gain at that moment in time. As a happy bonus (and separate to the growth income boost) upgraded farms also bring you more tax money. From an economic point of view you should upgrade the farms in your most fertile provinces first, as that brings you the largest boost in income. From a rice point of view you want to upgrade every single farm, everywhere, as soon as possible, full stop. It does not matter how fertile a province is, they always provide exactly the same amount of rice.

    The more advanced farm types need to be researched. It is strongly recommended that you take the time to do this, and make them one of your highest priority chi technologies. You may not want to go all the way up to the most advanced farm types if you are playing a short game; the time limit means you will not reap much benefit from the final technology. Reaching the level 3 farm, the land consolidation, with the art 'Chonindo' should be sufficient if you exercise restraint in the number of castles you upgrade. If you are playing a long or domination game then taking farms to the maximum level is advised.

    Certain technologies and buildings also affect rice. The market line begins to consume rice from level 2 (the rice exchange) onwards. The 'sumo tournament' art consumes a single unit of rice. The 'Chonindo' technology provide a bonus of 2 rice.

    The AI is very good at upgrading its castles, so as the campaign advances you should expect to be capturing provinces with castles which consume several units of rice. The AI does not always upgrade the farms in a province to match the castle level; sometimes it relies on surplus rice taken from other provinces. This means expanding by a single province can suddenly leave you with less rice. This is something you must always remain aware of and plan ahead for. After the initial turns of the game you should never allow yourself to go down to your last few units of rice, or worse zero surplus.

    Building slots.

    It is quite literally impossible to build everything in a single province, even if you remove the constraints of rice, money and build times. Every province starts the game with a level 1 castle, the fort. A fort grants a single building slot. Each level of castle after that adds another building slot, up to a maximum of 5. There are 11 families of buildings vying for those slots. The buildings range from the military dojos which allow you to recruit samurai units, to economic buildings like the market, to support buildings like the encampment.

    Certain families of buildings do not consume valuable castle slots. Farms, roads, ports, and province speciality buildings are always located in dedicated slots. These slots cannot be used for anything else, and start out occupied by the basic building of the relevant family.

    In the majority of cases upgraded castles mean troop recruitment centres. Higher level castles offer more recruitment slots, meaning that you can raise armies faster. Some troop related buildings work together to unlock new unit types, such as the way the stables family works with the sword, spear, and archery dojo families to unlock the advanced cavalry units. This means you need a few slots available in a single location. Some buildings offer bonuses to units recruited in that castle, such as the way the encampment offers a 10% reduction in recruitment fees. The more units you can source with these bonuses the better.

    The non-military families of buildings are generally perfect for spreading out. A market in one province, a sake den in another, a temple/church in a third. You do not need to have all of them in each province and so a single building slot is acceptable for the vast bulk of your provinces. This is how you make most of your rice savings; the moment you finish a level 2 farm in a province with a level 1 castle you are gaining surplus rice.

    If you conquer a province and find that it has buildings which do not match your vision for the province you should not be afraid to destroy them and start again. This includes provinces with higher level castles and several military buildings. If you do not need the recruitment capacity it is far more beneficial to level them and build a market, the sake den family, and/or the temple family. To mark a building for destruction click on it and then on the little torch icon on the right hand side of the interface. The building's picture will go dark. At the start of the next turn it will be gone.

    Specialisation: military provinces.

    At the start of the game you will only have a single dedicated military province, and will be utilising your economic provinces as secondary recruitment locations. All provinces can recruit both yari and bow ashigaru, and they will form the bulk of your early armies. Your lone military province will be your capital, taking advantage of that extra recruitment slot. All clans begin the game with a single dojo in their capital. If a clan has access to a specialist version of a basic samurai unit, like the Shimazu and their superior katana samurai, then this dojo will be of the right type to provide access to it. Clans like the Hojo and Takeda start out with the lowest level of the building family which provides their specialist units. In this example that means a siege engineer's workshop for the Hojo, and a stables for the Takeda. Other clans, such as the Oda or Mori have a spear dojo instead of a building relating to their bonus unit.

    If you do not start with your preferred flavour of basic samurai then you will need to consider taking action. You can upgrade your castle to open up another slot, or demolish the existing building so that you can replace it. The second approach is the better one if you absolutely must have the unit right now; upgrading castles cost far too much to be worthwhile until you have several provinces under your thumb. In the long view it is more beneficial to wait until you can take the first approach. Once you have several provinces, your situation is secure, you have built all of the basic economic upgrades, and your economy is bringing in at least a couple of thousand koku surplus per turn it is time to think about upgrading your military province. You also need to start thinking of multiple military provinces and where to place them.

    The infantry recruitment centre will create the heart of your armies. Depending on your unit preferences, this castle can function well at a level as low as 2, or it may need building up to something grander. At the basic level you want to build the dojo which grants access to your preferred flavour of samurai, and an encampment which upgrades into either the armoury (+2 armour), the jujusu dojo (+2 melee), or maybe the proving grounds (+5 charge) if you are using charge oriented units like no dachi. You should expand the castle and add in extra dojos or a temple if you require extra units.

    You will need a dedicated cavalry province if you intend to use the heavier varieties. This means a minimum of two slots, one for the stables and one for the dojo which unlocks the type of cavalry you wish to use, e.g. a spear dojo for yari cavalry. One additional slot will be required for each type of cavalry you wish to unlock. For this reason it is best to decide on a single type of advanced cavalry and rely on them; typically this will mean either katana cavalry or yari cavalry. You will almost certainly want to take advantage of the bonuses provided by the encampment family. At the basic level it makes the expensive cavalry units 10% cheaper to recruit, an appreciable difference. You should then upgrade that building to the proving grounds (+5 charge bonus), the jujusu dojo (+2 melee) or the armoury (+2 armour) to provide your cavalry with a little added edge. Because the dojos required for advanced cavalry also allow recruitment of the relevant infantry samurai type, a cavalry province can be used as a secondary heavy infantry recruitment centre. This is very helpful when you need to raise an entire army from scratch, or move quickly to replace heavy losses.

    If you plan to use a lot of samurai archers, warrior monk archers and teppo units then it may be useful to set up a dedicated ranged unit recruitment centre. This castle would need to be level 3 at the minimum, level 4 if you wish to use all of the missile unit types. The archery dojo family is the indispensable core. Depending on what units you require and how far you intend to build the castle up, you must then choose between adding the siege weapon family for access to guns, the temple family for access to bow warrior monks, and the encampment upgrading into the hunting lodge for a +5 accuracy bonus. If you place a temple in this province you will be able to recruit the powerful naginata warrior monk unit when you do not need to use your recruitment slots for ranged units.

    Regardless of which military buildings you choose to use or how many sites you decide to recruit at, you should always aim to keep the buildings upgraded to the maximum your technology will allow. Higher level buildings grand XP bonuses to freshly recruited units, and certain higher level buildings will reduce samurai recruitment times from 2 turns to 1.

    Specialisation: economic provinces.

    Economic provinces are much simpler. They will form the bulk of your territory, and the lower the castle's level the better. In terms of monetary gain, a basic market is the most advantageous building. Upgrading the market past the basic level may not always be wise; please read the economy section of the guide for a detailed breakdown. Build markets in every single economic province. After that the stealth family of buildings, starting with the sake den, is the best option as it gives a small financial return. At the start of the mid-game, when your empire is still relatively small, you might find it beneficial to build a single sake den instead of a market in a province with a level 1 castle. This will get you access to ninja without needing to waste resources on a castle upgrade. Later on you will be capturing upgraded castles from the AI and replacing the military buildings with economic ones, and it's at this point many players begin building extra sake dens.

    The final family of buildings you may consider for an economic province is the relevant religious family. If you are Buddhist this is the temple family, if you are Christian it is the church family. From the second level building onwards this family provides a bonus to chi research, and if you build several of them it can add up to quite a nice boost, particularly if you upgrade them to the higher levels. A temple/church is a nice addition to the provinces converting from military to economic. These buildings also add happiness to the province's population, and a constant conversion bonus to keep the populace adhering to your chosen religion. How useful these two bonuses are will depend on your circumstances. If you have converted to Christianity, or are conquering Christian provinces, then they can be invaluable.

    All three of these building families allow you to recruit agents. This means that you should aim to have a minimum of one of each type somewhere in your empire as soon as you feel it is practical.

    Province specialities.

    Some provinces have specialties, resources innate to them which provide various bonuses. Certain specialties are trade goods, which earn you a lot of koku if you can get a trade agreement with another clan and at least one port to export them from. Other specialties unlock units, provide statistical improvements for units recruited in that province, give economic boosts, improve research, or give other advantages. You can see a full list of specialties and what they do by checking the game's encyclopaedia.

    Certain province specialties allow you to choose a military oriented upgrade path or an economic one. For example the naval tradition speciality allows you to choose the trade oriented warehouses or the ship recruitment oriented pirate lair. Unless you are actively recruiting units in the province, you always want to pick the economic route.

    Where to place your upgraded castles.

    Between the lack of rice and the need for building slots, where should you place upgraded castles? The answer will depend greatly on your situation at the time of asking. In general it boils down to two factors: where you need to defend, and where you need to fight.

    Castles serve a valuable defensive role. Each additional upgrade to a castle adds free defenders, units which automatically appear when the castle is attacked. You do not pay upkeep on these units so they are a very valuable way to bolster your defensive army without breaking the bank. Higher level castles benefit from more complex wall arrangements on the battle map, making it harder for an attacker to win through to the keep. With the right defensive army and a bit of practice you can break stack after stack of AI troops on your walls with manageable losses on your own part. An advanced castle is the single best way to hold on to a key province. Due to the costly nature of castles you cannot afford to dig in and defend every province. Instead you should select some strong points and reinforce them. Any provinces further out to the front line from them should be viewed as disposable in the event of a crisis; you can fall back on your strong points to dig in, regroup, and begin to push back out again. Look for provinces which provide natural choke points, or which provide a likely route of attack from a particularly dangerous enemy. In the wider areas of the campaign map, such as the central area around Kyoto, you can use a single province as a fallback position for multiple border provinces, much like the heart of a flower surrounded by petals.

    Your capital always has an extra recruitment slot. This makes it a great location for recruiting your early armies. If you are playing as one of the more central clans, your capital may remain relevant as a recruitment centre for most of the game. If you are one of the more isolated clans, like the Date, then you may find that the distance from your capital to the frontline becomes so great it is no longer feasible to rely on it.

    A third factor is the presence of province specialties. Some you can take advantage of with a level 1 castle. Others, primarily the military specialties like horses, require a building which occupies one of your precious limited slots in order to make qualifying units available. The value of resources will differ depending on your personal tastes and the direction you have decided upon for your clan. If you are using few cavalry units then a province which offers a charge bonus to them is less valuable. If you are using a lot of infantry then a province which offers boosts to their attack and defence values is very valuable.

    If you are sourcing your army from multiple recruitment centres - and you should be - then you will not want the units to have to march for many turns in order to join up into a finished army. This should be your final consideration when choosing your recruitment sites.

    If there is a particular province you need to defend, and you find that you do not need any more recruitment capacity, consider using the various slots on economic buildings instead, or on mixture. A couple of dojos and a market is better than an empty slot or a slot wasted on a building you do not need.

    Buildings.

    If you want to take a look at all of the buildings in the game, or to check the effects they have, look them up in the game's encyclopaedia. It's very detailed, and it's easy to follow the upgrade paths and their technological requirements.


    Unrest, happiness, and maintaining control.


    Unrest. The one thing - aside from an enemy army, of course! - which you do not want in your provinces. As mentioned above, unrest is created when the factors giving unhappiness are greater than those giving happiness. If a province reaches the balance point of 1 happiness you should act swiftly to boost happiness before the town slides into discontent and maybe even outright rebellion. A province can reach 0 happiness and still be safe. It can even go into the low minuses without instant revolt. It's a gamble though, and one you should avoid taking. Sometimes that small chance of revolt activates on the first turn possible.

    You can see a breakdown of how much an item is affecting happiness by placing your cursor over the icon representing it. If the icon is flashing, or if the tooltip displays something like '6/5(predicted)' then the effect is about to go down next turn.

    So what makes a sengoku era Japanese peasant happy or unhappy? Quite a lot, he's a fussy fellow.

    Happiness.

    Your castle provides a repression bonus. This is a set amount which applies as long as the castle is not damaged. It increases as you upgrade the castle.

    Any units you have positioned inside the castle provide a garrison bonus. The more units present the bigger the enforced happiness bonus.

    Certain buildings will provide a set happiness bonus. As with the castle, this bonus continues to apply unless the building is damaged.

    A few arts give a permanent clan-wide happiness bonus.

    You may get a rare event which grants a temporary happiness bonus.

    The monk and missionary agents will provide a small happiness boost if given the 'minister to settlement' mission.

    Unhappiness.

    A newly conquered province will hate you quite a bit. The unhappiness penalty will gradually reduce provided you do not lose control of the province, and eventually the people will accept you as their rightful ruler.

    Everybody hates high taxes. Peasants hate reasonable taxes too. You can expect to receive a chunk of unhappiness for this reason, unless you want to try running your clan without an income.

    If your Daimyo has low honour it will cause a happiness penalty. If he has 2 honour then there is a -1 penalty, if he has 1 honour then it's -2, and 0 honour gives a nasty -3 penalty.

    If a province has sufficient followers of the religion you have not chosen to make your official clan religion, they will be unhappy. The larger the percentage of the population which follows the other religion, the larger the happiness penalty.

    Certain agent actions cause unhappiness if successful.

    Food shortages give a significant happiness penalty.

    An enemy army pillaging your province can make the people upset at your inability to protect them.

    Maintaining control.

    This is very simple when you know how. Firstly, enforce religious harmony. Purge any followers of other religions! Send in your monks or missionaries, and build churches and temples. If you share a border with a Christian clan and have chosen to remain Buddhist, consider sending ninja to sabotage churches and Nanban quarters as they have an effect which passively spreads the religion to all neighbouring provinces. If the building is damaged that effect vanishes until it is repaired again. In the long term, conquest is the best answer. If rival preachers turn up in your lands send ninja to dispose of them ASAP.

    Second, look at your castle's repression effect. It may be enough to keep a province under control without any other factors. Don't add garrisons where you do not need them. It is sensible and economically necessary to leave few troops in your safe heartlands; keep your armies on the borders where your enemies can attack. If the repression bonus is not enough start adding ashigaru as they are cheap. Each unit of yari ashigaru stationed in a castle will give 1 point of enforced happiness.

    Don't forget that some arts and buildings give a happiness bonus. Consider using them if you are running into real difficulty. It can be a lot cheaper than maintaining a huge garrison.

    Daimyo honour is easy to keep high. Do not pillage captured provinces. If you are informed a general should commit seppuku for his disloyalty, agree to gain a point of honour. If you do not then you will lose a point of honour. Changing religion applies a -2 honour penalty so take action to gain honour before converting and losing it. You can gain honour by glorious victory in battle, and by purchasing the 'honourable' skill when your Daimyo gains a level.

    If you wish you can use agents and generals to enforce happiness, although this means using a limited pool of men to do a job which other factors can do far better and so is rather inefficient. Consider it a temporary measure. A general needs to pick up the appropriate skills in order to have a real effect on happiness, otherwise he counts as a standard military unit. He needs to possess the skill 'intimidating' or a 'living treasure'. Ninja can add to a town's happiness by using the mission' establish spy networks', monks and missionaries by using 'minister to settlement', and metsuke by using 'oversee settlement'. Geisha have no effect on settlements.


    Frogbeastegg's Guide to Total War: Shogun II. Please note that the guide is not up-to-date for the latest patch.

    Members thankful for this post (3):


  4. #4

    Default Re: Frogbeastegg's Guide to Total War: Shogun II

    The economy.


    Money. Lots of clichés around it, most of them true - at least as far as the game goes. Money makes the Sengoku world go around. It's all deceptively simple, same as in real life. You get X amount in, need to spend Y amount on necessities, leaving you with a surplus or deficit of A. You do not want a deficit. To achieve a surplus you can either reduce spending or increase income. That's the tricky part. Income comes from a limited number of sources, and expenditure likewise goes on a predictable little list.

    As mentioned earlier in the guide, the currency in this game is called 'koku'. It is the weight of rice needed to sustain a man for a single year, or the gold equivalent to the value of that rice.

    Your most important economic information is displayed under the end turn button. The right hand figure, beneath the coin with the red arrow, is your predicted income. That sum will arrive in your treasury at the start of the next turn, unless something happens during the AI turns to interfere with it, such as the loss of a trade route. If this figure is in flashing red you are going to lose money and need to take action ASAP. The left hand figure, under the stack of coins, is your current treasury. You can view detailed economic information by clicking on the little abacus icon on the lower right hand side of your interface. It's above the end turn button. To view a breakdown of a trade route, hover your cursor over the dotted line (sea trade) or road (land trade) and a pop up box will appear to tell you who is using it and how much it is worth.

    If your treasury enters the negative then you become bankrupt. This is a terrible thing - it destroys town wealth, and causes massive unhappiness penalties. You cannot build or recruit units, or undertake agent missions until you have a positive treasury again. Escaping from bankruptcy involves a desperate flurry of actions, which may or may not prove sufficient to rescue the situation. Disbanding troops and taking other measures to reduce expenditure should be taken, alongside anything which will increase your income or treasury ASAP. Even a tax increase may be worth considering on a strictly short term, temporary basis. Avoid bankruptcy at all costs! Once you fall into the rabbit hole it can prove very difficult to escape.

    Expenditure in the game is limited to a handful of categories. Your army and naval upkeep is the biggest turn to turn expense, and this is why it is so crucial to exercise restraint when recruiting your armies. Nothing says approaching bankruptcy like a horde of samurai. As your empire grows you will find that administration costs go up. This represents factors like official corruption, incompetence, overstretched bureaucracy, and the other ills a large government attract. The increase is quite gradual, so as long as your economy is in healthy shape it should not cause you any problems. If you are reduced to vassalage, or if you agree to pay tribute over multiple turns as part of a peace treaty, the relevant sum will be deducted automatically from your income. The final type of expenditure is the cost of construction, recruitment and diplomacy conducted inside a turn. You are fully in control of this, and should think before issuing orders. Emptying your treasury if your predicted income for the next turn is low may leave you in trouble if something impacts your economy during the AI part of the turn. When you queue construction or recruitment orders you pay for the item upfront, meaning that you do not need to worry about the cost suddenly coming to bite you five turns later when you have forgotten that you ordered the item. If you cancel the item before it is completed you receive a full refund.

    Income is a little more complex. Let's go through it category by category.

    Taxes.

    Unlike many strategy games, taxes are not an additional source of money separate from any local income generating buildings. Taxes are the amount you deduct from each province's combined income. That income is made up of farming and town wealth, and any special factors like commerce or mining. A breakdown of each province's income can be found on the province information panel. This means that you seldom receive the full 'value' of a building's stated economic output. If you build a mine which generates 1800 koku per turn and your tax level is 20%, you receive 20% of that 1800 not the full 1800.

    Higher taxes can be counter productive. They cause more unhappiness, and give a large penalty to town wealth's growth each turn. If your taxes are too high then your town wealth will not grow, or worse, will decrease. A high percentage of not a lot is worth less than a smaller percentage of loads, to put it in very technical terms. Set your taxes too low, however, and you may find yourself struggling badly as the town wealth growth bonus is often insufficient to offset the loss of tax income. You can choose between none, minimal, low, normal (default), high and very high. Each step represents a 10% increase, starting with 10% tax rate for minimal. Tax levels are global; they apply to every single province you own. You cannot set independent tax rates except to exempt a province from taxes. Many players find that leaving taxes on their default level is the best general policy as it balances income against growth quite nicely.

    Certain arts will increase your tax yield, as will certain rare random events. The stated tax bonus will be applied on top of your final tax figure, and is not subtracted from town wealth. To give a working example of this, if you receive 200 koku from a province in taxes and gain a 5% tax bonus from an art, the magic koku fairy will make 10 koku appear from thin air and you will receive a total of 210 koku.

    Farming.

    Farming is the most basic level of income production. It is influenced by two factors, and remains stable across the game. It is predictable, reliable source of koku and should be exploited to the maximum. Farming also produces rice at the rate of a single unit per farm level.

    The fertility of the province is the first factor which determines farm income. The more fertile a province, the more koku the farm brings in. Fertility is fixed and can never be altered. You can find out how fertile a province is by hovering your cursor over the farm in the province improvement bar. Alternatively, you can hover your cursor over the little building which represents the province's farm on the campaign map. Assuming all factors are equal, a very fertile farm will make nearly three times as much money as a barren one. Due to this you will always want to upgrade your farms in order of fertility. This does not mean barren farms should be left at the basic level; any boost to your income is worthwhile, and all farms are equal when it comes to generating units of rice.

    The second factor which influences farm income is the level of the farm building. It's very simple: the more advanced the farm, the more money it produces. A barren province with maximum farm upgrades can be better than a fertile province with only basic farms. All provinces begin the game with level 1 farms and all further levels must be researched. This is one of the few research lines which all players should undertake, and in every game. Farming research should be given quite a high priority level.

    Town wealth.

    Town wealth is derived from multiple factors. These factors are added together to arrive at a growth figure for that turn. Negative factors, like taxation or high unhappiness, will deduct some money from the growth figure. Positive factors often come from buildings, such as the market, the sake den, and the port. Certain chi arts will boost town wealth. An event can give a temporary increase to town wealth, although these events are rare and you may only see a couple in an entire campaign.

    Trade.

    Trade is the fast route to wealth in Shogun II; the income can easily surpass multiple thousands, and without the need to wait for large amounts of construction and research to take place. There are three levels of trade: selling surplus goods, selling goods from your provinces, and selling goods from trade nodes. All trade relies on trade goods; the more of a good you have, and the more varieties of goods, the more money you will make. Each good has a different value; you can check its current worth on the trade screen.

    On forming a trade agreement, you will automatically import any goods which the other clan possesses and you lack. This is particularly useful for strategic goods like warhorses, which are required to build advanced cavalry.

    Selling surplus goods is something which happens automatically, and is a last ditch effort to make some money out of your trade goods. This is what happens with your goods if you do not have any trade partners, or if you have more goods than your partner can buy. The excess stock is sold at a basic price. This is not to be scorned - the sums involved can still be considerable, thousands of koku. It's a good buffer for those occasions where your trade network falls to pieces during a diplomatic crisis.

    Selling goods from your provinces requires a trade agreement with another clan. Trade can be conducted via road if the two parties share a land border. Otherwise all trade is conducted by sea, and can only be carried out if both yourself and your trade partner have docks with spare capacity. A single trade route is required for each trading partner, no matter how large or small they are. If either you or your partner lack a dock then sea trade is impossible. If you are trading solely by sea with a clan and they lose access to their last port (or you yours) then the trade agreement is broken and all trade halts. The more dock capacity you have, the more routes you can support. A trade port or military port can support a single route, a Nanban port can support 2 routes, and the Nanban quarter 3 routes. This means that most clans will increase their trade capacity by taking control of more provinces. Selling goods to another clan is worth more koku, and there is a bonus applied on top of the value of the goods. The longer the route exists the more koku you receive from this bonus. Should the route be disrupted for some reason trade ceases and the bonus is lost, irretrievably. Even if trade is resumed on the next turn the bonus will have reset and will have to build back up again. The bonus means that it is a good idea to stick with at least some of your trade partners for as long as possible. Choose clans whom you are unlikely to end up at war with, and try to keep amiable relations with them. Larger clans seem to be worth slightly more as trade partners in terms of trade income, as do clans a good distance from your borders.

    Trade via trade nodes works similarly to selling goods via trade agreements. The difference is that you must park one or more trade ships on a special point on the campaign map. These points are golden circles once the area has been scouted on the map, and are represented by round painted circles with an anchor symbol on the calligraphic map which covers most of Japan when you first start the game. The location of the circle on the painted map is approximate; the node is nearby but not quite in that exact spot. If you send a ship there you should spot the node easily enough, if not keep looking as it won't be far. You can see examples of trade nodes below.


    Placing a trade ship on a node gets you access to one particular good; each node has a pre-defined specialty. A trade route is formed immediately, and you will see the income added to the prediction of next turn's income. The more trade ships you have on a node, the more you make, although the return with each ship is diminishing. Around five ships per node is a good number. While military ships cannot make money from occupying a trade node, they can prevent enemy ships from taking the node before you get a trade ship there. The AI will prey on your trade fleets if you are at war with a clan which possesses a navy, and the Wacko pirates are a sporadic threat, so it is advisable to keep a few military ships near your trade ships in order to protect them.

    Trade can be an invitation to destruction. If you become overly reliant on it you will crash hard when your trade is disrupted. Disruption is rare but can be counted on happening at least a couple of times during the average campaign unless you play an exceptional diplomatic game as well as being fortunate in what the AI decides to do. Never allow yourself to be lulled into a false sense of security - build up your land based economy, even if you are rolling in koku thanks to trade. Check your army upkeep costs and compare them to your land based income; can your land empire pay for your military without your sea based income? If so, you are in an excellent position. If the gap is small then you can probably manage if the worst happens. If the gulf is large then you will spiral towards bankruptcy, and will be forced to disband troops in order to keep your head above water. That military weakening acts like blood in the water and the sharks will scent it.

    Are trade nodes worth starting a war over? If you can force the rival fleet off the node, secure it yourself, and continue on without many consequences, then definitely! Taking a node owned by a one-province minor clan at the opposite end of Japan is easy and the aggrieved party cannot effectively strike back. Taking a node owned by the big angry clan which can drop armies on your doorstep is a bad idea; war will cost much more than you could gain ... unless you have other military goals in mind.

    Rice is nice: part II.

    Rice affects the economy is a fairly simple way. On a per turn basis, each unit of surplus rice gives +1 to town wealth in every province you own. This means that if you have 1 unit of rice and 10 provinces, you effectively gain +10 town wealth. Obviously it's not quite as beneficial as that when the taxes are calculated, as 20% of 10 is worth more than 10 lots of 20% of 1. This is because 20% of 1 results in 1/5 of a koku, which the game will round down, while 20% of 10 results in precisely 2 koku. But what if you have a larger surplus? 15 units of rice mean +15 town wealth per province per turn, and 20% of that adds up. Furthermore, most of the growth bonus is being added to the wealth pool, which means you gain more taxes from it in the future. It's constantly expanding income! You can see the surplus effect at work in the pair of images below. The left hand one shows a town where the bulk of the town growth is coming from the rice surplus, despite the presence of a level 1 market and a sake den. The right hand screenshot shows the same province a single turn later. Notice how much the town's wealth has grown - it is enough to boost the final tax figure by 5 koku, from 696 to 701. This screenshot was taken with an empire which controlled 13 provinces, so extrapolate that growth across 13 provinces for the real 'this turn' benefit.


    As your clan expands it is very easy to have a large rice surplus provided you plan for it. Research and construct higher level farms everywhere, and keep your castles at the lowest level possible outside of the provinces where you really do need to upgrade. By the midpoint of a campaign it is possible for a well planned rice surplus to be bringing in a few hundred koku in taxes each turn, and that's before the large pool of town wealth is factored in.

    The way rice affects economic growth means that you need to scrutinise the market family of buildings very closely. Level 1 is brilliant; you should build them everywhere you can squeeze them in without needing to upgrade the castle. A flat +200 koku added to commerce every turn, and you get 20% of that on a typical tax rate. 40 koku might not sound like much but it soon adds up. The level 2 market (the rice exchange) is where matters become tricky. It consumes a single unit of rice, and adds 500 to commerce in the province. That means you gain 100 koku of income, but lose whatever growth bonus that unit of rice was bringing in. With a small empire the improved market is better, provided you don't keep an eye to the future and consider how that unit of rice will apply to a larger empire as well. With a mid-sized empire the answer begins to get tougher. Consider a large empire, and it can be argued that the unit of rice is worth more than the market, particularly since constructing the market costs koku. The level 3 market consumes a second unit of rice in return for a +1000 koku commercial boost.

    Markets do impart a town wealth bonus, but only for the province in which they are based. Locally, they give far more growth than the rice they use. Empire-wide, maybe not. The level 3 market, the merchant guild, gives +20 to town wealth, so if you have 21 or more provinces that unit of rice arguably gives a better growth return when it is stockpiled.

    The most advanced market, the kabunakama, gives very large boosts to both growth and commerce and still only consumes 2 units of rice. Additionally, you can recruit higher ranking metsuke from it. If you leave all of your metsuke sitting in towns boosting your tax income this experience bonus may not be useful. If you use one or more offensively then it can be valuable as it allows you to replace losses without needing to train the new agent on soft targets before he is capable of tackling more useful ones. This combination of factors makes the kabunakama well worth considering. Construction of it requires the province specialty 'crafts', so you should keep that in mind if you decide to build one.

    Does this mean that you should never upgrade your markets past level 1? Some players say yes. If you play a long campaign and expand quite rapidly in the earlier phases of the game then you gain more from the rice surplus effect. Choosing not to upgrade allows you to avoid researching certain arts, meaning you can pick up others which may be more beneficial to your situation. Finally, you save quite a bit on the cost of upgrade construction. Other players prefer to selectively upgrade one or two markets. Due to the way rice and building upgrades work, it's most effective to make an either/or choice about upgrading markets. Either you leave the market at level 1 and use the province for a rice surplus, or you upgrade it as far as possible in order to get the maximum back from your rice. To wring the last little drop of benefit out of the upgraded markets, you should site them in your richest provinces, ones where you have a metsuke to oversee the settlement and where you have other buildings which provide a substantial boost to your income. Regardless, you should not build upgraded markets in most of your provinces. It is simply a bad investment with an inferior payoff!

    Note that if you conquer a province and the AI had upgraded the market, it is possible to regain the rice by demolishing the building and replacing it with a basic level 1 market. Fortunately the basic market is quick to build and comparatively cheap, so it's not overly harmful to do this.

    Ninja buildings: an alternative source of income.

    Each level of the stealth family of buildings grants a small increase to commerce in its home province. Level 1, the sake den, grants 100 koku. Each level thereafter adds a bit more. You should never choose the stealth family over a basic market; by the time the ninja buildings are giving more income than the basic level 1 market, you will have spent thousands of koku on building upgrades, not to mention the research required to unlock those advanced buildings. You should use them to supplement income in economic provinces which have slots left after the market is constructed.

    The highest level building in this family, the infamous Mizu Shobai district, also gives a 25% bonus to tax income for that province! This is very nice indeed if you can manage to construct it in a wealthy province. You can only have one of this building, so select your site carefully.

    Other money generating buildings.

    Some other buildings will provide income. Most of the province specialty buildings offer two paths, one military and one economic. Needless to say, you should pick the economic path unless you will actively use the military bonus.

    Vassals and tribute.

    If you create a vassal you will receive tribute from them. This amounts to roughly half their income. Vassals also make good trade partners in a diplomatically turbulent environment, such as after the realm divide.

    Money from war: pillaging towns and trade routes.

    If you are at war with a faction which conducts naval trade, you can send a navy to disrupt that trade. This will bring a small proportion of the trade route's income to you as your crews steal cargo from enemy ships. Piracy is a very handy source of extra koku, and you should take advantage wherever possible. It doesn't tend to give enough of an income boost to be worth constructing fleets specifically to undertake this task; it does offer enough to offset the upkeep of your existing navies when you do not need to use them in battle or for transportation purposes. To attack a trade route simply select your navy and right click on any part of the dotted line which forms the sea trade route. Be aware that the AI will drive off your pirate force if it can, so either use a navy strong enough to defend itself, or a single cheap ship which you do not mind losing.

    When you first conquer a new province you will be offered the choice between occupying it peacefully or pillaging it. Pillaging provinces is inadvisable - it gives your daimyo a hefty honour penalty and that means that your generals will become disloyal, and you will receive penalties to both diplomatic relations and to happiness in all of your provinces. The small amount of koku gained is not worth the damage.

    Treasury versus income.

    Ideally you want to have a large treasury (savings) and a large income (profit per turn), realistically this is not always possible. So which is better if you have to choose? The answer depends very much on the player.

    Some people look at returns for every koku spent. The worth of an expense is judged according to how many turns it will take to recoup the money spent on construction. A large treasury takes precedence over a large income, and often in the mid to late game buildings will be deemed "not worth it" because it takes too long for the cost to be repaid. If something goes wrong with income, these players will typically ending up living off their savings. Their income will not be high enough to offset the disaster, whether it is a loss of trade or having a particularly rich province captured.

    The other style of player prioritises income above cash in hand. They will make many investments, typically building a lot of economic buildings, farm upgrades and so on, no matter how early or late in the campaign it is. Because of all this extra construction their treasury is often emptier, although it is easier for them to fill it by saving for a few turns. In the event of an economic disaster this type of player has a better chance of maintaining a positive income due to the wider range of incomes, and if they cannot remain in the black then their deficit should be smaller. However if they do end up running a negative and are required to use their treasury to pay for routine expenses, they face running out of money to cover the bills that much sooner than the treasury oriented player.

    Neither approach is superior to the other. You need to decide for yourself. When an event like realm divide hits do you want to have a better chance to pay for everything up front, or do you want to have a larger cushion to ward off the hurt?

    Frogbeastegg's Guide to Total War: Shogun II. Please note that the guide is not up-to-date for the latest patch.

    Members thankful for this post (3):


  5. #5

    Default Re: Frogbeastegg's Guide to Total War: Shogun II

    Religion


    Please note that the Ikko-Ikki downloadable content adds a third religion into the game. This religion is exclusive to the Ikko-Ikki faction and other clans cannot convert to it. For this reason - and because some players may not choose to buy the DLC - it will not be covered in this section of the guide. If you wish to know more about the Ikko-Ikki please read the chapter dedicated to them.

    For the remaining clans, religion comes in two flavours: Buddhism and Christianity. All clans start the game as Buddhists and the option to convert to Christianity will become available further into the campaign, the precise time of which will depend on multiple factors. The two religions offer different advantages and for optimal play you should aim to bring those advantages into effect as much as possible, particularly if you decide to undertake the conversion to Christianity.

    First of all, let's take a quick look at the advantages and disadvantages of each religion.

    Buddhist advantages:
    • Access to the powerful warrior monk units.
    • Hallowed ground province specialty offers powerful boosts to warrior monks.
    • Not having the various Christian penalties can make life simpler, smoother, cheaper and easier. This is a large advantage even if it only occupies a single bullet point!


    Buddhist disadvantages:
    • It takes longer to get access to gunpowder units, and you will never be able to build cannon.
    • The temple family of buildings is slightly less effective in terms of research boost and conversion rate than the Christian family.
    • The Buddhist monk agent is slightly less effective at boosting chi research even with all of the relevant skills.
    • Your trade income will be slightly lower due to the lack of the Nanban quarter's third trade route.
    • Your monks are slightly less effective at causing revolts in enemy provinces.


    Christian advantages:
    • Early access to gun (teppo) units on construction of a Nanban trade port.
    • The 'imported matchlock ashigaru' unit becomes both cheaper and faster to recruit after conversion.
    • Access to European cannon when you build the Nanban quarter.
    • Access to the Nanban trade ship.
    • Access to the missionary agent.
    • Access to the Christian family of buildings.
    • Extra trade income; the Nanban Quarter has 3 trade routes instead of the usual limit of 2.
    • Super-powered chi research if you take full advantage of the Christian family of buildings and correct missionary skills.


    Christian disadvantages:
    • Diplomacy penalty: an immediate, permanent diplomatic penalty with all Buddhist clans. This penalty varies based upon your difficulty level.
    • No warrior monk units.
    • Limited benefit from the hallowed ground province specialty.
    • You will need to ensure you convert provinces in order to keep unrest down.
    • Conversion takes time and effort, and can prove costly.
    • You can end up waiting for the game to 'let' you convert; you need the event which offers Nanban trade before you can build the port.
    • Converting causes your daimyo to lose 2 points of honour.


    Now let's take an in-depth look at each.

    Buddhism.

    In a way Buddhism is the vanilla, the default, the status quo. The advantages may look short and rather lacklustre next to the long list for Christianity but you should not let this deceive you into thinking it is the boring or weaker option. Consider that the disadvantage list is also short compared to Christianity's. The real strength of Buddhism comes from what you do not need to do, the things you do not need to worry about, the resources you do not need to spend, the time you do not need to pass. Oh - and the warrior monks! Don't forget the warrior monks. They are nice units.

    All clans begin the game as Buddhists. While you need to do some work in order to access benefits like the warrior monks, most of the key benefits are already in play. This means it is very nearly a zero investment religion; it's gain from the word go, and the costs which appear later on are relatively minor compared to those of Christianity. Because most of the benefits come from the things which do not apply, this low investment status is going to apply for most of the game. So what are these things you do not need to do?

    You do not need to convert your clan.

    This means you do not need to wait around for the Nanban trade event to fire, and then build a Nanban port in one of your provinces. That is koku saved, and you are not at the game's mercy waiting before you can enact your plans. You do not then need to spend turns spreading the Christian influence throughout your provinces. This is a huge undertaking you are evading! Converting the population is a time consuming, expensive task, even for a small clan with 3-5 provinces. Read the Christian section to gain an appreciation on just how big of a bullet you are dodging. At the same time as you dodge that bullet you dodge another: your daimyo is not taking a -2 honour penalty. That means you do not court loyalty problems with your generals, and unhappiness problems in all of your provinces. There's a further cost you avoid in relation to daimyo honour: Christian clans will need to take action to boost his honour back up or to kill him off. Typically this means using him to win battles. Buddhist players can sit pretty and use the generals they wish to build up instead of urgently needing to use a man they may not wish to risk in battle. They are also avoiding the sudden need to conduct war while in a position of internal turmoil; compared to a Christian clan in the midst of conversion, Buddhist clans are fighting from a position of strength.

    You do not need to convert every single province you conquer.

    While Christianity can turn the need to convert into one of its strengths, Buddhist factions gain from flexibility. See a vulnerable province and have an army nearby? You can rush in and take it should you choose. A Christian clan will need to think harder about how they will hold on to the province given the high religion unhappiness penalties. A Buddhist clan will spend less on garrisoning the new province, and will have happiness safely under control much sooner. Has someone unexpectedly declared war on you? If your defence goes well enough that you are in a position to counterattack and make some territorial gains you can go for it. Once again a Christian clan would need to think harder.

    Provided they have the economy to support it a Buddhist faction can expand farther, faster. Take province, fix up the castle and install small garrison, and move on. You can do this over and over. Conversely, a Christian clan must conquer, fix the castle and install a larger garrison, and begin work on converting the populace. They can do this with a missionary or a church. The latter takes time, koku and a building slot to construct. The former is drawing on a pool of agents which is limited to a maximum of 5, and typically it is far better to have missionaries work in groups of at least 2 to boost conversion speed. Taken together this means a Christian faction is going to grind to a halt much sooner, say after 2 or 3 provinces. Unless, that is, they have taken the time to seed the ground prior to the military advance. There will be more on that in the Christian section.

    Even when only expanding by a single province, the sooner you have it under control without the need for a large garrison the better for your overall flexibility. If you need to keep a main army stack in or near the province then that army is tied up. What if you suddenly need it elsewhere in your lands?

    The only provinces you will need to convert are those which have picked up some Christians via the actions of an AI clan. Most AI clans will not dabble with Christianity; the western island of Kyushu is the game's hotbed of religious turmoil and it's quite unusual to see Christianity spread outside of there. If you are not going to Kyushu then chances are excellent that you will not need to convert anyone.

    You don't have to spend as much on your provinces.

    The most basic cost saving is in garrison size on provinces which have not yet been converted. Even using ashigaru units costs a sizeable amount of koku when you have to use large numbers of them. In poorer provinces the cost of the garrison can easily outstrip the province's income.

    The other monetary investment Buddhist players avoid is the cost of converting the province. Missionary cost 500 koku to recruit, although that cost is spread widely amongst the many uses a Christian player will find for the missionary. Buildings may also be desirable to support the effort and while the first level Christian building is cheap, later ones are not.

    You do not need to concern yourself with gunpowder unless you want to.

    Depending on one's point of view this is a small advantage, no advantage, or a small penalty. The firearm units are not everyone's cup of tea. It is entirely possible to go through the entire game without using a single unit of teppo; unlike bows, spears, cavalry or swords they are not one of the foundations stones of a balanced force. They require more of a learning experience to use effectively than most other units. There are situations where they struggle to be of true value, and the situations where they actually excel can be rare.

    Due to the costs involved in converting to Christianity, it is much harder for a Christian player to justify not using teppo in some form or another. Ideally a Christian player should be working to include teppo in his strategies from the turn the Nanban port is completed. A Buddhist player who dislikes teppo has no pressure to use them, and in fact gains by being able to research other arts instead of those which unlock the superior gunpowder units.

    A Buddhist player will not have access to cannons, or to Western style ships with cannons. Unless you manage to capture the Black Ship, the cannon bune is the best you will get and it's a poor second compared to the Nanban trade ship.

    If you happen to like guns, Buddhism's late access to them can be vexing. To offset this a little you can work to level up a Buddhist monk or two, the build the Nanban port in a province. Move the monks in and have them minister to the settlement. If they are a high enough level they will counter the Christian conversion factor and the province will remain 100% Buddhist. Note that you will be limited to the more expensive, slower to recruit version of the imported matchlock ashigaru, so if guns are your thing you should still aim to research the relevant technologies as soon as possible.

    No religious diplomacy penalty.

    Unless you are dealing with Christian clans or the Ikko-Ikki, of course. Then the penalty applies. Considering that the vast bulk of clans will remain Buddhist the penalty is rendered negligible.

    While the diplomatic penalty is not so great as to render diplomacy useless, it is hefty enough to make life that much more difficult for a Christian clan. It may be the difference between making a deal and failing, and it should mean that on average you have to give less in order for the AI to agree.

    Not forgetting the warrior monks!

    The warrior monk units will be covered in detail in the unit section of the guide. For now suffice it to say that bow warrior monks are extremely good archers: long range, accurate, and with an ability which hurts enemy morale. Naginata warrior monks are masters of melee slaughter when used correctly. Use the two kinds of warrior monks well and you will find it difficult to not respect what they bring to your army.

    If you make use of the hallowed ground province speciality you can boost your warrior monks experience, and potentially other stats like morale depending on which buildings you choose. If basic warrior monks units are cake, upgraded warrior monks are cake with icing, cherries, and those little sprinkles which will cause your enemies to choke to death.

    The disadvantages.

    The disadvantages of remaining with Buddhism compared to converting are generally easy to offset. A Christian with a consolidated empire will 9 times out of 10 be making more per turn thanks to the trade bonus. Under more mixed conditions the gap should be much narrower due to the Buddhist's lower general expenditure. Provided your economy is able to bring in sufficient to pay all of your upkeep with a healthy surplus left over you have no reason to worry; good economic management is more important to solid gameplay than the boost provided by a single building.

    While it takes longer to get guns, you are not at a severe battlefield disadvantage provided you don't charge head on into the line of fire with your best units. Use the superior range of your various bow units to pick them off at a distance, or use cavalry to charge in from a flank and swiftly rout them without entering the firing angle. If you feel cruel you can use a few units of yari ashigaru as bullet shields, taking the fire while your better melee units move into position behind them. Choosing to fight in the rain can be advantageous if you lack archers and want to force the battle into melee as swiftly as possible.

    Chi research will be slower compared to a Christian clan taking full advantage of their various research bonuses. Choose your arts wisely and this will not matter. In the average campaign the difference adds up to a mere handful of technologies, nice to have but not critical to success.

    The conversion effect promulgated by Christianity can cause problems. Certain buildings spread it passively to neighbouring provinces, and so if you end up with one of these buildings bordering your lands your populace will begin to convert whether you wish it or not. Depending on how strong the conversion effect is, you may need to place a Buddhist monk or two in your province to counter the effect. You may also need to build some of the Buddhist family of building for their passive conversion bonus. The AI will send out missionaries to spread the gospels. Keep a ninja or two handy to kill them, or a metsuke to imprison them. Whatever method you choose make sure you keep on top of the situation: a small number of Christians are not a problem, a larger percentage soon impacts on your control. Allow a sufficient part of your province's population to convert and a riot is all but guaranteed unless you maintain a massive military presence.

    The one area where you will find it hard to compensate is the navy. If your rival is using Nanban trade ships you are going to need a large, expensive fleet and a good bit of skill to defeat them. The Nanban trade ship is much more powerful than anything you can build. Fortunately the AI does not use it nearly as well as a human - a human can effortlessly sink entire fleets with a single ship!

    The 'cause rebellion' mission is a powerful tool for monks and missionaries. To get the best chance at success you need to use it in a religion which does not have your religion, or which only has a small percentage of your religion. While you can use it successfully in provinces which share your religion it is a lot harder to get any success. Consider how many provinces in Japan are Buddhist if you do not take action to spread Christianity yourself. Around 98% of them in any given game. Your monk is going to have a hard time.


    Christianity.

    As you can see from the lists Christianity has a lot of penalties, some of which can be rather keen. Fortunately it has a pair of weapons which offset this, and those weapons are not the ones you would expect when glancing at the list of benefits. The missionary agent and the Nanban trade ship are both dangerous when used correctly.

    The advantages and disadvantages of Christianity are so intertwined that it is not possible to replicate the layout of the Buddhist section and keep them separate. Instead this section will be arranged by topics.

    How to convert.

    Until you officially convert to Christianity you cannot access missionaries or the Christian family of buildings so your port is the only method of adding to the percentage of your population which follows the religion. Unfortunately until you upgrade it to a Nanban quarter the port only affects the province in which it is constructed, and you are only permitted to build a single one. Cunning would-be Christians will take note that if you start to build a Nanban port and then capture a province which has a completed one, you will be allowed to keep both.

    If you intend to convert you should plan ahead and make it possible to pile on a lot of Christian conversion factors in as short a time as possible. The chi arts which unlock the Buddhist buildings also unlock the Christian ones, although the description will not say so until after you have officially converted. This means you should research some Buddhist arts before you hit the button. Researching 'Zen' will get you the basic religious building, and researching 'essence of the spirit' will get you the second level. You should not consider converting until you have access to the second level building at the very least; the level 2 building (the mission) has double the conversion bonus of the basic building. This is the difference between a quick, neat conversion and a slower, more painful one. The third level building takes a lot more research to unlock, and so it is not advisable to wait for it as you will either stunt your research by focusing too heavily in a single area, or you will have expanded far enough that converting your provinces will be very messy.

    Converting is as simple as pressing the 'change religion' button in the family screen of the clan management interface. You can only do this once per daimyo, and you need to wait until you receive a pop up message on the campaign map telling you about Christianity. As soon as you hit that button you lose access to all of your Buddhist benefits, start gaining religious unhappiness in all of your provinces, and get access to the Christian benefits.

    If you intend to convert then you will want to do so as soon as possible. To this end you should research the two chi techs mentioned above as soon as is feasible, being careful to pick up some Bushido technologies as well. You should expand far enough to make your position and income secure, but not too far. The fewer provinces you have the better your chances of keeping control. It is strongly advisable to prepare your provinces before hitting the button. Make sure you have empty building slots in key locations so you can throw in chapels ASAP. If you choose locations which border on your other provinces you can convert them via the spread effect of the level 2 'mission' building, meaning you save a bit on construction costs and slots. You may need to upgrade some economic province castles specifically for the purpose of housing a Christian building. You should also have some yari ashigaru units ready to hand as you will need to increase garrisons in order to keep the peace. The unrest effect does not strike at once, it grows gradually. It is possible to be lulled into a false sense of security during the early turns of the conversion only to find your provinces are on the brink of revolt a year later. Finally, money. Stockpile as much as possible, both to pay for the Christian buildings and to allow you to exempt provinces from taxes if the revolt risk grows too high to manage.

    As soon as your first Christian chapel(s) complete, recruit your missionaries. Hire as many as you are allowed. If you leave them standing idle in a province they will convert the populace but will not gain XP towards their next level. Instead you should send them on the 'minister to settlement' mission by targeting the province's castle. Then they will gain 1XP per turn, a slow but appreciable growth. Make sure you order the construction of the level 2 Christian building as soon as the level 1 version completes.

    After that it is a simple balancing act as you wait for the Christian percentage of your population to reach 100%. Keep happiness under control, try not to eat through your treasury, stay out of wars, and bide your time. Conversion is a slow process; be prepared for it to take several game years before the situation comes under control. Once your homelands are converted you can look outwards and start using those new toys ...

    Effortless naval supremacy.

    One ship. One crew. A killing force like no other. The Nanban trade ship is devastating in battle. It can take down fleets of eight vessels single-handedly. Eight warships, not eight Japanese trade ships. Proper warships like the heavy bune and Sengoku bune, not simple ships like the arrow kobaya. Surprisingly considering its efficiency, the Nanban trade ship is not that expensive. You will save a lot of koku on fleet upkeep by using these beauties. As a final bonus they have a large movement range on the campaign map, making patrolling your waters with a single ship even easier.

    If you are playing as one of the three Western clans (Shimazu, Chosokabe, Mori) then this unit is almost worth converting for, never mind the other benefits. No longer do you need to spend large amounts of your income on big fleets of ships. No longer do you need to research the more advanced ship types. No longer do you need military ports. A single Nanban quarter and a couple of Nanban trades ships working independently and you are done, practically unbeatable at sea and for a fraction of the cost, research and time investment. If you own any trade nodes - and if you are playing as any of these clans then you should own several - then a single Nanban ship provides adequate protection for your trade fleet, and also makes you money because, as the name suggests, it is a trade ship.

    How should a player use them in battle? Once you reach the battle map and try them out the answer becomes very obvious. Their cannons have massive range and are quite accurate. A single good broadside from range will make most enemy ships waver. Two or three good broadsides and most ships will rout. Cannon are excellent at sinking ships or making them surrender; a high percentage of your battles will see one or more enemy going under or joining your side after the battle. At close range the Nanban ship is quite resistant to arrows and other weapons. It has a large crew so boarding is less of a concern, and if you play half-decently you will never be boarded anyway. If the ship catches fire it is generally quite slow to burn, giving you enough time to win the battle or to pull away to begin repairs. Play hit and run, don't let the enemy encircle you, and the day is as good as won. Due to this intense reliance on manoeuvring, pairing the Nanban ship with other vessels is often counter-productive. If you capture other ships you can scupper them immediately, since you don't need them. This saves upkeep and adds a piquant "Ha! Take that!" flavour to your victories.

    Do not try to use the Nanban ship in auto-resolved battles! It is undervalued greatly, and will lose to a paltry fleet. This is the single disadvantage to the ship - you will always be required to fight your naval battles no matter how little you wish to.

    Mr Missionary says ...

    The missionary will be covered in detail in the agent section of the guide. For now it is enough to note that he is the second of Christianity's two powerful weapons, and that no Christian campaign will succeed without heavy usage of them.

    Power? What power? Remember in the Buddhist section I observed that the 'cause rebellion' mission has a higher chance of success in provinces which do not share the agents religion? And that I noted that the vast majority of Japan is Buddhist? There - that's the power. If you pick your targets a missionary will have an easier time sparking revolts in AI provinces. If you select under-defended targets then the rebels are more likely to seize control, losing the rival clan land and the resources which go along with it.

    You will also want to use missionaries to convert your own provinces after you make the religious switchover, and to convert provinces you conquer either before or after your army goes in. Raising the proportion of Christian subjects in a province held by a rival clan subjects them to the same unrest penalty you face when you conquer a predominantly Buddhist province. You can send your missionaries deep into enemy territory converting away, far ahead of your army. This is a double-edged sword. On the one hand it gives the AI problems and forces it to waste resources maintaining control. On the other it means you face bigger garrisons when you finally do invade. Sometimes it is a powerful strategy, others not. Assess your situation and use it accordingly.

    Guns.

    Many new players think that early access to guns is the main reason to convert to Christianity. That is because they expect the primitive matchlocks to behave in a similar manner to the more advanced weapons used during Napoleonic warfare. These players are invariably disappointed. Teppo are not a miracle weapon, and do not rate as one of Christianity's best benefits. They are a nice advantage if you are prepared to put in the time and effort required to learn to use them, and a liability if you field them without the knowledge.

    At the point where a Christian clan gains access to imported matchlock guns they are a real novelty. Chances are that no one else in Japan will have access to them, or only a couple of minor clans if the situation on Kyushu is unsettled. What does this mean for the Christian daimyo? It means you have access to a fiddly, troublesome weapon that costs as much as a samurai unit and takes multiple turns to recruit; a weapon which causes massive morale shocks, slaughters targets with no care for how much armour they are wearing, and which cannot be matched by your enemy.

    The unit section of the guide goes into detail about how to get the best from your teppo units. For now, consider that the addition of a couple of them to your armies, combined with careful battlefield usage, can deliver a shattering blow to enemies on the field. Combine them with your missionary's 'demoralise' mission and you can cause an enemy to flee shortly after they contact your main battle line. They are also very potent when used to defend castles, and so make a great addition to any position where you intend to use a castle as a bulwark to break an enemy army. The Buddhist disadvantage section gives an overview of the main ways to defeat guns in battle; read it and be wary of those factors on the field.

    Research - the key to chi.

    If you follow the line of skills which give a bonus to chi research a single missionary can give you a 21% chi research bonus. It is more than worthwhile to have one or two missionaries skilled purely for research. The highest level of Christian building, the cathedral, gives a 25% bonus to chi research. The third rank building, the church, gives a 15% bonus, the second level building a 10% bonus, and the basic chapel a 5% bonus. You will be constructing religious buildings in many provinces for the conversion effect. That adds up to a lot of bonuses! It will give you several extra chi technologies in an average game, provided you actively get these buildings and skills into place early on.

    Economy.

    It is hard to assess how much of a boost you get from the extra trade route in the Nanban quarter. It will not be massive as that would unbalance the game. It does appear to be appreciable, and in a game with such a tight economy any extra money is well worth having. When your empire hits its stride and your populace is content, money will roll in.

    On the downside everyday life can be more expensive. You will need to pay for larger garrisons while converting freshly conquered provinces. It's definitely best to send your missionaries in ahead in order to reduce the unhappiness when you do take over. If you are building religious buildings in most provinces in order to take advantage of the conversion and chi bonuses, well you are building and that costs money! You will likely be upgrading your castles one level higher than a Buddhist player in order to fit in that religious building without reducing your other capacities. This means you have the added cost of the castle upgrade to factor in to the cost, and the reduction in ride surplus.

    Diplomacy is harder with the religion penalty, and the best way to off-set this is to throw money at other clans. Want them to like you? Throw them 5,000 koku and benefit from a +75 relations boost. Want a specific deal like a trade agreement? Throw in several thousand koku and they are more likely to listen. Effective; expensive.

    The Christian family of buildings.

    Generally speaking, if you have chosen to convert it is strongly advisable to research the arts which allow you to build the entire family of Christian buildings. The more advanced structures greatly increase your neighbouring conversion effect, meaning that your borders can roll out a conversion affect ahead of your armies. That saves time for your missionaries, and frees them up to perform other missions. As already mentioned, the Christian family of buildings gives a significant bonus to chi research. This means that the building maintains a useful function once conversion is complete.


    Frogbeastegg's Guide to Total War: Shogun II. Please note that the guide is not up-to-date for the latest patch.

    Members thankful for this post (4):


  6. #6

    Default Re: Frogbeastegg's Guide to Total War: Shogun II

    Diplomacy.


    Shogun II is the first game in the series where diplomacy is an essential tool if you wish to survive, particularly on the higher difficulties. From trade agreements to alliances, it buoys up your peacetime efforts. From declarations of war to vassalage, it permits your war effort. A smart player will ensure that the full diplomatic toolkit is deployed to support every possible aspect of their game. The player who neglects that toolkit will find that all of Japan is out to destroy them, and that their clan is less able to resist than it might otherwise have been. Diplomacy remains valid throughout the game provided you maintain some effort - if you allow the situation to slide so badly that everyone hates you it can be very difficult to recover. Even in the dramatic, hate-fuelled days of the realm divide, diplomacy has a role to play and should be utilised to the maximum.

    Diplomacy in Shogun II is pretty logical. There are only a few aspects which are perhaps not obvious, yet once they are explained they too make sense. The AI's reaction to your overtures is usually understandable, and your likelihood of success is clearly indicated before you extend your offer. Ask yourself what your response to the offer you are forming would be, and let that be your guide. If you were militarily strong and someone asked you for a peace treaty because they had taken a single province from you, you would refuse. The AI will also. If you were beaten down and barely hanging on, then you would accept and the AI will also. If a rich and powerful clan requested a trade agreement which would gain them thousands and you mere hundreds, chances are you would refuse. As will the AI.

    Diplomacy begins with attitude: how does a clan feel about you? It is then influenced by the AI clan's personality and status. Next comes the offer, the value of which is assessed through the lenses of those two concepts. At this point a response will be given. If the AI accepts the deal then attitude, personality and status once again come into play to determine how well the AI keeps its side of the bargain. To understand diplomacy you must understand each of these concepts. Let's go through them one by one.

    Attitude.

    This image shows a pretty typical relationship from the middle of a campaign. These are the cogs which drive attitude, the first pillar of diplomacy. Clans can hold four major attitudes towards you. Friendly, indifferent, hostile, open warfare. There are gradients of these attitudes, such as very friendly as well as friendly, but overall that's a fine detail rather than a separate state. The attitude is determined by the sum total of the positive and negative influence factors. 0 is indifference, a positive number is friendly, and a negative number is hostile. The larger the number, the stronger the attitude. A +170 very friendly clan is happier with you than a +70 one. Hatred can run deeper than friendships: a relationship can sank past -450, but never rise above +200. Certain factors will change over time, always heading towards a neutral 0; positive factors will decrease and negative ones increase. If a factor is changing then a - or + will be displayed in brackets after the number. Other factors do not change over time, and will remain constant. To discover what factors are influencing your relationship with a clan, simply open up the diplomacy screen and hover your cursor over the clan's name in the list. A little black pop up will appear, exactly like the one in the picture. In the early game only a few influences will be at work. In the late phases of a long campaign there will be a great number of them, double the number in the picture and maybe more. As you may gather from the implication of that, there are a large set of variables which will influence your relationship with a clan. Most are straightforward and make sense at a glance, a few benefit from some explanation. The key to understanding is simple: the relationship history shows the story from both clan's sides, not just the AI's. This means that actions taken by the AI against you can cause a penalty in your relationship with that clan. I have included a quote from a CA developer, Enigma, below, as he provided an excellent explanation of how this works.


    Quote Originally Posted by Enigma, CA
    There has been a lot of discussion in the past few weeks about the "Dishonouring Treaties" diplomacy effect, with many players believing that this feature is bugged. Shogun 2 differs from Empire and Napoleon in showing a symmetric relationship between clans, rather than one clans opinion of another clan. The consequence of this is that dishonourable actions by either party will show up in the relationship between those two clans.

    If the "Dishonouring Treaties" factor appears in your relationship with another clan it is not that the player is being blamed for dishonouring treaties, but that the relationship between the two clans has degraded, because one or other of them has dishonoured a treaty.

    But what does it mean to dishonour a treaty? If you declare war on a clan whilst, or shortly after having certain treaties with them then you will be considered to have dishonoured that treaty. For example, if you sign a peace treaty and then a year later declare war again you will be hit with the "Dishonouring Treaties" diplomacy effect with all clans. This only applies if you are the instigator of a war, joining an ally will never incur a penalty.
    Personality and status.

    A clan's personality, strength and wealth will also influence its attitude towards you. Personality is, again, logical in how it impacts the game. You can find this information on the diplomacy screen. Click on a clan to select it and the information will appear in the top right hand corner. As you will undoubtedly have noticed, a sample picture of this information is displayed to the left. This picture tells us that the Imagawa are not to be taken on lightly, that they want the player to be crushed, and that they will keep any agreements they make for a reasonable time period. How do we know this? Let's start from the top. The name of the daimyo doesn't matter much, though it can be handy for identification purposes if you are looking to send an agent after the fellow on the campaign map. Power refers to the military might of the clan, i.e. how big is their army? There are various levels, with terrifying being the highest. You must remember that this term is relative. Most clans are rated at low power levels in the opening phases of the game, but that doesn't mean that they will be a walk over! Their 'pathetic' 1 stack army is far from puny when you likewise only have a single stack. Next comes prosperity, and again the ratings are self-explanatory. This appears to refer to a combination of treasury and per turn profit, although it's hard to be sure as a large profit tends to mean a large treasury. This is useful for gauging the kind of resources the clan will throw behind a war. Rich clans can support larger and more advanced armies, and can recruit new units faster. It's also very handy when you are looking to gain money from a clan - there's no point in starting talks when your enemy's treasury consists of three grains of rice and a broken chopstick. Attitude is the one word description which sums up your relationship, and is determined as discussed in the section above. Clans rated indifferent or lower are more likely to refuse your overtures, and to declare war. A hostile clan will definitely come after you if it sees opportunity. Temperament is the first aspect of personality, and determines how the clan will behave on the campaign map. Ambitious clans like the Imagawa will expand, peaceful clans are quite happy to stay within their starting lands, and so on. Integrity is the second element of a clan's personality. Clans with high integrity will honour their bargains, whereas clans with low integrity tend to break them as soon as it becomes convenient.

    All of these factors combine. An ambitious, powerful clan which has low integrity and hates you is highly likely to declare war on you as soon as it deems it convenient, breaking all treaties you have with them in the process. Am ambitious, low integrity clan which is very friendly will be a little more reliable, however. Peaceful, honourable clans are very reliable in keeping treaties provided you do not let relations deteriorate into hostility. They will tend to stand with you even if they are feeling apathetic, but you should not rely on them to honour a military alliance's call to war. As a clan's personality is fixed, the relationship is the main area where you can apply leverage to make a clan see things your way. Most of the time you will be seeking to increase the positive factors of the relationship, either to maintain a friendship or to avoid hostility and the war which tends to come with it.

    Before we start breaking down the diplomatic actions, there are some useful bits of information on the main diplomacy screen which deserve a mention. If you click on a clan the map in the top middle changes to reflect how everyone feels about them. Red for hostility, green for friendliness. It's a handy at a glance summary of how isolated a clan is - or isn't. You can also see allies, vassals, enemies, and trade agreements listed on the middle left of the screen. Be wary of declaring war on clans with many allies, especially popular clans as the likelihood of an ally joining in a war depends heavily on how much they like their partner. You should also check to see if you share allies with a potential enemy, as in the event of war the ally will have to choose which side to join. You could find yourself dumped like a bad date with your erstwhile ally joining the party coming to kill you; a miscalculation like this can be enough to see you crushed. Vassals will join their overlord's wars unless they rebel.

    At the bottom left of the diplomacy screen you can see a collection of icons representing all of the trade goods in the game. A grey icon means that the clan has no access to it. An icon with a green mark shows that they own a source of that good, and a red icon means that they are importing it. An identical display on the bottom right shows your own access to these goods.

    The circular icons in the middle of the bar which displays the clan's name show which religion the clan officially supports. Most will be Buddhist but it's a handy way to locate the rare Christian clans. This bar also shows whether you can trade with a clan so check it often and if you see a colourless little icon with what looks like a ship's sail on it, consider opening negotiations. You always want a maximum number of trade routes.

    Now, on to individual diplomatic tasks.

    How to make and keep friends.

    Trade agreements are a good place to start. When one has been in operation for a while you will gain a small relationship boost. Having a mutual enemy also gives a small boost, under the "enemy of my enemy is my friend" principle. A daimyo with high honour (+3 or more) will give a small boost to relations, as will the diplomatic arts calligraphy and tea ceremony. Sharing a religion gives a small boost.

    Gifts are the bread and butter of friendship. A gift of 5,000 koku will raise relations by +75 points the first time you do it. Smaller gifts give smaller boosts, and larger ones give a bit more. Be aware that there is a limit to the love that can be inspired by gifts. It seems that a total of +85 is the maximum, and once you reach that point any gifts given will have no effect. The boost will gradually decline, and you can use smaller boosts to top it back up again. 5,000 koku sounds like a lot. By the time you are entering the mid-game, provided your economy has been sensibly tended and you have a few trade routes going, it is not. It hurts a bit, yes, and may prevent you from doing something else that turn. If it prevents a war you are not ready for, or keeps alive a vital alliance, or maintains a particularly lucrative trade route, then it is cheap. Be generous: pay the clans you need to keep at your side whenever the relationship dips too low.

    Marriage is the strongest tool in your arsenal for tying a clan to your side. It is the most limited also, and you will only have the chance to deploy it a handful of times in an average campaign. Both you and the target clan need an eligible child: one who is of adult age and is single. One male and one female is required, obviously, though it does not matter which belongs to which clan. Remarriage is not possible in the event of a spouse's death. Marriage will immediately take you up to the +200 relationship cap, and the decay from that point is very slow. A single marriage can keep a clan happy for decades of game time, provided you do nothing to upset them.

    Hostages taken from an AI clan force a kind of temporary, false happiness as the clan does not want you to execute their child. Giving a hostage of your own has a similar effect, but not as reliable as they are the ones holding the sword.

    There are other minor factors but these are the main ones.

    Keeping friends is as much about not annoying people as it is about pleasing them.

    Stop being so annoying!

    What annoys clans in Shogun II? Quite a lot - they are a tetchy bunch.

    War. Clans hate you if you are at war with them, and the penalty is massive. They hate you if you are at war with an ally of theirs even if they themselves have not joined the fight. They hate you for expanding your territory. If you make them a vassal then they hate you for "past grievances" even if you never met them before and resurrected them from the grave where another clan buried them.

    Agents. If you use an agent against them and they fail in their mission, that causes hate. Certain successful agent missions, such as causing rebellions, still cause hate.

    Religion. If you are of a different religion then there's a good dose of hate coming your way.

    Breaking treaties. It doesn't matter which of you broke the treaty, if there was one in the past and it broke then resentment lingers.

    Dishonour. If your daimyo's honour is below 2 then you are held in contempt. The lower it is, the worse it gets.

    Realm divide. Lots of ever-increasing hate.

    Threats. The AI can threaten you, and you can threaten it. It's quite a large penalty.

    There are probably others. By the end of a campaign the list of reasons why people want you dead is very long.

    We have a hostage situation here!

    Hostages guarantee a clan's adherence to a pact with their lives. If the treaty is broken before the designated time then they die, simple as that. A hostage is always given for 8 turns, no more and no less. At the end of that time he will be released back to his clan. Any male who is older than 5 years old and who is not a general is eligible to become a hostage. If you marry most of your menfolk off, either by diplomatic arrangement or by random event, the offspring will give you a decent pool to select hostages from.

    Most clans will abide by the agreement if they have given a hostage, although an unscrupulous clan which has been given considerable provocation by you may lash out regardless of the consequences. This means that hostage tasking is an excellent way to ensure that a vital peace agreement lasts long enough for you to recover, or for ensuring that a bothersome clan stays out of your way for a time.

    Giving a hostage is a slightly different proposition. If you hand a hostage over and the clan attacks you, the hostage still dies. For this reason you should never give a hostage to a dishonourable clan unless you are prepared to risk losing them.

    The AI values hostages highly. If you request one you had better be offering a good deal, or your opponent needs to be desperate.

    Vassalage.

    Vassalage is a polite way of saying "I own you!", and unsurprisingly the freshly created vassal tends to resent that. A vassal will give you half of their income each turn, and is locked into military alliance and military access treaties. They cannot enter alliances with other clans. If the master starts a war then the vassal is dragged in with them. A vassal cannot declare war of their own accord unless the target is also an enemy of their master, or is their master. The only way for the vassal to end this state of affairs is by rebelling.

    If you create a vassal it is smart to immediately initiate diplomacy and give them a gift to counter the resentment. Then ask for a trade treaty so that your vassal can further its contribution to your income by buying anything which you are not managing to sell to other clans. As time passes you should keep an eye on your vassal, make sure that the friendship level has not degraded too much. A happy vassal is a loyal vassal, and will stand with you in difficult times like the realm divide. Creating vassals after the realm divide is a way around the diplomatic penalty, as the negative modifier is only applied to clans which existed when the event triggered. Capturing Kyoto and reaching legendary fame both trigger the divide; any clans which missed the penalty on the event will gain it when you capture Kyoto, so don't get too comfortable.

    A vassal's territories count towards your victory province requirement. For example, if you own 10 provinces and have a vassal which owns a single province, the game considers that you have 11 provinces towards the required sum.

    Most vassals are created by capturing a province which used to be a clan capital, either as the final step in your conquest of the clan, or after the clan has been killed off by the AI. You can demand a minor clan becomes your vassal during ordinary diplomacy; the option will only appear if you are very powerful and the other clan is very weak. The likelihood of acceptance is very low.

    Military alliance and military access treaties.

    Do not think that you can be sneaky by arranging your armies in allied territory and then declare war on them so that you can swoop in to take all of their castles that same turn. When war is declared your armies are moved back to your borders. Shogun II expects you to be sporting.

    Military access is valued by the AI. It will pay you for it, meaning that it can be a reasonable source of income during the early phases of the game.

    If you declare war you cannot call your allies to your side. This option appears in defensive wars only. Sometimes it is advantageous to let relations drop and provoke the AI into starting the war.

    If you have a military alliance but not a military access treaty, you will automatically be allowed access to your ally's territory if you enter a war together. This access will be revoked as soon as the war or alliance ends.

    Tribute and gifts.

    Giving money and getting nothing in return is a gift. Giving it as part of a peace treaty demand is tribute. The AI will never refuse a gift, meaning that you can always squeak in a relationship boost no matter how badly they want your head for a ceremonial tea strainer.

    The AI tends to dislike paying tribute, and you are most likely to get it when you have badly beaten a foe. A clan must have the income or treasury to cover the tribute amount; it cannot pay money it does not have.

    Threats.

    When the AI threatens you it creates a big dip in relations. When you threaten the AI you are trying to bully it into agreeing to what you request. This only has a chance to work if you are militarily stronger than the other clan, far stronger. The target clan will resent you no matter what the outcome, and may even declare war as a counter! It is a very risky tool, and not one I recommend using unless you are trying to provoke the AI.

    How to choose your friends.

    Most of the time a temporary, fairly loose partnership is sufficient. You do not want alliances with many clans else you will end up being forced to break them when clans come into conflict. Having a trade treaty and a positive relationship score (above indifferent) is sufficient provided you do not leave tempting targets like an unguarded border.

    Lasting friendships, the ones designed to ensure that you have a buddy to guard your back in the toughest times, should be selected with the greatest of care. These are the clans you will attempt to marry into, whom you will follow into their wars and whom you hope will follow you into yours. You will pay them many thousands of koku in gifts. The first consideration is, you want someone reliable. Secondly, you want someone who will not get in your way but equally who is not so far away that they can be of no military use to you. Allying with someone who owns provinces which you are required to have in order to win is occasionally advisable, provided you are happy to wait until the very end of the game to take those provinces. Allying with someone who is in a position to block your path to further conquest is a disaster, for example the Date should not ally with an Uesgui clan which owns a chain of provinces which traps them in the northern tip of Japan. The final consideration is picking a winner. A long term ally isn't much help if he is annihilated on turn 40. Clans with peaceful personalities will not expand much if at all, so that means they tend to get gobbled up, or are left relatively weak if they do survive. Other than that it is a case of who you like the look of, and a gamble which you hope will pay off.

    How to end wars.

    If you are winning, it's reasonably easy. When the AI has lost a large proportion of its military forces and probably a province or three it is ready to talk. Exceptions are clans which really, really hate your guts, the full -450 cases. They can be found spitting in your face even as you deliver the final blow. If you do not ask for much then a deal can usually be secured. Sometimes you need to offer money or a hostage in order to get them to agree. If the amount is low and the need for peace high then the cost is well worth paying as it gives you chance to reorganise and consolidate. It can be a sound idea to throw a trade treaty request in with the peace treaty; it does not cost much in negotiating stakes, and a resentful clan is likely to refuse a trade offer made after the peace is signed.

    If you are losing or about even then it is tougher. The AI will not agree to peace unless it feels it needs it, so even large offers of tribute combined with hostages and other attractive items may not be sufficient.

    If a formerly friendly clan has followed an ally into a war against you then it can be possible to pay them off and get a peace treaty right at the very start of the war, no military action required. Offer them a large payment and maybe a hostage and see if the predicted outcome is 'moderate' or better. If so, try it. You may be successful, or the clan may present a counter offer. Sometimes it is better to pay a large amount of koku and avoid battles on multiple fronts. A clan bought off in this way can be won back over to friendship in the future.

    If a war has dragged on for years without any military action taking place the AI may come to you and present a peace treaty. It will usually request that you pay it tribute. You can refuse, or you can take the opportunity to end a pointless war. On these occasions the AI will almost always refuse to agree if you present a similar peace request yourself because it does not see itself as threatened.

    Other tools.

    You can demand a clan breaks it's alliance with a third party. This is a useful way to break up threatening enemy blocks, or to isolate a target before you declare war. Clans tend to be resistant to this, and it seems to be most successful when paired with a big fat bribe as you try to buy them out of a war which their ally dragged them into.

    You can set up a trade embargo with a third party. This means that the clan agreeing to the embargo will not trade with the named clan. To be honest it is a little pointless as there are many potential trade partners available for the AI clans, right up to the end of the game.

    Join war allows you to enter a war which your ally is fighting.

    Frogbeastegg's Guide to Total War: Shogun II. Please note that the guide is not up-to-date for the latest patch.

    Members thankful for this post (4):


  7. #7

    Default Re: Frogbeastegg's Guide to Total War: Shogun II

    Research: Discovering the Arts


    A note on terminology for this section: 'art' and 'technology' are used interchangeably. They mean the same thing. 'Tree' or 'technology tree' refers to the interlinking web of arts. A 'tier' is a horizontal row of arts all on the same level of the tree, a bit like a shelf they all rest on. You can see them defined by faint lines drawn on the background of the tree.

    Research in Shogun II comes in two flavours: bushido and chi. Bushido is all about the military, it's access to new unit types, upgrades to existing ones, and campaign map bonuses which apply to your armies or navies. Chi is the civilian side, generally termed the economic side as most of its arts provide or save money in some way. You may only research a single art at a time, so you must attempt to balance your efforts between the two trees in order to ensure you have what you need, when you need it. The order you do things in will be subtly different in each game you play, as you aim to fit your technology to the situation on the campaign map. In one game you may be hard pressed militarily, and need to get the early bushido army boosts before looking at the chi section. In another game life may be more peaceful, enabling an earlier economic growth.

    It is impossible to research every single art in a single game of Shogun II. This is purposeful; the developers wished to force you to make choices. When you cannot have everything, what do you consider to be important for your current game? That is the question you must ask yourself right at the very beginning. To that end, let's take a look at the two trees.

    Research strategies: Bushido.


    Colour key, from left to right:
    Purple = spears
    Brown = guns
    Blue = navy
    Green = archery
    Red = swords
    No dot = neutral, not part of a line

    Note that with bushido it is far more advantageous to go deep into a line and return later on to pick up early arts in a different line. This is because of the 'master' buildings, the highest level of dojo in each building family. The first clan to construct a master building gets a permanent bonus! Practically, it is also useful to have access to faster samurai recruitment times and higher starting experience (XP) values on a single unit category rather than having a selection of lightly boosted units in all categories. Better to spend 7 turns researching something very helpful than 5 on something reasonably helpful.

    The first decision you need to make is between swords and spears. Due to the large number of 'no line' arts required to unlock the sword and spear arts, it is not really possible to excel at both. You can excel in one and pick up some basics in the other, or you can be mediocre at both. Mediocrity in both may not be too bad if you intend to bulk up on archery. Most of the time, excelling in one is advisable. Whichever you choose, that unit type should form the backbone of your armies. You will still use troops from the other category but they will not be the powerful force that the researched type is. Your choice should be influenced by secondary considerations. Choosing the neutral technologies which unlock sword arts makes picking up archery technologies easy. Choosing spears provides faster access to guns.

    Once you have chosen your main weapon path, the navy tree is a good place to go next. Do you intend to use a lot of ships in your campaign? If not, ignore it totally or only pick up the very first art for the campaign movement boost it provides. Now you have ruled out an entire line of the tree! If you do intend to use a lot of ships, ask yourself whether you need your navies to be stronger at the expense of your land armies. If the answer is no, you should definitely pick up the first art and then you can ignore the rest of the line. If the answer is yes then you will pursue this line to the end.

    In the later half of the campaign you can attempt to mix your lines a little, for example going swords, archery, guns. You do this by researching the neutral path which unlocks the second side of the tree, and then picking up the relevant related line. It is important to only pick one line when doing this, else you will then end up being mediocre in 4 lines instead of strong in two and quite good in a third. If you decide to do this it is very much worth your time to complete both neutral lines and research the ultimate bushido art at the bottom of the tree.

    The neutral technologies are lower priority than the ones belonging to the lines you have chosen because the bonuses they provide range from nice to not really important. Obviously you must research them at some point, but that does not mean you need to grab them as soon as they are unlocked. The arts belonging to your primary line (swords or spears) should be researched straight after they become available. If you are fond of your secondary line (archery, guns) then arts belonging to that category should be picked up relatively quickly, but not prioritised over the primary line or a particularly juicy chi art. The neutral technologies belong in the gaps where you have nothing more important to research. That means that it is every fourth item of research (e.g. sword, archery, chi, neutral, repeat) at the very best, and probably far less than that as chi requires more dedication if you do not wish to hobble your clan's economic side.

    That is the long term plan. In the short term, you want to get all three of the foundational neutral arts before too long: bushido, strategy of attack, strategy of defence. This is because they provide a solid bonus for your armies in the early game. A simple +1 to attack or defence may not seem like much, but when you consider how flimsy the ashigaru units are it becomes more appreciable. That +1 can mean the difference between victory and defeat, between winning clearly and winning with a lot of casualties. Once you have all three, you can start to head down your line of choice on your next item of bushido research.


    Research strategies: Chi.


    Colour key, from left to right:
    Red = religion
    Blue = diplomacy
    Brown = happiness
    Black = ninja
    Purple = metsuke
    Orange = markets
    Green = farms
    No dot = neutral, not part of a line

    The chi tree is more messy than the bushido one. There are more short lines, and parts of some lines end up crossing over others so that you are required to deviate from that line in order to complete it. The good news is that it is still possible to select parts and follow them deep into the advanced parts of the tree. Again, you do this by ignoring entire sections.

    The green dots mark the arts which unlock the more advanced farm types. These are essentially a requirement for every player in every game, and if you do not plan to pick them up you had better have a very good excuse! Getting this line means collecting the first market art; the basic market building is actually unlocked with the foundational art, 'chi', but I have not included it in the market line because it is not optional. Consider what was said about level 2 markets in the economy section. Oh dear, being forced to take the art which unlocks them in order to get farms is unappealing, right? Well, it's not so bad. It also gives you access to better roads, and that is handy.

    The rest of the market line is easy to ignore unless you have decided to build a kabunakama, in which case it is vital. If you do choose to research this, do it after you have completed all of the more appealing lines and when you have a significant boost to your chi research rate. In order to access this final market art you also need to get a neutral art, 'traditional building'. Traditional building is quite nice in that the bonuses will come into play around the time when castles become ludicrously expensive and slow to upgrade. It also unlocks some of the most advanced buildings, and is required for the ultimate chi technology, 'epic architecture'. Given this inter-dependency, the best thing to do is decide whether you want those buildings and the ultimate chi art, or whether you do not. If you want all or most of them, do the necessary research after the important items are finished. If you are less bothered about them, ignore all three arts.

    On the opposite side, the red dots are practically mandatory, at least to the one with the two men sat above a building (scholarship). Why? Temples or churches. If you intend to become a Christian clan, then this line is definitely vital as without it you will not be able to convert your populace! As a Buddhist this line unlocks the buildings which allow you to recruit those awesome warrior monk units. Both types of religious building give a bonus to chi research. That's desirable no matter what; time spent on this line will allow you to pick up a couple of other chi arts, on average and provided you build and upgrade around 5 of the religious buildings. The final religious art is less important, and as it requires you to research the two diplomacy line arts it should be skipped unless you want those two arts.

    The diplomacy arts are very nice to have as they make life that little bit more manageable. They are not vital however, and should be picked up during downtime when there is nothing more useful available. Perhaps save them until the latter half of your campaign, once your religious buildings are boosting your research rates. Note that the diplomacy line is a requirement for the ultimate chi art.

    The brown line is best thought of as happiness. The first technology gives loyalty to your generals, meaning they are less likely to revolt. The second gives happiness to your populace, but consumes 2 units of rice. I recommend entirely ignoring this line unless you are having severe problems managing these two aspects, and even then a better approach would be to tackle the root problems instead of wasting research on a bandage.

    The black dots are, appropriately enough, for the ninja line. This line offers two benefits: improved ninja agents, and access to the more advanced stealth family of buildings. The improved agents will either be very appealing or not at all depending on how much you use ninja. The stealth family of buildings offers a chance at an income boost, as mentioned in the economic chapter. They also provide happiness. Chances are, most of the time you will not have large numbers of stealth family buildings in your empire until the latter half of the game. That means this line is best left until later unless you are a hardcore ninja lover. You may even find that you do not need it at all, if your economy is thriving without upgrading your sake dens.

    The metsuke line is the one with the pair of purple dots. This one is very straightforward: are you using metsuke a lot in the field? If so, are you struggling to fund their missions? If the answer to both of those is yes, research the first one of these two. Otherwise ignore the line entirely. The second art is very difficult to recommend; the repression bonus you gain on the second art is simply not worth the cost of missing out on other, more useful arts, and the 10% success chance is not really necessary if you have trained your agents up to a high level.

    Every chi art you research is a boost to your clan but a setback to your army. Any lines you can cut out save research time for something more important. Thus you should think very hard before engaging in the more disposable lines: happiness, ninja, metsuke, the two later neutral technologies, and the final items in the market and religion lines.

    That does not mean that you should neglect chi in favour of bushido in the early game. Some of the most easily accessible chi arts are vital to setting up your economy in the opening phases of the game. Try to strike a balance so that you finish your chi research right around the time when you have the resources and provinces to put the new building or upgrade to use. There is little point in researching markets before you have provinces to house them, yet once you have that suitable province, the sooner the market goes in the sooner you begin to benefit. Likewise farm upgrades and temples.

    How to speed up research.

    As mentioned above, the religious buildings add a bonus to chi research. The bonus starts small but becomes quite respectable on the higher level buildings. Christian buildings have a better bonus to research than Buddhist ones. Castles will add a tiny bonus to bushido research; this does add up to a more respectable amount when you have a large empire. How many religious buildings should you construct? That is going to be a very game specific question, and the answer does not rely solely on your research desires. A Christian clan must construct many, while a Buddhist clan only needs a few in order to recruit warrior monks and Buddhist monks. Too many religious buildings can cripple your economy, as you use up building slots which could be occupied by a market or sake den. Too few and your chi research will crawl. I would recommend building at least 5 across your empire by the mid point of your campaign. That allows you to get the maximum number of religious agents, and when the buildings are upgraded by a few levels the bonus adds up into something which cuts time from the more advanced technologies.

    Certain character types can speed up your research. Generals can choose a skill which give a bonus to bushido research, and you should seriously consider doing this with at least one of them and doing so early in the game. Many players choose to collect these skills on their daimyo. The skill is 'poet', accessible when the general reaches level 2. It has three possible levels, and when fully upgraded it gives a 12% bonus. Buddhist monks and Christian missionaries can also choose skills to speed research, this time chi research. The Christian missionary's bonus is larger than that of the Buddhist monk. For the monk the relevant skills are 'spiritual', 'meditation', and 'enlightened'. All of these have a single level, and add up to a total of 15%. The missionary's skills are 'heterodoxy', and 'doctor of the church'. The first skill only has a single level whereas the latter has three levels. The total research boost is 21%. If you have the maximum number of religious agents you should definitely set at least a couple up so that they boost research, and then add other skills in a supporting role. If you are not using the agents aggressively you can use more of them as researchers, gaining them experience on easy missions like demoralising small armies and then spending the points on research skills.

    The bonuses are not exactly straightforward. They do not deduct that amount of time off the total, e.g. 21% off 12 turns. Instead it appears that they stack up, and once a certain percentage threshold is reached a tier of arts becomes a bit cheaper. It is not really worth worrying about which bonus levels provide what discounts: more is better so go for more wherever possible.


    Frogbeastegg's Guide to Total War: Shogun II. Please note that the guide is not up-to-date for the latest patch.

    Members thankful for this post (3):


  8. #8

    Default Re: Frogbeastegg's Guide to Total War: Shogun II

    Agents.


    This section is intended to give an overview of each agent's capabilities and how best to use them. It will not discuss using skill point distribution to sculpt the agent towards a specific line of work, as a quick glance at the skills' tool tips will reveal which ones benefit each job role. However, it is worth noting that agents will not receive sufficient skill points to buy every ability, which means that specialisation is important. The limit of 5 agents per type allows you to build specialists and still have recruitment capacity left over. Skill points do not need to be used immediately, so saving points in order to buy the skills which open up at higher levels is often worthwhile, depending on your job goal.

    Monks (or missionaries if Christian), ninja and metsuke are the core triad, the agents you will use most often. Geisha sit on the periphery, sipping green tea and aloof from the scrum. Generals, while classed as characters by the game, do not really belong in this chapter as their role is so different. They are best considered as part and parcel of your military. The three core agents operate on a rock-paper-scissors basis, which is to say that each type is strong against one agent variety and weak against another. Monks are strong against metsuke and weak against ninja. Ninja are weak against metsuke and strong against monks. Metsuke, as you have no doubt gathered, are strong against ninja and weak against monks. Unlike rock-paper-scissors, strength and weakness is not absolute. It is a slightly improved chance of success when faced with the correct target type, no more.

    When an agent undertakes a mission there are three possible outcomes: success, failure, and critical failure. Critical failure results in the agent's execution. Certain missions have a fourth possibility: critical success. This is best demonstrated by the assassinate mission. Success results in the ninja wounding their target, leaving them incapacitated for several turns. Critical success results in the target being killed. Overall, critical success is nice but should not be worried about as any variety of success is worthwhile. Critical failure, on the other hand, is something you wish to minimise - it is a complete loss of all resources and training put into the agent, and with nothing to gain from it. Taking skills and retainers which increase escape chance in the event of a failed mission will reduce the chance of a critical failure; it is usually worth taking at least one skill or retainer to boost this.

    An agent's level will increase their chance of success at any given task. Each level is represented by a star, and each star represents a point of skill towards a particular job. Thus, a level 4 agent will have a base skill level of 4 in all possible jobs. Skills and retainers gained by levelling an agent up will add additional stars to a specific job. So if a ninja is level 4 and has skills which grant 2 points towards the sabotage ability, he will have a total of 6 points in that area. Buildings which allow you to recruit agents at level 2 or higher are valuable - agents recruited from them have a better chance of succeeding fresh from school due to the improved basic chance and the ability to select some bonuses immediately. Success is further influenced by a variety of factors: the presence and level of an enemy agent, the level of the target character, skills possessed by the target or nearby agents, the presence and size of a garrison, certain arts, and more. Once all of the factors have been processed by the game, the end result will be displayed as a percentage chance of success. You will be able to see this before commissioning the mission, so check the details carefully before committing. If the chance of success is too low you will not be allowed to attempt the mission.

    The type of mission strongly influences your agent's chance of success. It is harder to convert an entire province than it is to demoralise an army, for example. Generally speaking, a level 1 agent should not attempt the more advanced mission types as their chances of succeeding are low in all but the most careless security cases.

    Missions cost money; the cost varies wildly depending on what you are attempting. Bribing large armies costs an awful lot more than burning down a hut. You will pay the price upfront, and regardless of whether the mission is a success. You can see the success chance of a mission at any point, provided your agent has moves remaining and the target is visible on the campaign map. You do not need to send your monk hiking across three provinces in order to discover that he only has an 11% chance of success.

    When an agent has attempted a mission they cannot do anything else for that turn. This means that they are stuck in place on the campaign map (assuming that they survived their mission) until the next turn, regardless of how many movement points they had remaining. If you intend to do a bit of scouting and a mission in the same turn, scout first and then return to tackle your target.

    In addition to clear skills like assassinate, bribe or convert, each agent possesses smaller, less obvious skills. Each of the core agent types grants a different bonus when attached to an army. A ninja will increase the army's field of view on the campaign map, give an improved chance to detect hidden units, and slightly increase movement range. A monk or missionary will boost the morale of all units in the army during battle, a particularly invaluable skill when using units like the ashigaru. A metsuke will reduce the chance of success for an enemy agent targeting the army. Similarly, a bonus is granted when the agent is stationed inside a friendly castle. This takes the form of a cost-free mission. You must assign the mission in order to receive the bonus, except in the case of the monk/missionary's religious conversion effect. Each agent will increase public order slightly, making it easier to keep the province happy. Ninja will establish spy networks, decreasing the chance of rebellion and allowing the province to see a bit further across their border into enemy territory. Metsuke increase tax revenue and make it harder for enemy agents to operate against the castle's buildings and inhabitants. Monks convert the population to their religion, and inspire loyalty, making it more difficult for enemy agents to bribe. Geisha do not grant a bonus to armies or to towns.

    Training agents is simple. Each mission grants XP (experience points) whether it is successful or not; successful missions give much more XP than failed ones. XP remains standard; it does not decrease as the agent becomes more experienced, or if it is repeated every single turn, or even if the target is very easy. Why risk the life of your new ninja by targeting a big, heavily guarded castle with a sabotage attempt when you get the same XP from burning down a hut in an virtually empty, low-level province? Simple, easy missions with high chances of success are the best way to train an agent. Once the agent has gained a level or two they will be better equipped to deal with tougher targets, whether that means better guarded ones or jobs which have lower chances of success. Undertaking the free friendly town-related missions (e.g. establish spy network) will grant 1XP per turn after the first turn. A successful or critically successful mission will give 15XP. A failed mission will still give 3XP, so it is worth trying the occasional uncertain mission provided you expect your agent to survive.

    That is pretty much everything you need to know for a general overview of agents and how they work in the game. Now let's look at the specific types.

    The ninja.


    Ninja have the best field of vision on the campaign map. They can see a very long way, and have a chance to detect hidden enemy armies or stealthy agents. Note that was chance to detect, not will detect! Unlike prior games in the series, spying is no longer infallible.

    Ninja like sabotage. Sabotaged buildings cease working until their owner pays for their repair. Repairs usually take a few turns. Sabotaging buildings is most useful when you take out a building which in some way acts as a support pillar, for example a happiness/public order building in an area with high unrest, or a dojo which allows recruitment of particularly dangerous units. Sabotaging farms and other economic buildings can set back the enemy's economy, although you need some dedication to cause a clearly noticeable effect. Causing a shortfall which results in the AI being unable to recruit a single unit is a mostly invisible benefit, as you will not be aware that recruitment has been prevented. Causing economic devastation which prevents the AI from recruiting many units and upgrading its provinces, now that is easy to spot! Thus, take down many economic buildings in many provinces in a short period of time, and keep on targeting them as soon as they are repaired. Otherwise, it's seldom worth the money and opportunity cost.

    Sabotaged armies are unable to move for a single turn. They cannot support friendly armies in battle. This makes it an excellent tool for isolating and individually purging multiple armies without having to fight a massive, multiple phase battle. If you only have one army in the area and the enemy has two or more, sabotaging one of those armies may well mean the difference between victory and defeat. Strategically, sabotaging an army can buy time. A single extra turn before you have to fight that army may be sufficient for you to bring up reinforcements, or to recruit that new unit, or purchase peace via diplomacy, or ...

    Sabotaging castle gates is considered to be a separate variety of sabotage. If successful, the castle's gates will all be wide open on the battle map when your army turns up. This can be a mixed benefit. Depending on the castle type and the defending garrison, it may well be that the gates are as well defended as the walls. In which case your men will have to battle their way through a nasty bottleneck, unable to bring their numbers to bear until the defending units have been driven back. This can be very bloody. Against larger castles or smaller garrisons, it should be possible for you to get at least a few units in through an unguarded gate, at which point you can lay into the defenders on equal footing, allowing the rest of your army to fight their way in with fewer casualties.

    Assassination can be considered a cleaning tool. Enemy agents in your territory? Clean them up with a ninja. Enemy units active in a province you intend to attack? Clean them up. Enemy general with scary skills leading the next army you face? Clean him up. Even if the ninja gets a success instead of a critical success, assassination will clean away the stain of that character for 1-3 turns as the injured character is removed from action until healed. Once healed, the enemy agent will reappear in the clan's capital, potentially moving him a long way from the area you are operating in.

    The monk/missionary.


    Although their skills are different, the monk and the missionary function in a very similar fashion and have the same missions. The differences come down to things like increased/decreased bonuses to chi research, or the ease/difficulty of sparking rebellions due to religious spread. These aspects have already been discussed at length in the religion chapter.

    The monk has a very small line of sight and is not apt to spot anything which makes a token attempt to hide. He's a poor scout. A poor scout is better than no scout; if you run him along the roads you will at least pick up information about where the castles are within provinces, and how well they are garrisoned.

    The monk's flagship ability is 'provoke rebellion'. This was discussed during the religion chapter. To recap, it works best in provinces which are lightly garrisoned and which have a low percentage of the population following your religion. This means Christian clans have an easier time than Buddhist ones.

    Likewise, the monk's population conversion abilities have already been discussed. Character conversion, however, has not. This mission is essentially the ninja's 'assassinate' by another name. If successful the target character will have to take time out to consider life, the universe and everything. Critical success leads to the character quitting his day job and running away to ... meditate on a mountain or something; he is removed from the game.

    The monk's most widely useful ability is the most modest of the set: demoralisation. Target an enemy army with it, and success will leave that army prone to routing during battle in that turn. It generally has a high chance of success, and is cheap to fund. Taking out nasty armies is that little bit easier when demoralise has been successfully applied. It couples well with the ninja's 'sabotage army' skill; a scared, immobile army is clay waiting for you to shape it on the campaign map.

    The metsuke.


    The metsuke is a fairly average scout in that he can see a reasonable distance but not as far as a ninja, and he has a chance to spot hidden agents and armies. He has quite a large passive bonus to detect enemy ninja, so the best way to secure a province against subterfuge is to station a metsuke there.

    The metsuke's most useful ability is actually his free town-based mission. In a game where money is tight, increasing your tax income is an attractive option. Most, if not all, of your metsuke should be assigned to this task. Levelling them up to rank 2 provides access to skills which increase the effectiveness of overseeing towns; this is good because it boosts the tax bonus quite nicely. The next set of tax boosting skills are available at level 4. It is not a good idea to level your tax metsuke up in order to gain them as the process is so time consuming it will result in a net tax loss compared to sitting in a town at level 2.

    Aside from that ability, the metsuke's main applications are bribery and disposing of enemy agents. Bribery is simple; you send your metsuke over to talk to the army or character you wish to bribe, and he offers them a sum of money. The larger the army or higher level the enemy target, the more it will cost you. If the attempt is successful then the enemy agent disappears from the map, or the army joins you. Some of the enemy troops in a bribed army may decline to join your clan, in which case they will disappear from the game.

    Disposing of enemy agents works in the same fashion as 'assassinate' and 'convert', except the metsuke arrests the target when successful. Success means that the target is imprisoned for a few turns before being returned to its home clan. Critical success results in the target being executed as a criminal. Remember: metsuke are particularly good at disposing of enemy ninja. A clean, ninja-free house is a happy house.

    The geisha.


    The geisha is a special lady. Refined and exclusive, she demands a high level of dedication to subterfuge before she will consider taking up your cause. It's very possible you will play entire campaigns without recruiting one - the building and research requirements are quite stiff. You must research the art 'Ninjutsu mastery', and construct an 'Infamous Mizu Shobai District' before you get the option to start recruiting.
    Once you are sufficiently advanced to recruit a geisha, you may be disappointed. Her skills are a trifle limited compared to the rough-and-tumble ninja. She will not sabotage - honestly, if you were wearing a kimono, would you play around with fire? No, you would not. Those trailing sleeves are quite the hazard, not to mention the risk of stains on that expensive silk! Nor will she accompany your army (it's just not civilised!) or mingle with the townsfolk (too smelly) if you place her inside one of your castles.

    What the geisha will do is kill people in a variety of charming ways. She is an assassin extraordinaire, better than any ninja. She starts with the highest level of subterfuge skill as soon as she is recruited; ninja have to reach maximum rank in order to get the same. Many of her skills are tailored towards killing, making her more capable than a maximum rank ninja trained in assassination skills.

    When not engaged in the gentle art of murder, a geisha can spy passively. This means that she has a good range of view on the campaign map, and can sometimes spot concealed armies or hidden agents. If she is headed into a busy enough area on the map, the geisha can spot further targets to visit after she disposes of the one which brought her out there.

    Because she is not part of the core trinity, the geisha is neither weak nor strong against the other agent types. This is a minor advantage, as she is less likely to be picked off by some ill-mannered ruffian on her journey about the campaign map. It also means that she operates at full effectiveness against all possible targets. Although a goddess, the geisha is not invulnerable; high level agents can sometimes successfully use their neutralising abilities (assassinate, convert, bribe) against geisha, and other geisha have no qualms about eliminating a rival.

    When you want to send a special message, nothing says "Die, die, die!! Just DIE!!" better than a geisha. Death wears a gorgeous kimono.


    Frogbeastegg's Guide to Total War: Shogun II. Please note that the guide is not up-to-date for the latest patch.

    Members thankful for this post (3):


  9. #9

    Default Re: Frogbeastegg's Guide to Total War: Shogun II

    Survival of the fittest: the realm divide


    For many new players, the realm divide is a scary big event lurking off in the future. They have heard enough to worry about it, and not enough to feel confident they know how to cope. While this element of uncertainty adds a certain flavour to the player's first campaign, understanding what the realm divide entails does not spoil future campaigns. To the contrary, knowing precisely what is going to happen adds new layers to the game. If handled badly the realm divide will spell the ignominious end of an otherwise successful campaign. Do well and you will emerge on the other side as Shogun, victorious.

    What is realm divide?

    The realm divide is an event which triggers once your clan has met a certain fame threshold. The Shogun realises that you have become a powerful force and orders the other lords to destroy you.

    The event will trigger at a predictable time once you know what to look for. Certain actions are assigned fame points; once your score passes a set threshold realm divide begins. Each province conquered adds points, and this will be the main source of your realm divide trigger. Most players seem to get between 14 and 18 provinces before the event triggers. Creating a vassal will add fame points. Each heroic victory adds a few points. If you are fortunate enough to research and construct a legendary building, that too will add some fame. Difficulty level and campaign length may have some small influence on the threshold.

    There is a second way to trigger realm divide and that is capturing the capital, Kyoto. If you play as a clan which starts out in central Japan don't allow yourself to be tempted into taking the capital too early!

    Once the realm divide is in effect it is there for the remainder of your game. You cannot get rid of it.

    The AI will not be targeted by the realm divide event. It can expand as much as it likes, conquer Kyoto, and generally become a fearsome force without the Shogun declaring his ire. This is one of the few areas of the game where the AI is not treated the same as the player.

    When realm divide triggers a diplomatic penalty is applied, and it will grow with every passing turn up to a massive -200 relations with every clan. It is possible for you to keep some allies if you work hard at it; you will need to actively court their favour, sending them gifts of money in order to buy friendship. Most clans will declare war on you sooner or later. Vassals created before the realm divide will get the diplomatic penalty, and most will eventually rebel.

    How should I prepare for realm divide?

    Firstly, keep an eye on your fame metre! If you open the clan and family screen the little yellow bar below the animated portrait of your daimyo is the fame bar. It starts out empty. Once full, boom! When the metre is nearly full it is a good idea to pause and consolidate.

    Money should be your first concern. Once the diplomatic penalty is applied you will steadily lose your trade partners, and in most games trade income makes up a significant part of your income. Take the time to review your economy, making savings where you can and adding to income producers where the cost is not too high. Remember that you are about to embark on the closing phase of the game; a building which costs thousands of koku but which only gives a small per turn income may not be the best investment. Upgrading farms in fertile areas is worthwhile; upgrading farms in your poorest areas is of questionable value. You may find that a review of your castles reveals slots used for buildings you no longer require. If so, demolish them and replace them with level 1 markets and the stealth chain of buildings. Reviewing your garrisons may bring to your attention units you had forgotten about, or which you no longer need. Disband them or send them to form a new army. Check your treasury report to see what money you have coming in and from what sources, and how much you are spending on maintenance.

    Aside from doing what you can to safeguard your income, you should work to stockpile a reserve. The more koku you have in the bank the better. If you do end up losing money each turn in the earlier phases, savings will give you chance to recover. 50,000 koku is a good beginning, 100,000 is better.

    Your armies will be your second concern. You should make sure that each one is at full capacity, and that the composition is one which you like. Check that they have generals, and that those generals are still loyal. The last thing you need is a general embarking on a personal rebellion when the fires of realm divide start burning. By this point you probably have several armies; you will now need to engage in some refinement. You will need as many armies as you can support without placing yourself in economic danger. What this means depends on the player. Some prefer to have a large amount of savings, and use that to fund more armies than they can pay for via their economy. Others prefer to use a smaller force and live within their means. If you intend to try the first route, then you should ensure that you have sufficient armies to expand at a blistering pace, allowing you to meet the victory conditions with all possible speed. Ideally you will have an army to cover every possible frontier plus one spare on top of that. It is also useful to keep several armies consisting of 6-8 ashigaru ready, so you can move them in to garrison a newly taken castle the turn after your real army has conquered it. This allows your elite forces to return to the field and resume conquest much sooner. Overall, this approach is a gamble. You are wagering that you have the ability to meet the victory conditions before your treasury runs out. If something goes wrong and you are not able to pull that off, you may end up watching your entire campaign spiral into ruin. The second approach, that of living within your means, is slow and steady. Check your financial breakdown by clicking on the abacus icon above the end turn button. Look at your total income minus the trade figure: this is how much you have to support your armies and navies. In the wild world of realm divide trade income should be viewed as an untrustworthy source of income, and consequentially it should not be paying for anything which you urgently need. Typically you will be able to support 2 or 3 full stack armies plus a few small garrison forces, depending on which provinces you own and how you have developed them. If you use diplomacy and agents, and pick your fights carefully then even 2 armies will be enough. Regardless of which approach you choose, the composition of your armies is a delicate thing. Due to the economic crunch you should not field a lot of samurai or you will haemorrhage koku like it is going out of fashion. Due to the large scale of the warfare, your armies need to be resilient and of sufficient quality to win battle after battle against advanced foes without becoming too badly mauled. That means you cannot rely too heavily on ashigaru unless you are producing them at a high experience level and from a province which grants them some upgrades, such as improved armour.

    Your next concern should be the diplomatic situation. Go around your vassals and allies and make sure their relationship with you is very strong. Give gifts to those who do not have relations of +150 or over. Consider making marriages with particularly vital clans. Prepare to cut your losses with less friendly clans; it will cost too much to try and maintain good relations with many clans. Choose several and encourage them to stick with you.

    After that look to the harmony of your lands. Do all of your provinces follow your religion to 100%? Do you have any other sources of unrest which you can act to reduce?

    Agents have many purposes during realm divide. You should review all of the ones you have recruited and move them into positions where they can spring into action once the realm divide is announced. Place ninja where they can sabotage enemy armies or buildings, bring monks or missionaries into positions where they can demoralise the enemy, and if you have a geisha start looking for targets to send her after. Metsuke may be best left overseeing your richest provinces in order to wring that little bit extra from your economy, or you may prefer to bring one or two into active duty and use them to arrest enemy agents.

    Once you are happy with your situation take a deep breath and move to trigger the realm divide. Typically you will do this by capturing one more province. If you want to maximise your gain, try to capture more than one province at the same time. This way you enter realm divide with a little more land.

    Not dying for fun and profit: how to survive the divide.

    If you have done your preparation work well then you already have a good chance. If you haven't, well, maybe you can struggle through and triumph in the end. Don't assume defeat: however hairy the situation gets, keep on fighting. It's not over until your head is displayed on a spike before the Shogun!

    Swiftly reducing a few nearby clans to vassalage can be a sound opening strategy. Vassals created after the realm divide will be immune to the realm divide diplomatic penalty. This is a very useful way to create pet trading partners to keep your economy afloat. Furthermore, vassals count towards your victory province count, and will often field large armies which can assist you in battle if you call them into your war. Their lands act as a buffer between yourself and the increasingly hostile clans. This makes them an attractive proposition, and having several can be a good help.

    Keep a close eye on your vassals and allies, always. Check their status in the diplomacy screen each turn and if the friendship score is dropping too low consider giving them a gift to boost it back up. If you cannot or will not try to repair relations, prepare for the inevitable declaration of war. Never leave provinces bordering uncertain allies or vassals open, always defend them or you will find yourself being overrun once they turn on you.

    Whether you decide to create some vassals or not, your main strategy should be one of systematically reducing threats. Try to pick an enemy and finish them off while holding others at bay. Do not try to advance in multiple directions unless you are absolutely positive you will not over-extend and make yourself vulnerable. Mistakes like that are harshly punished when most clans want your head.

    Send your agents out and get them busy. As mentioned in the preparation section, every agent you possess excepting some metsuke should be readied for action. Now is the time to capitalise on that preparation and open up with as many useful missions as you can. If you position your agents well, and they do their job, you can severely hamper your enemies right from the word go. Keep them active throughout the long war which follows; you have enemies enough that every possible advantage should be seized upon.

    Capturing Kyoto is something you should attempt as soon as your situation is secure and you can spare the large number of men a successful siege will take. If you can take and hold Kyoto for four turns you will become Shogun. This is a very good thing - as well as being a victory condition, it also grants you a series of bonuses. You will gain 2% to your clan's tax income, +1 morale for every unit you field, +1 honour for your Daimyo, and two bonus units. The bonus units are the Nihon Maru ship (a massive and strong bune) and the great guard cavalry unit (a supercharged version of yari cavalry). As the capital, Kyoto is an advanced province and you will benefit from the recruitment possibilities it provides. Beware: capturing Kyoto will apply the realm divide diplomacy penalty to any clans who do not already have it, such as those vassals you created after the divide.

    Remember your victory conditions; do not become embroiled in a needless chase. If you are playing on short campaign length and only need Kyoto and a reasonably small number of provinces in order to win the game, don't set about conquering half of Japan! Take the number of provinces you need and head for the capital. There's no point in conquering more provinces than you need in order to win unless it gives you a strategic advantage which outweighs the cost of taking and then holding those lands. All clans need to capture certain named provinces aside from Kyoto; have you captured all of the ones on your own list? Check, and go collect the necessary provinces if you do not yet have them. Forget about this simple factor and you could end up conquering province after province and wondering why the game will not end.

    Other than that, it is a matter of keeping your cool and continuing to utilise the skills which brought you this far. Win your battles with as few losses as possible, make your defeats costly to the enemy, keep your economy buoyant, manoeuvre to your advantage, expand where it is safe, retreat before superior force if necessary, do not over-extend, and keep your armies in the best condition possible.

    Frogbeastegg's Guide to Total War: Shogun II. Please note that the guide is not up-to-date for the latest patch.

    Members thankful for this post (3):


  10. #10

    Default Re: Frogbeastegg's Guide to Total War: Shogun II

    Battlefield units: an in-depth examination.


    In this chapter we will take an in-depth look at each of the battlefield units. Their strengths and weaknesses will be examined, and their role on the battlefield investigated. This section is intended to familiarise the player with the units they will have easy access to in the campaign. It will not cover any of the units added in downloadable content, or the oddball units like loansword ashigaru and samurai retainers. Nor does it discuss naval units.

    The statistics for each unit can be found in the game's encyclopaedia. This can be accessed outside of the game by choosing 'encyclopaedia' in the little grey menu which appears when you tell Steam to launch Shogun II. The encyclopaedia will open up in your default web browser; this makes it easy to browse alongside the guide. Unit stats are subject to change in future patches, and the encyclopaedia is always updated to reflect any changes made.

    Unit special abilities are discussed as per the unit entries in the encyclopaedia, i.e. under the assumption that the unit will have all of the abilities it possibly can. In some cases research is required to unlock the ability for use in the campaign so please be aware that you may need to work a little in order to see the full potential of your units.

    A general note: samurai and elite units like warrior monks are classed as being resistant to morale shocks. Morale shock is a state triggered when a unit takes massive losses (circa 20% or more of the total number of men) in a short space of time. This is an added morale penalty on top of all others which may be influencing the unit, and is the reason why units tend to rout after being hit by a good volley of bullets, fire bombs, or other especially devastating attacks. As the elite and samurai units are resistant to this penalty, they are less likely to break as a result of such circumstances.

    Spear infantry.


    Yari ashigaru.

    The humble yari ashigaru is the game's staple unit: you will be using a lot of them during the course of a campaign. Cheap, versatile, and with a lot of men in each unit, the yari ashigaru can perform in a number of different roles. In terms of stats, this unit does not excel anywhere. It has poor armour and low melee defence, meaning that the men die very easily in melee and to missiles. Its attack and charge ratings are quite poor, so it will not be a big killer. Its morale is poor. Its marching speed is average for an infantry unit. Because they are armed with spears (yari), these soldiers are vulnerable to enemies using swords. Quite a set of disadvantages. They hardly sound worth using, right? Wrong. During the early phases of the game, the yari ashigaru will form the bulk of your infantry line and if you use them correctly they will serve you admirably well into the closing stages of the game.

    Ashigaru do not have great morale, so always ensure that this unit is deployed in a fashion which bolsters its fighting spirit. Don't leave them isolated, don't send them anywhere where the enemy will surround or flank them, keep them close to friendly units, and if possible place your general close by so that the ashigaru are within the morale-boosting blue circle. Always keep an eye on them if they are fighting in a situation where they are taking heavy losses. Once a nearby friendly unit breaks and runs, ashigaru will usually begin to waver - if they do not break outright. If you pay correct attention to your ashigaru's morale, you will find that they are capable of standing and fighting like seasoned soldiers. By the time a yari ashigaru unit has an experience (XP) level or two, morale will be less of an issue. The high-XP ashigaru seen in the latter half of a campaign can be astonishingly vicious in battle, a far cry from the more timid unit you originally use.

    Yari ashigaru possess a special ability which provides a lot of their battlefield value. This ability is the spear wall formation. Lethal against cavalry, it also has a place when you are fighting defensively against any other unit type. Spear wall formation causes the ashigaru to close ranks into a dense formation with their spears arrayed in a pointy forward-facing hedge. The unit becomes very vulnerable to attacks on its flanks or rear, and can only move slowly. Due to this reduced speed, it is best to march into position and then assume the formation. Do not attempt to issue charge or attack orders when the unit is in formation; let the enemy come to you. Otherwise you risk disrupting your formation at the very moment when it needs to be in perfect order. Because the men are so tightly packed together it covers less ground than the standard formation does, so you will usually need multiple units all in spear wall formation in order to provide decent coverage. Any cavalry foolish enough to charge into this hedge of spears will be turned into horse kebabs. Against other units, the ashigaru will behave as though their attack score has been reduced and their defence increased: they will make fewer kills and take fewer losses. Ashigaru in a properly supported spear wall formation can hold their ground against nasty units like naginata warrior monks for an appreciable length of time. They will inevitably lose, but the time they buy can be sufficient for you to flank and destroy the enemy with a different unit, or to win an advantage elsewhere on the battlefield. Surprisingly, the spear wall is not horrifically vulnerable to arrows. Men will still be lost, but not at a rate which causes the formation to crumble.

    When not in spear wall formation, yari ashigaru are still very capable of killing cavalry. In fact, they are so effective at it that they make yari samurai something of a questionable purchase during the earlier part of a campaign. Whether facing fragile light cavalry or heavier units like katana cavalry, the lowly ashigaru is more than capable of seeing off the foe unless you allow something foolish to happen. They are also reasonably capable in melee combat, depending on what you send them up against. In a one to one straight up fight, units like katana samurai will dice yari ashigaru like so many carrots, but it will take them some time if you keep your ashigaru in a situation where their morale is supported. In an unfair situation, such as two ashigaru fighting a single katana samurai, you will likely win provided you attack the samurai from two different directions. This contrast means that you should decide early on in the battle what role you wish your yari ashigaru to take: that of the anvil holding the enemy in place so others can strike the fatal blow, or that of the angry mob ganging up and tearing heads off.

    Deploy yari ashigaru in thicker formations, a minimum of four ranks deep or more if you suspect that they will face a particularly devastating charge. This helps them keep formation, which in turn helps them to stay alive as scattered formations tend to be more vulnerable in melee combat. Thin formations are easily swept away, or broken into two, and with ashigaru this often proves deadly. Unless you are using the spear wall formation, you should always aim to charge any enemy unit you engage. Do not simply stand there and take a charge! That is the best way to encourage your ashigaru to rout within moments of contact, as they will take a higher number of casualties than necessary, and will not gain the morale bonus for counter-charging.

    Yari ashigaru are also an excellent choice for those times when you need a disposable unit to absorb damage, shielding your better men. Whether the task is walking into a hail of bullets, or receiving a charge by a powerful enemy unit so a more specialist unit like a no dachi can attack from the flank, the poor yari ashigaru is your best option. Just remember that they will break and run quickly if they are taking large amounts of casualties in this kind of exposed job, so the shield is temporary at best. Make maximum use of the time which their lives buy you and the exchange can be a good one.

    Yari samurai.

    In the original Shogun: Total War the yari samurai was the mainstay unit, the backbone of every army and the versatile jack-of-all-trades with an anti-cavalry bonus. In Shogun II that role has been usurped by the yari ashigaru, and at first glance it appears that the yari samurai has been left shuffling his feet and wondering what the world has come to. The good news is that they still have a valid part to play in battle. The bad news is that role is more limited and specialised, making them a unit where you seldom want more than a couple in your army.

    Speed: this is the key to understanding the yari samurai's new role. They have the ability 'rapid advance' which lets them march swiftly for a set period of time. It does not make them as fast as galloping cavalry; it does make them the fastest infantry on the field by a good stretch. This makes them ideal as a mobile reserve, or as a rapid strike force. If you see a part of your line in trouble, issue a move order and then use 'rapid advance' and watch the samurai sprint to the aid of their allies. If you spot the enemy general in the vulnerable position, give the attack order and start 'rapid advance' and it will be that much harder for him to escape before contact is made. If you do not have any cavalry but need some units to take out enemy archers, yari samurai are again a good choice as their armour affords reasonable protection against arrows and they can close the distance quickly, reducing the number of volleys they must face. This burst of speed makes yari samurai excellent ambush troops. Hide them in a forest and when the enemy line is tangled up with yours, run them out at top speed and smash into the enemy before they realise what's coming.

    Yari samurai do not have the 'spear wall' special ability. Because of this it is best to use them offensively, that is to say counter-charge instead of standing still to be charged into. This applies whether facing cavalry or infantry.

    Because they are armed with yari, this samurai unit is weak against foes armed with swords. Katana samurai will defeat them, as will more advanced unit types like naginata warrior monks. Due to their decent armour and good defensive skills, the yari samurai will be able to hold on for far longer than a yari ashigaru in the same situation, making them that bit better when used as an anvil. Due to the cost of the unit this is best used as an emergency last resort; focus on the more mobile, situational deployments 'rapid advance' enables. Ashigaru are quick to replenish after a battle, samurai are not. Yari are not the best weapons for scoring high kill counts against enemy infantry, yet you will see respectable results from your yari samurai provided you do not pit them against units they are vulnerable to. They can handily defeat ashigaru in a one-to-one fight, and can hold their own for a good while against two ashigaru units provided their position is good. Facing cavalry, butchery is the best word to describe what happens. Horses are severely allergic to spears and yari samurai are warriors who live and breathe spear-based combat. Yari ashigaru are good enough cavalry killers that in some ways it is a waste to use yari samurai for this role, so consider allowing your yari ashigaru to deal with the horse kebab process while your yari samurai remain aloof, waiting for a situation where they can speed in to support elsewhere on the field.

    Yari hero.

    The yari hero is a unit you will not see many of during the average campaign. The pinnacle of the yari family, it requires a lot of research and building upgrades before it is available. It is painfully expensive, and contains only a small number of men. But what warriors those men are! They epitomise everything which is strong about the yari, and make up for the weaknesses with their excellent stats.

    The yari hero possesses the 'rapid advance' skill of the yari samurai, along with the defensive 'yari square' formation. They also have the 'hold firm' ability, which boosts morale of up to three nearby units when activated, encouraging them to fight on to the last man. Taken together this illustrates a crack reserve unit, capable of dashing to weak points and ensuring that they are held to the last man. They can also be handy in a defensive castle battle, as they can hold a key position and keep on holding it.

    Do not allow yourself to be lulled into a false sense of security with this unit, however. Heroes they may be - heroes die. They can kill multiple men for every casualty they take, yet there are only a few men in the unit. They still fall to arrows and especially bullets. If you come over all Tom Cruise and charge them alone into an enemy mob, you will get to watch a glorious last stand - a total waste of lives and koku.

    Sword infantry.


    Katana samurai.

    The katana samurai is quite possibly the samurai unit which you will use the most. Why? Because they excel at killing infantry, particularly infantry equipped with spears. Ashigaru are no match for these samurai, and the other varieties of samurai infantry will take a good beating. The most elite units, like naginata warrior monks, can sometimes defeat katana samurai all things being equal, but they will take heavy losses in the process. A bit of cunning from your side, and the katana samurai can emerge victorious.

    Katana samurai are versatile on the field. You can use them as part of your line, going toe to toe with enemy infantry. This can be effective provided you guard them against enemy cavalry and ranged weapons. Alternatively, you can use them as a reserve and flanking force. This second approach is probably the best, as it lets other troops (typically ashigaru) absorb the losses while leaving your katana samurai free to dive in where they can do the most damage, racking up the kills and breaking enemy morale. When used in this fashion, the samurai should be positioned on the edges of your battle line, ready to march out and around the enemy line once battle is joined. They will then charge home into the rear of the enemy infantry fighting on the ends of the line. This will soon cause them to rout, and the samurai can roll on along the enemy line routing unit after unit. When used as a strategic reserve, the samurai should be positioned closer to the centre, behind your battle line. They can then charge forwards to support any point which is under severe stress.

    Cavalry are the critical weakness of katana samurai - they will be ridden down, overrun, and finely diced in short order. Even the two weakest cavalry units (light cavalry and general's bodyguard) are more than capable of disposing of katana samurai if they hit them with a good charge. Against stationary cavalry, the katana samurai have a better chance but it will be a messy fight and the stronger types, like katana cavalry, will still emerge victorious. Keep your katana samurai away from cavalry; let your yari ashigaru, yari samurai, or naginata handle them.

    Like most samurai units, katana samurai have some good armour. Bow ashigaru will still score kills against them, but not so swiftly as they would against an ashigaru unit. Samurai archers are more dangerous as their arrows are armour piercing. Teppo (guns) ignore armour and will kill samurai as easily as peasants. In order to be fully effective in melee, a katana samurai needs to have as many men as possible. Consider that a full unit of yari ashigaru has twice as many men as a unit of katana samurai, and that other samurai units will have the same number of men. Katana samurai will either be fighting with full advantage but whilst outnumbered 2-1, or against equal numbers but without a massive advantage. Every last man counts! Do not allow them to wilt away under ranged attack!

    No dachi samurai.

    No dachi are a specialised samurai unit. They exist for a single purpose: the charge. In some ways, they are best considered a form of slow cavalry. Great care is required if you wish to use them successfully, as their incredibly low armour and weak defensive abilities make them frighteningly fragile. Just how fragile are they? Their armour is the same as a yari ashigaru's, and their defence ability lower. That means they die faster than peasant soldiers who cost nearly 1/4 as much to recruit!

    Like katana samurai, no dachi are vulnerable to cavalry, and that's before their low defence is factored in. A single good charge by any cavalry unit will utterly shred no dachi samurai. Keep them well away from anything which has a horse. Any ranged unit will pick no dachi apart, so make certain that nothing has the chance to or you may find your samurai dead before they can enter the battle. Don't let anything with a good charge value charge directly into them because the no dachi will take dramatic losses as the units collide. Never allow anything to engage the no dachi samurai from the flanks or rear, or you may as well delete the unit and save the enemy the bother. Finally, don't expect them to do well if you let them sit in a prolonged melee. They will kill a lot of enemy soldiers, yes, but they will also die in disturbingly high numbers. Fortunately, no dachi have decent morale to offset all the losses they will be taking. They possess standard samurai morale, not the higher amount sported by elite units like warrior monks, so don't get too cocky.

    Now we have seen what you should not do with no dachi, you might be wondering what they can do without ending up in a bloodied heap. The answer is in that lone purpose: the charge. Engage a unit with another and charge those no dachi in to hit the flanks or rear. Watch the enemy casualties spike through the roof, and their morale tremble. Many units with moderate to average morale will break soon after being subjected to this combination of a fearsome charge, the losses it causes, and the flanking morale penalty. Even if the target enemy does not break, your no dachi will be able to keep hacking away without facing the full force of melee because the enemy soldiers will be split between fighting in two directions. This enables the no dachi to score some kills with their high attack rating without taking as many casualties as they normally would. All engaged targets are valid for no dachi used in this method, even cavalry provided they are stationary.

    To support this do-or-die style of battle, the no dachi has the special ability 'banzai'. This increases their charge and melee attack abilities, allowing them to score even more kills. It also boosts their speed, and locks their morale at a high level so that they cannot be routed. While this ability is active they will fight to the last man. 'Banzai' requires the art 'sword expertise' before it can be used, so your first no dachi will lack this ability unless you wait until later on to recruit them.

    During castle assaults no dachi can be very handy at storming walls provided you are able to keep them from being shot at. For best results send them to an isolated part of the wall where they can climb over in peace, then activate 'banzai' and charge into the back of the enemy ranks as they defend the walls against your other units. Making no dachi samurai climb walls directly into combat is a terrible idea as they will not benefit from their charge value, and will suffer all the penalties of their abysmal defence. No dachi can have some use in a defensive castle battle; send them barrelling into units which are struggling to climb the walls and they can kill without needing to face more than a small portion of the enemy unit at once. This allows them to last for longer in the melee even without 'banzai' to pep them up, because the enemy has less chance to score kills. Just make sure that they are fighting in a spot where the enemy can't pelt them with arrows.

    No dachi benefit from a longer, thinner formation as this allows a larger number of men to impact during the charge. Two or three ranks is best, with three ranks providing more durability against a slight loss in kills.

    A unit or two of no dachi will be sufficient for most armies if you wish to use them. But why use them instead of using the army slots for cavalry? Cost is part of the answer: no dachi cost slightly less to recruit and maintain than a decent cavalry unit. Light cavalry are still cheaper though, and serve a similar purpose. If you lack access to warhorses, you cannot build the better varieties of cavalry, and that leaves a niche for no dachi samurai. 'Banzai' is the main reason though, as it allows for a more powerful charge and an unbreakable unit which will stand in melee and slaughter. Cavalry forced to fight in melee tend to die distressingly quickly while causing fewer kills due to their smaller unit size. Give no dachi samurai a try. You will not want them in every army you recruit, but you may be surprised at how well they can perform in the right circumstances.

    Katana hero.

    Like the yari hero, the katana hero represents the pinnacle of the sword family. Once again this small unit is made up of elite warriors with high stats in all areas. As swords provide a more useful bonus overall than spears, the katana hero's role on the battlefield is slightly more open than that of the yari hero. Practically impossible to rout, this unit can stand and fight to the death against infantry, and cause ferocious amounts of damage whilst doing so.

    The katana hero has two abilities: 'banzai' and 'hold firm'. This enables it to perform in two main roles. 'Banzai' lets it act as a hammer, charging in to deliver carnage on a localised scale, killing as swiftly as the small number of men in the unit will allow. Aim this little ball of death into the right spot in the enemy's line, and it can begin a chain rout as unit after unit flees the unstoppable whirling blades. Beware of sending the heroes in too deeply without adequate support, however. They are still mortals, and will slowly be worn down by weight of numbers.

    'Hold firm' is probably the best use for this unit. Place the katana heroes in the centre of your line, or at another position where you believe the fighting will be thick and fierce, and let them bolster the morale of up to 3 nearby friendly units with this ability. The heroes themselves will stand and fight to the death regardless of whatever 'hold firm' is in use or not, causing terrible damage to all who come against them. If you need a point to hold no matter what, there are few better ways to do it.

    Do try to keep the katana heroes shaded from cavalry and ranged units, as these are their biggest weaknesses.

    Bow infantry.


    Bow ashigaru.

    Question: what is better than killing your enemies?
    Answer: killing them from a distance without getting a scratch on your pretty armour.

    An indispensable part of any early-game army, bow ashigaru share a lot of characteristics with their yari-wielding counterparts. They have poor morale, low armour, and are cheap, cheap, cheap! The ability to damage your enemy before melee contact is made is especially valuable in the early parts of the game, where your troop quality is lower and your ability to replenish losses less developed. You will want to start recruiting them on the very first turn.

    As with yari ashigaru, they can remain relevant all the way up to the end of the game, although this depends on the AI's army composition. Bow ashigaru do not use armour piercing arrows, so they struggle to cause as much damage when faced with armoured targets like samurai. Even katana samurai or yari samurai prove resistant, never mind units like the heavily armoured naginata. Against those tougher targets you should use samurai archers, as they do have an armour piercing bonus. That does not mean you should not use bow ashigaru if you have nothing else, or if your samurai archers are all busy. The ashigaru will still score some kills, and that is better than nothing. Bow ashigaru also have slightly lower accuracy than their samurai counterparts, meaning fewer shots find their targets. The bow ashigaru's battlefield niche is in quantity of arrows loosed: there are as many men in a bow ashigaru unit as in a yari ashigaru one, meaning they outnumber the fancy samurai. When faced with poorly armoured targets like other ashigaru, warrior monks, or no dachi samurai, quantity of arrows results is more important than quality of shooting. Seek out these soft targets as a priority, and if your enemy continues to recruit them you should continue to field your bow ashigaru.

    While their armour value is low, bow ashigaru can perform adequately in a missile duel provided you remember to deploy them in 'loose' formation. This spreads the men out so that they take fewer casualties. This is a good default formation, and it should be used unless you do not anticipate incoming enemy fire. Bow ashigaru deployed in loose formation and sent out in front of your main line will absorb enemy missiles, and do damage in return. As you will not be using your archers to melee, and as they are easy to replenish after the battle, this is an excellent use for them.

    Line depth does not affect the accuracy of your missile units. You can deploy them in a single rank or in a square block without impacting performance. A deep formation does seem to make it slightly easier for enemy to score ranged kills, as arrows missing their target can catch the man stood behind instead. Deploy your bow ashigaru in a formation which fits the space you have available; loose formation does tend to take up a lot of space and that is more important than keeping fewer ranks.

    Skirmish mode orders a unit to automatically begin to pull back when an enemy unit reaches a certain distance from it, in any direction. This is a very handy tool for keeping your archers alive without needing to baby-sit them; toggle it on at the start of battle. The only time you do not want to use skirmish mode is when you are using your archers to hold a position behind your infantry line. Sometimes, depending on how far back you deploy your archers, the enemy units engaged in melee with your infantry line can be enough to trigger the danger sense.

    Bow ashigaru are dire in a melee. Do not allow the enemy to engage them, and only send them into melee yourself if the circumstances are demanding that every last man wields a sword. They may not do much damage, but they can still inflict the location and numbers-based morale penalties on enemy units and that can be the key to breaking the foe before your own line routs. Although they fight with swords, bow ashigaru do not receive the katana's anti-infantry bonus. You can order a ranged unit to engage in melee by clicking on the melee toggle icon on the left hand side of your interface. Unsurprisingly, bow ashigaru are horrifically vulnerable to cavalry. A single good charge will usually rout them near-instantaneously.

    Once the necessary art has been researched, bow ashigaru can use flaming arrows. As the name suggests, this skill allows them to loose a single volley of burning arrows at their target, inflicting a few more casualties. The ability recharges relatively quickly, so it may be possible for your bow ashigaru to loose a second or even third volley of flaming arrows if you move them to a location where they can continue shooting once melee is joined.

    If you are fighting a defensive battle, bow ashigaru can erect screens during the deployment phase of the battle. Once the battle begins they can no longer do this. The screens are immobile, so be sure to choose a good location before clicking on the gong. The screens will significantly reduce casualties from enemy missile fire, both arrows and bullets. As long as your unit is stationed behind them they will have a strong advantage in any missile duel. Other units can be positioned behind the screens; order your bow ashigaru to move to a different location and position your other unit in their place. This allows you to protect your infantry line from ranged fire. The screens also break up the formations of oncoming enemy units, making life a bit easier for your melee infantry.

    Bow samurai.

    Bow samurai are the middle-ground of the three archer types. However this does not make them the mediocre unit in the family, or one which can be overlooked. When you begin to phase out bow ashigaru, this is the unit you will be replacing them with.

    Compared to bow ashigaru, bow samurai are more accurate and have better armour, morale, and melee abilities. As the unit contains fewer men than the bow ashigaru, the increased accuracy allows them to compete in terms of kill count. Fewer arrows are loosed yet more find a target. The arrows used by samurai archers are armour piercing, and so are best used against targets wearing medium or heavy armour, like the naginata samurai or yari samurai. Using them on lightly armoured targets is a bit of a waste unless there are no armoured targets available. This need to use arrows where they do the most damage means that bow samurai can happily co-exist beside bow ashigaru in the same army, with one selecting the armoured targets and the other the softies.

    The fact that bow samurai wear better armour should be appreciated by any general engaging in a missile duel. Better armour means fewer casualties. You should still be a little wary of engaging in a missile duel with bow ashigaru units, however. While your samurai are better protected and more accurate, they are badly outnumbered by the peasants. All things being equal, the two units will tend to kill each other at the same rate, with the ashigaru routing after doing heavy damage to the more expensive samurai.

    Bow samurai may have better melee ratings than bow ashigaru; this does not mean that you still should let them engage in a brawl unless circumstances are desperate. Their combat abilities are still poor, and they do not receive the dedicated sword unit's anti-infantry bonus when fighting with their katana. Every samurai lost in melee is approximately 30 arrows lost, and you can be positive that those arrows would have scored many more kills than his feeble sword skills. Even so, desperate times can call for desperate measures, and bow samurai are more use in a stand up fight than their ashigaru counterparts. They are also harder to replace - weigh up that melee order carefully before committing.

    Bow samurai share the same abilities as bow ashigaru. They can deploy screens during a defensive battle, and can loose fire arrows once the appropriate art is researched. They also share many other aspects, such as the vulnerability to cavalry, and the way loose formation and skirmish mode should be set in almost every battle.

    Bow warrior monks.

    This unit will not make up the bulk of your archery corps unless you have koku coming out of your ears and even then you should think twice about fielding large numbers of them; they are very expensive. For your money, you get an elite archer best described as reassuringly scary.

    Bow warrior monks have a larger range than the samurai and ashigaru archers. They have high accuracy, and use armour piercing arrows. This makes them deadly. They see it, they shoot it, it dies. There's just one snag with these archers - they consider wearing tissue paper to battle the height of good sense. Bow warrior monks have an appalling armour rating. Shoot at them, they die. Hit them with a pointy object, they die. Scowl at them, they die! Enter them into a missile duel, and you are effectively throwing money away unless you can somehow prevent the enemy from shooting back.

    The combination of range and accuracy makes this unit a good sniper. Target valuable enemy units and pick away at them while they close with your army. If possible, take down the enemy general; a single well placed arrow can break the morale of an entire army. High accuracy opens up another role for this unit once the infantry lines have joined: it can target enemy units which are engaged in melee with your own while causing fewer casualties from friendly fire. Try to find a high point, or move the monks around to a flank where their line of fire is a bit clearer, and snipe away in support of your melee infantry without needing to worry about turning your own people into cute imitation hedgehogs.

    Warrior monks they may be, but they do not share their melee-oriented counterparts' skill with a blade. Their poor melee stats, combined with their dreadful armour and high cost, means that they should be kept out of melee at all costs. They will do little damage and die in droves, and unlike bow ashigaru they are not easily replaceable.

    Bow warrior monks have access to fire arrows and screens, same as the other two archer types. Their third ability is a new one. 'Whistling arrows' is a single volley ability with a recharge timer, same as fire arrows. It looses a volley of arrows which make a weird noise, badly damaging the morale of all the units they fly over. This moral penalty applies to both enemy and friendly units, so don't stand behind your infantry line and shoot whistling arrows over their heads! Between the morale damage from being under missile fire, and the damage caused by losses, whistling arrows can prove the final straw for nervous units like ashigaru.

    Bow hero.

    Another best-in-class unit. With the long range of the bow warrior monks, and even higher accuracy, this unit is a sniper par excellence. That is all you really want to do with this unit; putting it in melee at any time is a waste, as is engaging in humdrum tasks like a missile duel. Target the enemy general or other high value units and watch them turn into feathered novelties.

    The bow hero has the same skills as the bow warrior monk, including 'whistling arrows'. They also have the 'hold firm' ability, same as the other two hero units. This means you can place them behind your infantry line and snipe safely away, turning on 'hold firm' to support the line if things get hairy.

    As there are fewer men in the bow hero unit, each man carries more arrows in order to round things out.

    Honestly there is very little that needs to be said about this unit. Snipe!

    Guns.


    Imported matchlock ashigaru, and matchlock ashigaru.

    Imported matchlock ashigaru and matchlock ashigaru are two very similar units, so they will be discussed together.

    Imported matchlock ashigaru are hands down the worst unit in this category. Expensive and slow to recruit, hard to gain access to, and rather rubbish in terms of statistics, they are nonetheless powerful when used correctly.

    Matchlock ashigaru are where teppo begin to become feasible on a wider scale. It is a much cheaper version of the imported matchlock ashigaru, with the recruitment restrictions removed. You can pump these fellows out from any castle you own once you have completed the necessary research. You should note that this version of the gun ashigaru is slightly less accurate and slightly slower when it comes to reloading. The difference is not such that you should favour the expensive imported guns over the home-grown variety, but do bear the performance difference in mind if you are swapping from imported matchlocks to local ones. The local version of the unit does have slightly better morale, however.

    Aside from those differences, the units are identical.

    Bullets have one appeal: they kill naginata samurai hulked up with the best armour in all Japan with the same ease as they do bow warrior monks in their tissue paper armour. If a man is hit by a bullet, he's out of the battle.

    Well, there are other appeals. Guns cause a big morale hit to the targeted unit. The flat trajectory of the bullets makes it easier to blast a target into giblets. With careful deployment you can combine these two factors, delivering a big morale penalty from the gunfire and another from high casualties, causing a unit to rout in short order. Battlefield strategies will be examined in the following chapter; the topic is too wide to be covered satisfactorily in a unit description.

    In order to get half decent results, this unit should be deployed in a manner which takes advantage of the skill 'fire by rank'. Three ranks deep is generally optimum for this. 'Fire by rank' causes the front rank of the unit to fire at the same time and then kneel down and begin to reload. The second rank fires in unison over their heads, and also kneels. The third rank will then fire. When the first rank has reloaded they will stand and fire another volley. This allows more damage to be done to oncoming units, as otherwise the unit will pop off individual shots as the men see a target, and the men at the very back tend not to fire at all. This scattered fire reduces the moral shock guns can give, and noticeably reduces the kills they achieve. Three ranks delivering fire into an oncoming unit will kill a good proportion of the enemy, and leave their morale on wobbly ground ready for your melee units to score an easy victory.

    Guns are not suited to engaging in a missile duel. They have a shorter range than traditionally armed archer units, and their armour is lousy. They are also useless in a melee. Honestly, forget that this unit can do anything except walk, run and shoot people at close range. Anything else is a waste of resources.

    The two types of matchlock ashigaru can erect bamboo screens during the deployment phase of defensive battles. This is invaluable as it prevents those nasty mishaps like cavalry running over your guns and killing them all. It also makes it possible for your matchlocks to remain at close range with the enemy in relative safety, provided the enemy has not worked its way around the screens. Bullets cause more damage at close range.

    Matchlock samurai.

    If you wish to use teppo, then matchlock samurai are the unit you should aim for. More accurate and better at reloading, they offer an improvement over the gun-wielding ashigaru in the two most important areas. Teppo samurai will fire more shots in the same period of time, and will do far more damage with each volley. When you are using guns that should be all you care about. The improvements in other statistics, such as morale, amour, and melee attack, are nice to have but not nearly as important. You still do not want this unit to engage in hand to hand combat; it is not very effective at it in comparison to other units, and it is a severe waste of its potential.

    Matchlock samurai have the 'bamboo wall' and 'fire by rank' abilities, same as the other gun units. They have an additional ability which further boosts their capacity to excel: 'rapid fire'. This ability has a long cool down period so you should expect to use a maximum of twice in a battle, unless the battle continues for an usually long time. When activated, the ability only lasts for a short window of time. This makes correct usage critical. Luckily, that is very easy to do. 'Rapid fire' allows the samurai to fire and reload more rapidly; anyone attempting to use guns will soon notice that they do most of their damage when the enemy unit is charging towards you. Thus, 'rapid fire' is best activated as soon as the enemy enter the maximum range of your guns. The ability will allow you to pour on average one extra volley into an approaching infantry unit, more if you can somehow prevent them from running straight into the teppo samurai. If the approaching infantry unit has low morale, you may find that they break before they reach your samurai, in which case 'rapid fire' also allows you to plant some bullets in their backs.

    In a siege battle the combination of greater accuracy, faster reload, and occasional 'rapid fire' usage make matchlock samurai a premier choice for manning the walls. Support them with a few decent melee units in case the enemy manage to climb the walls, and enjoy the amount of damage they can do.

    Heavy infantry.


    Naginata samurai.

    The naginata samurai represents a valuable addition to most armies. They are a balance between solid defensive capabilities and respectable melee ability, versatile to a level offered by few other units. If you wish to replace your yari ashigaru with a samurai infantry line, the naginata samurai is by far your best choice.

    The naginata samurai's high defence is initially the most striking aspect of the unit. They wear heavy armour, comparable to that worn by the hero units and significantly stronger than that possessed by the other non-heroic samurai. Their melee defence ability is likewise high. Whether at a range or close up, the naginata samurai is a tough nut to crack. Arrows will still bring them down, though with fewer casualties per volley. Bow ashigaru in particular will have a difficult time causing meaningful damage unless they are allowed to chip away for a while, as they lack the armour piercing arrows used by their samurai and monk counterparts. As long as you do not expect them to sit in an arrow shower and emerge several minutes later in top fighting form, the naginata's ability to take fire is respectable. In melee, opponents will have a harder time scoring a fatal hit. Effectively, this means that you will see individual men dying at a slower rate. There is one type of damage which laughs scornfully at the naginata's tough man act - bullets. Even the weakest teppo unit will be able to shoot down naginata with ease; bullets do not respect armour, and nor can they be blocked with a blade. Beware!

    The weapon for which this unit is named, the naginata, provides their other key strength. The naginata is effective against cavalry, although not quite as effective as a yari. It is also effective against infantry, but not quite as effective as a sword. This means that they are solidly effective when fighting any variety of enemy, even if their bonuses are slightly weaker. Versatility on the field should not be under-estimated - naginata samurai can go fight whatever you need them to at that precise moment without doing a poor job of it, and they do not need to be sheltered from unit types which are strong against them. Effectively, should you so choose, naginata can replace all spear and sword armed units. This flexibility is why they can replace yari ashigaru as the main line infantry: unlike katana and yari samurai, they are not vulnerable to something, and so you are less likely to see your line crumble. However, cost considerations will encourage most clans to continue to utilise yari ashigaru for parts of the core line; reinforcing the centre and flanks with naginata is often enough of a boost without blowing your budget.

    The combination of toughness and versatility makes the naginata samurai an excellent assault unit, particularly in sieges. More men will survive scaling the walls, and you can be sure that whatever they face once they climb over they will be fighting with good effect. They have typical samurai morale as well; routing need not be a concern unless their situation becomes very bad. In offensive battles against an entrenched enemy with a lot of archers, naginata samurai are a solid choice for the first assault wave, screening your more fragile shock troops.

    In defensive roles, the naginata samurai perform well once again. They can stand and fight against anything, surviving for a respectable amount of time and doing some good damage. They can be trusted hold key positions in field, giving you time to enact a flanking manoeuvre or defeat the enemy in detail. Send them to man the walls during a defensive castle battle, and again the combination of toughness and versatility will stand them in good stead against whatever your enemy throws at them.

    Whether in an offensive or defensive battle, naginata make a good reserve unit. Again, this is due to their flexibility. It's hard to be sure which units you will need to send your reserve against, and it can be disastrous if those units turn out to be ones your reserve is weak against. Difficult battles can hinge on your reserve's ability to kill where it counts, so a little insurance in the form of a flexible unit is worth serious consideration.

    Cumulatively, that means the naginata is good at pretty much everything and can be used in nearly every possible role! Sounds too good to be true, right? The naginata's main - arguably only - problem is that it is a jack of all trades. Specialist units like the katana samurai will do more damage when paired up against their ideal foe. The naginata can't produce the same number of kills, and tend to kill at a slightly slower rate. Naginata samurai lack special abilities to provide or support a 'master' role; they have no equivalent to 'banzai', or 'rapid advance', or even the humble ashigaru's 'spear wall'. They do not have a single special ability. The naginata is solid not spectacular, flexible not fantastic, agreeable not awesome. Decide which of the possible roles you wish them to play, and then support them with the more specialised unit types.

    Naginata warrior monks.

    You might wonder why naginata warrior monks are classified as heavy infantry. After all, 'heavy' usually implies strong armour and these fellows are wearing tissue paper. The label makes more sense if you throw the traditional meaning out of the door, and instead think in terms of "hits the enemy like a tonne of bricks dropped from a great height."

    Naginata warrior monks are one of the scariest units on the battlefield. They are, simply, killing machines. They have a high attack value, a strong charge value, and like naginata samurai they are strong against everything they can engage in melee. Their special ability, 'war cry', terrifies the enemy, demoralising up to 4 nearby units, as well as reducing their defensive ability and movement speed. War cry is a win-win proposition for the monks. If the unit doesn't break, the monks will be able to dice away that much more effectively. If it does break, they can cut down routing men without facing a threat to their own lives. War cry really is one of the keys to realising this unit's full potential; use it as often as possible. Always attempt to trigger it when it can affect the maximum number of enemies; sometimes this means waiting until after the charge has hit home.

    Naginata warrior monks have very high morale. In most circumstances they can be relied upon to fight to the last few men, sometimes even to the death. Considering the appalling losses they can take, this is very good news.

    Unfortunately (or fortunately, depending on whether you are commanding or facing the monks) the naginata warrior monks have a big weakness, and that is their vulnerability. Any form of ranged weapon will reduce them to pincushions in short order. In melee they manage a little better, as their defence skill rating is comparatively high. This means that they are good at parrying or blocking melee attacks; it does not make them durable. You should never let a unit with a high charge value charge your monks - the carnage can be quite horrific. Cavalry, no dachi samurai, other warrior monks: all of them represent a strong threat if they are charging. Let other units absorb the charge, and then send your monks in.

    There are two main ways to use naginata warrior monks. The "There go my monks!" approach involves lining them up, charging them at full speed towards the enemy line, triggering war cry at the most opportune moment, and letting them do as much damage as possible. The tactic is so named because "There go my monks!" running by, and "There go my monks!" as they die. It's a high risk, high reward strategy, and one which results in a lot of bodies, many of which will belong to your side. If you use this tactic, provide your monks with adequate support by sending other units in close on their heels. This will capitalise on the devastation caused by the charge and war cry, and take some of the heat off the fragile monks. The other approach can be thought of as the "Monk surprise!", as it involves delivering a surprise horde of hyped-up warrior monks to the rear of an enemy unit. In essence: wait until the two main infantry lines are engaged, then send your monks running around behind the enemy. Charge in, trigger war cry, watch the kill-counts spiral.

    Cavalry.


    All cavalry units can be ordered to dismount. This will transform them into a small samurai unit of the same weapon type, e.g. yari samurai for yari cavalry, katana samurai for katana cavalry, etc.

    Light cavalry.

    Light cavalry are the first cavalry type which you will have access to, aside from your general's bodyguard units. They are the only cavalry which do not require access to warhorses, or high level stables in combination with other dojos. This makes them far more affordable, even before you consider their lower recruitment and upkeep costs. As you might expect from that, they are the weakest type of cavalry.

    Light cavalry have low armour, terrible melee defence, low melee attack, and cavalry comes in much smaller units than infantry. Collectively this means that light cavalry go 'poof!' if you let them get involved in a stand-up fight: they are outnumbered and outclassed. Spear-armed infantry in particular will shred them like so much confetti, even if the cavalry attack them from an advantageous position like the rear. As soon as the charge has completed you should seek to withdraw your light cavalry from the melee by issuing a double click movement order to a position some distance behind their current one.

    In terms of morale, light cavalry have the same rating as most samurai infantry units. They do tend to be a lot more prone to routing, however. This is due to the heavy casualties they take in a fight, and to the smaller number of men in the unit. A loss of 1 man out of 30 is a lot scarier than 1 man out of 80. Keep this in mind whenever you are issuing orders; a simple movement order can be sufficient to induce a rout if the unit is already battered and their path takes them close to the enemy.

    Light cavalry do have a good charge rating, and they are fast. Until the yari cavalry arrives on the field, they are the fastest unit available. This speed is their main use. They are excellent for running down routing units to ensure that they do not recover and return to the fight, and to cause as much damage as possible. Nipping around the battle lines to strike at archers left exposed by the AI is another strong use for light cavalry; again, do not allow them to stand in melee as even bow ashigaru can cause serious damage when given chance. Because they are armed with spears, light cavalry have a small bonus against other cavalry types. In the earlier parts of the game where you are most likely to be using light cavalry, this means one thing: general hunting. The general's bodyguard unit has stronger stats than the light cavalry; however if your unit manages a good charge against a stationary or distracted general, the situation tips in favour of the light cavalry.

    If you suspect that the enemy is using hidden units on the battlefield, or are playing in legendary mode with its restricted camera, consider using your light cavalry as scouts. They are fast enough to escape danger most of the time, and disposable enough that their loss will not harm your plans.

    Light cavalry can use the 'wedge formation' special ability if your general has purchased the skill which permits its use. This formation allows them to punch through thin enemy lines. In reality, the AI seldom deploys its infantry in thin strings, and the wedge smashes into its target like a paper plane hitting a brick wall. Wedge formation typically reduces the damage your unit does, as fewer men are actively involved in the charge and first seconds of the melee.

    Once you have access to the more advanced types of cavalry, there is little reason to continue recruiting light cavalry unless you are strapped for koku.

    Yari cavalry.

    Yari cavalry can be thought of as a better version of light cavalry. They are fast, armed with a yari, and fragile. They do represent a significant step up from light cavalry. Their morale is higher, as are all of their statistics except speed and armour. In all respects they do more damage, take fewer losses, and perform that bit better.

    Yari cavalry have a stronger anti-cavalry bonus than light cavalry, and so this should be their main use. Hunt down and neutralise enemy cavalry of all types as a priority. If you can manage a clean charge they will inflict tremendous damage to the enemy cavalry unit on impact, and that gives them sufficient advantage to win the ensuing melee. Running down routers should be the second priority for your yari cavalry. Engaging infantry should be a task performed only when there are no better targets available, and you should only seek to charge vulnerable units and quickly withdraw again. Yari cavalry are not equipped to survive a melee once they are brought to a halt. Their power is all in the charge.

    Yari cavalry can use the 'wedge formation' skill if your general has purchased the ability which unlocks it. Like all cavalry, they are horrifically vulnerable to spear-armed infantry and should never engage them unless they are routing.

    Katana cavalry.

    Katana cavalry are something of a matched pair with yari cavalry. Where yari are charge-oriented, fragile, anti-cavalry units, katana cavalry are slower, better in a melee, and designed to be anti-infantry.

    Compared to the other melee cavalry types, katana cavalry do not do so much damage on the charge. They will score a good number of kills, but it's not the avalanche effect that the others provide. Once in melee though, the tables turn and katana cavalry will quickly outstrip their cousins. These men wear heavy armour and have a high melee defence skill: they have staying power. They also have quite a high attack score, meaning that they can cut down most types of infantry without problems - provided that infantry does not possess an anti-cavalry bonus. Do not engage yari or naginata infantry unless you wish to see your cavalry reduced to horse burgers. The ideal targets for katana samurai are anything on foot armed with a sword or a bow: units which are inherently weak against cavalry. Because of their combination of weaker charge and stronger melee ability, this is the only unit of cavalry which should not be used in a charge, withdraw, charge fashion. Withdraw them from combat if they are getting mauled, otherwise leave them to do their job.

    You must remember the small size of the unit if you wish to keep it alive. In most unit to unit combat it will be outnumbered 2-1 or even 3-1, and no matter how good the individual warrior, those numbers will tell. A katana cavalry unit can expect to defeat a katana samurai, for example, but it will take plenty of losses in the process if you simply charge it in from the front and leave them to it. If that same battle is fought with the cavalry charging in from the flank or rear, they will take fewer losses. If they charge a katana samurai unit which is engaged with another friendly unit, they will take fewer losses again. Fight smart or don't bother; this unit is far too expensive to throw around carelessly.

    Once again, this unit can use the 'wedge formation' skill if your general has purchased the necessary ability.

    Bow cavalry.

    Bow cavalry are a rather difficult unit. Difficult to use, difficult to find a good role for, difficult to recommend in bulk, difficult to recommend in isolation. With a lot of work they can become rewarding.

    Bow cavalry are fast, mobile archers. They use the same armour piercing arrows as bow samurai and bow warrior monks, meaning that they can be effective against tough targets. There are only a few men in each unit however, so they cannot loose the same clouds of arrows as the various infantry versions. Fortunately, their accuracy is quite good.

    The "drive by shooting" tactic is the best and simplest use for bow cavalry. Ride by a target with 'fire at will' on, and your men will loose arrows as long as they are in range. This allows you to deal damage while staying out of reach. Sometimes you can lure enemy units into chasing your bow cavalry, allowing you to draw them away and isolate them. At this point can send several units to mob them and swiftly hack them to bits; katana cavalry are good for this role. Alternatively, you can simply ignore the isolated unit(s) and focus on defeating the main enemy force while it lacks the support. "Drive by shooting" is a delicate thing; too many bow cavalry units and you will lack the strength to cut the enemy to bits in melee, too few and you won't do much damage or be able to lure many units. Additionally, active bow cavalry units place a significant demand on the player's attention due to the large number of orders which need to be issued and the need to keep them away from enemies. You will have to experiment for yourself and find the number you feel comfortable with.

    Bow cavalry should not be used in a missile duel against any variety of infantry archers if you can help it. For one thing, horses are big targets. For another, there are two arrows headed your way for every one you send back. If you must engage in a shoot out, use the 'swooping crane' formation. This orders the horse archers to gallop around in a circle, loosing their arrows when they pass by their target. It keeps up a steady stream of arrows while making it harder for the enemy to hit their target. Swooping crane will tire your bow cavalry out quickly, and they will still take more losses than you would like. If you must engage infantry archers with your bow cavalry, you should use two or more bow cavalry to target each enemy archer unit.

    In terms of melee oriented statistics like charge, attack value, melee defence etc, bow cavalry are quite weak. They fight with swords and do not receive a bonus of any kind against any target. Their armour is weak, and combined with their low defence skill that renders them fragile. You should order them into a melee only when the situation is very desperate, or when they can hit the rear of a weakened, demoralised unit on the verge of routing.

    The main problem with bow cavalry is that they take up a slot in your army which could be used for something better: something easier to use, or more powerful, or more versatile, or cheaper, or something which is a combination of those factors.

    Great guard cavalry.

    If yari cavalry are pepped up light cavalry, then great guard cavalry are pepped up yari cavalry. Stronger in all possible statistics, the great guard should be used in the same fashion as its weaker yari cavalry brethren. The notable difference is that it can survive for longer in a melee, so it does not necessarily need to be pulled back after a charge has completed. It's still advisable to do so however, as this expensive unit still takes an unfortunate amount of losses if left to fight. Losses are more undesirable than usual, given the unique nature of this unit; replenishment is a slow process. The strong charge is the real benefit of this unit in any case, and standing in melee won't take advantage of that.

    The great guard cavalry can use wedge formation provided their general allows it. They also have a second skill, 'second wind'. This skill refreshes their stamina, allowing them to combat the exhaustion created by riding around the field and fighting. Consider that charging involves galloping around, and that high levels of exhaustion degrades combat effectiveness, and you will see that the ability to refresh fatigue is quite handy.

    The general's bodyguard.

    Each adult male member of your clan, and each general which you recruit via events, comes with a unit of bodyguards. These are the first cavalry you will have access to in the game. Contrary to earlier Total War titles, the bodyguard unit is not particularly strong. No longer is it advisable to use your general as heavy cavalry! Instead, the unit's value lies in the skills you can unlock and the morale bonus the general provides.

    In terms of stats, the unit is slightly stronger than light cavalry, although slower. They use swords in combat but receive no bonus against any other unit type. They are capable of holding their own in a fight for a short while, and can do some respectable damage if charged into weak units like archers. This is really not recommended - in addition to being ill-suited to melee, the loss of your general causes a massive morale penalty across your entire army and it is easy for your general to die. Additionally, this unit is very slow to replenish when back on the campaign map, typically replacing just a single man per turn. Use your general to chase down routers when the enemy's main line breaks, if you have no other cavalry. Otherwise keep him firmly out of the fray.

    Although only one man can command the battle and thus take the title of general, each unit of bodyguards has its own set of abilities and can use them individually. For example, your daimyo and his young son are both present in an army when it enters battle. Both men will appear on the field with their respective bodyguards. Although the man with the highest command rating for the situation will be dubbed the general, the other man will still retain his blue morale boosting circle and any other abilities you have purchased for him. You will be able to use each man's specific abilities by selecting the bodyguard unit and issuing the relevant order. There is no limit on the number of bodyguard units you can have present in a battle.

    The general's abilities unlock gradually as you buy skills for him when he levels up.

    First of all, each general has a blue circle surrounding him when you select the unit. Any unit inside this circle gains a morale boost. The size of the boost depends on the skills and retainers you have assigned that general; it is also possible to increase the size of the circle. Even at the basic starting level the boost is sufficient to transform freshly recruited yari ashigaru into dependable infantry. Placing your general behind your main infantry line is recommended; it protects him, and applies to the bonus to as many units as possible in a location where the fighting is certain to become thick.

    'Inspire unit' boosts a single targeted unit significantly for a short period of time. It increases the target's melee attack or missile accuracy as appropriate, along with further boosting their morale.

    'Rally' attempts to recall a routing unit to the fray. It may or may not succeed, depending on how badly broken the target's morale is. The routing unit needs to be within the blue circle for this ability to have any effect.

    'Stand and fight' is probably the most powerful ability your general can have. When this is selected he and his retinue dismount, draw their swords, and form a defensive square. They are declaring that they intend to fight on until victory or death find them; they will not withdraw. This provides a large attack, rate of fire and morale increase to all nearby units. It will be very difficult for the enemy to break any line supported by this ability. On the downside, if things do go badly then your general is likely to be cut down as he will not manage to get back on his horse in time to escape.

    Siege weapons and special units.


    European cannons.

    This unit is only available to Christian clans during the campaign, so it's quite rare. It has a very long range and tolerable accuracy, combined with a very slow rate of fire. It is best used for bombarding an immobile enemy, such as defensive troops inside a castle. In an open field battle it will manage to get some shots in before the lines close, but not enough to do a large amount of damage.

    The presence of a cannon does tend to make the AI more aggressive in field battles, in that it will not sit back to be bombarded. It will seek to close the gap ASAP.

    Cannon can target and destroy parts of a castle during a siege attack. Destroying towers allows your troops to approach with fewer arrows coming at them, destroying the gates allows easier access to the inner wards, and bombarding the walls causes casualties amongst any unit standing on them.

    Mangonels.

    The mangonel is the only large scale siege weapon available to Buddhist clans. They are essentially a weaker version of the cannon, with shorter range. Their projectiles are not bad though: the pots explode into pockets of flame on impact. This means that they are capable of killing multiple men should they manage to hit a unit.

    Mangonels are less effective as destroying castle structures than cannon, and so you should aim at the units sheltering inside the castle instead.

    Like cannon, mangonels tend to make the AI more aggressive in field battles.

    Rockets.

    Think of a cross between a gun and a firework, and you have the fire rocket. Ineffective at destroying structures, the fire rocket is best considered an anti-infantry weapon. Inaccurate and slow to reload, it is usually best to turn off 'fire at will' and either issue targeting orders yourself or re-enable 'fire at will' when the enemy are very close. If the enemy are running towards you, assume that you will have a single volley, and wait until you can see the whites of your enemies' eyes before firing in order to maximise accuracy. If they do manage to hit something, the results should be impressive. If the enemy are more relaxed in their approach you should be able to manage multiple volleys; target the densest clusters of enemy troops so that each rocket does more damage. Rockets cause a lot of morale damage, and set the area of impact on fire for a short time.

    This unit is terrible in a melee and should never be allowed to fight in hand to hand. It is also horribly vulnerable to cavalry, and enemy archers.

    Due to their long range, you can use this unit to fire over castle walls and kill the men sheltering inside.

    Fire bomb throwers.

    Primitive hand grenades are as deadly to the user as to the target if not deployed with care. This unit should be used in conjunction with a unit of yari ashigaru. Use the cheap, disposable ashigaru to engage your target. Now, run your fire bomb throwers around to the side or rear of the enemy, and order them to throw. BANG! Most of the enemy unit will be blown to bits - as will a large part of your ashigaru. If your fire bomb throwers are standing on higher ground than your ashigaru they can safely throw the bombs over their heads. If you attempt the same thing on level ground your ashigaru will take the brunt of the damage as the grenades explode at their feet. Should you decide that this approach is cruel to ashigaru, it will be very difficult for you to make effective use of this unit. Their range is so short that throwing bombs at a unit charging towards them is a hit and miss affair, as likely to blow your unit up as the enemy even assuming they manage to throw any bombs.

    Unsurprisingly, bombs cause a lot of damage to the morale of any unit hit by them.

    If you happen to have some bomb throwers handy when defending a castle, you might like to try placing them on the walls. Most of the time their bombs will sail over the wall and blow to smithereens the men preparing to climb the walls. Occasionally someone will throw a dud and blow up some of your defenders instead. Hmm ...

    Kisho ninja.

    This is a strange unit; it has quite a few unique traits.

    Kisho training means that this unit can be deployed anywhere on the field at the start of the battle. You can place it right on the opposite side of the map from your army, should you wish. The advantage to this is that it allows you to place it in a good location for an ambush. As you might expect from a bunch of ninja, this is a very stealthy unit, good at hiding in grassland as well as the usual forests. If you order it to walk whenever it moves, it will remain hidden until the enemy reach a close distance. To further the kisho ninja's stealth abilities, it has the skill 'stealth', which enables it to remain hidden while running for a short time after it is activated.

    In terms of weapons, the kisho ninja sport a sword and smoke grenades. The smoke grenades are short-range weapons which, in terms of use, behave similarly to the bombs used by fire bomb throwers. In result they are very different. Blinding grenades lower the accuracy, speed, and combat effectiveness of any men who survive the explosion, making them easy prey for your own units. Note that your own men can be affected by this blinding effect as well, so use the grenades carefully! There are only a small number of men in each unit, however they are trained combat experts and quite deadly. Their armour is light yet this should not matter much if you use them correctly; archers need to see ninja in order to shoot at them, and blinded men fight poorly in a melee.

    The ability to sneak around makes the kisho ninja excellent battlefield assassins, capable of hunting down the enemy general and other key units. Hide them, have them move stealthily into position near the target, unleash the smoke grenades, then charge in to butcher the target while they are still reeling.

    Frogbeastegg's Guide to Total War: Shogun II. Please note that the guide is not up-to-date for the latest patch.

    Members thankful for this post (5):


  11. #11

    Default Re: Frogbeastegg's Guide to Total War: Shogun II

    Putting it all together: some basic army templates


    Now that we have looked at the individual units, let's take a look at how to combine them into an army. The following templates are intended as foundations to help new players field something effective; as they gain experience players should tailor them to suit their preferences. This is by no means a comprehensive selection of templates - there are hundreds of potential combinations. Nor are these templates intended for use in the multiplayer part of the game. The deployment positions illustrated in each screenshot represent a generic starting position which you can then tailor to the terrain you are fighting on, for example hiding some of your reserve forces in a nearby forest in order to set up a surprise attack.

    Each screenshot has a larger version available. Click on the text above the image to open up the full-sized version in a separate tab. It is recommended that you do this while reading each template description as it is far easier to identify the individual unit types in the larger versions.

    While some of these arrangements (most notably the ones involving guns) look awkward to use, the custom grouping tool renders it child's play. If you set up your units in position and then group them by pressing control+[number], the whole group will be locked in their current formation. You can then move the whole complex mass about with a single click, without a single soldier stepping out of place. If you need to change the formation's facing, hold the right mouse button and the formation will appear as a ghost. You can then orient it however you wish without losing the overall arrangement. The 'right click and hold' method is recommended for all movement orders as the ghost allows you to check that nothing will go awry, such as your entire army ending up off-centre and presenting its flanks to the enemy. In the screenshots, you can see which units are locked together in groups by looking at the interface bar at the bottom. Each group has a coloured bar above it, along with the Japanese character for that group's assigned number.

    As a general rule of thumb, until you know what particular types and numbers of units you prefer to use, a balanced force is the best idea. Using the 20 unit maximum, a balanced army would be something like this:
    1 general
    4 bow units of some sort
    2 melee cavalry
    8 yari or naginata infantry to make up your battle line
    5 infantry units as reserves, e.g katana samurai, naginata warrior monks, yari samurai, etc

    When you are more familiar with the game you can start making decisions like fielding more archers and fewer infantry or no cavalry, adjusting the length of the main battle line, increasing the cavalry component at the expense of the infantry, replacing cavalry with shock infantry like the no dachi, adding a gun or siege weapon contingent, and so on. Units which require a lot of player attention, such as cavalry, should be fielded in fewer numbers until the player is more adept at splitting their attention across multiple parts of the battlefield. Consideration should also be given to the unique clan bonuses: build your army to maximise those special strengths. Oda's superior ashigaru won't do you any good if you leave home without them!

    Templates for more advanced armies, such as pure samurai, cavalry heavy, bow heavy, and so on, are not included. The reason for this is simple: by the time the player is in a position to field them, they will understand what they desire in their army and thus will no longer need any guidelines. Nor are templates provided for situational battles, such as defending a castle. Two gun formations are discussed as a lot of players struggle to incorporate them into their army.

    Unit upgrades, such as improved armour or higher experience, will subtly change the manner in which you can use a unit, and thus the unit combinations which are practical. As it takes a while to gain access to large numbers of experienced, upgraded units, this chapter will not attempt to discuss this aspect. By the time the player has access to them, they should be in a position to understand the implications without the need of a guide.

    The basic.

    This template is - as the name implies - the most basic possible. It uses the two most freely available unit types: spears and bows. It is easy to field when you have a small number of units, to expand as you recruit more men, and to incorporate the more advanced unit types.


    The front line is composed of bow ashigaru in loose formation, with skirmish mode toggled on. They will shoot at the advancing enemy. When the enemy line gets close you can either have them fall back behind your infantry line, have your infantry charge forward through them, or have them swing back to the left and right to take up new shooting positions on the flank of the engagement. Experiment with all three of these options; each one suits different battlefield circumstances. Having the archers fall back behind the infantry establishes a more defensive shooting position for them, ideal if there are dangerous units roaming around, such as cavalry on your flanks. Having your infantry charge on through the archers is the least micromanagement intensive option, and it allows your archers to keep on loosing for longer. Be aware that you will suffer some friendly fire as the infantry run past the shooting archers. The casualties should not be too severe, so do not let this put you off the tactic. Moving the archers off to the flanks gives them a clearer line of fire when the lines have clashed. Instead of shooting over their friends' heads (and possibly hitting a few in the back) they will be able to shoot the exposed enemy flanks. Reducing friendly casualties while increasing enemy deaths is always a good thing, however there is a drawback - this kind of positioning leaves the archers more vulnerable to attack by roaming cavalry or flanking infantry. Use it when you have secured your flanks.

    Behind the bow ashigaru is a line of yari ashigaru. Behind them, in the centre, is the general. You can see the blue morale-boosting circle; in this position it covers the core of the infantry battle line. This is good, as generally speaking that is the part which will take the largest battering. If your centre breaks and routs it will be very difficult to recover. More yari ashigaru are positioned to the left and right behind the main infantry line: this is the reserve. These units will deploy outwards in a bid to flank the enemy line once battle is joined, rush to shore up any struggling parts of the main line, and counter enemy flanking attempts.

    You will note that this screenshot shows an army with fewer than 20 units. This demonstrates the flexibility of the basic template. If you have more bowmen, extent the frontal archer line. If you have fewer, make it shorter. If you have fewer yari ashigaru, consider taking a unit from your reserve and adding them to the main line, or make the main line shorter. If you have more yari ashigaru, extend your main line a bit and add more units to the reserve. Two reserve units per flank plus one central one is a good rule of thumb; extending your main battle line to cover too much ground can leave you struggling to adequately support all units.

    Incorporating the samurai unit types is a simple as identifying their role in the army and adding them to the relevant position. Cavalry go with the reserve flanking forces. Melee samurai also take up the flanking reserve positions. Bow samurai can take up forward positions with or instead of the bow ashigaru.

    It is possible to use an all-samurai variation of this template. Simply replace the yari ashigaru with naginata samurai, and the bow ashigaru with bow samurai. This makes for a durable army which is easy to replenish after a battle, and which requires minimal player direction during combat thanks to the naginata's ability to deal with pretty much anything. You can add in a few units of cavalry or non-naginata samurai if you wish.

    The mixed mid-game.

    When you take the basic template and add in lots of samurai, expanding to the full 20 unit limit, you end up with something very much like the mixed mid-game. The template is so named because it will take until the early parts of the mid-game before you have access to this range of samurai and the funds to field them.


    The front line is made up of bow ashigaru in loose formation. They will absorb all incoming enemy fire, while targetting low-armour units. Behind them come bow samurai. They start the battle sheltered by the bodies of the ashigaru; once you have an idea of what your opponent is intending to do you should deploy them in a position where they can shoot at any armoured targets. In a situation where you are pressing the offensive, this is often done by splitting the samurai archers into two 'sides' and moving them out to the far left and far right of the bow ashigaru. In a more defensive situation where you are letting the enemy come to you, you can move the bow samurai around to the flanks as described above, or you can continue to hold them behind the ashigaru. This second tactic ensures that the ashigaru absorb all of the oncoming damage and act as a distraction, enabling your samurai to pick off their targets. When the enemy infantry line closes with your two sets of archers the choice of action remains the same as when using the basic template: withdraw your archers behind your infantry line, withdraw them out to flanking positions, or charge your infantry through your archers. If you are fighting a very entrenched battle, where you anticipate holding your position against greater numbers, you might like to deploy the bow samurai behind the infantry line from the very beginning. This ensures that they are sheltered, and can pick away at the most dangerous targets without interruption. As bow ashigaru are more disposable, they should once again be deployed in front in this situation.

    While this template boasts quite a few samurai units, you will notice that ashigaru are still present. This is a cost cutting measure, and a bid to gain a little more ... disposability in the army's make-up. If you need to assault a defensive position under enemy fire, send those ashigaru in first and follow up with your naginata. In more balanced situations you can mix the naginata and yari ashigaru together to form a single infantry line. In this screenshot, the front line is made up of a unit of naginata, then two yari ashigaru, then a naginata in the centre, two more yari ashigaru, and finally one more naginata. The naginata hold the key positions of the main line: if either flank or the centre crumple under enemy assault the situation will swiftly become dire. Their higher morale and combat ability make them ideal for this role when compared to the fragile ashigaru. The ashigaru themselves have the safer positions in the line, and so should take less of a battering.

    Once again, the general is parked in the centre-rear. His blue circle covers most of the infantry line, and he has easy access to all parts of the line so that bringing abilities like 'inspire' and 'stand and fight' into action will not be a problem.

    Behind the general stands a lone unit of yari samurai. They are the core of the reserve in this set-up. The central position, combined with the unit's speed, means that they will be able to reach all parts of the battle equally quickly. When you need to throw in your emergency unit you do not want them to travel longer than necessary! They can also act as a bodyguard for your general; the AI sometimes likes to send a single unit of cavalry around the rear of your army to pick off your general after most of your reserves are engaged. The yari samurai are excellently equipped to deal with this.

    To either side and behind the main line sit the flank reserves. Cavalry should be considered separately to the infantry, although there is a lot of overlap in their roles. These are the flexible parts of your army, and your choice of unit type should reflect this. Here, 4 units of katana samurai have been deployed. Other strong candidates for this position are naginata samurai, naginata warrior monks. Yari samurai and no dachi samurai can perform, but should not be used exclusively as the awful defence of the no dachi and the reduced ability to kill infantry quickly of the yari samurai can prove crippling if the enemy field the right units against your flanks. Katana samurai can generally rely on your cavalry or the lone yari samurai reserve to deal with flanking enemy cavalry, so their own weakness is much less of a disadvantage in this role. If you have been able to build multiple dojo types in your empire, it is possible - and preferable - to mix up the types of units used in this reserve. It is better to field two naginata types to deal with both cavalry and infantry, and two strong infantry killers, with each flank hosting a single unit of each type. The units in this position will deploy out in a bid to flank the enemy line once combat is joined, deploy to counter enemy flanking attempts, move to extend the length of the main line if the enemy is seeking to envelop you, rush in to assist struggling sections of the main infantry line, and more. Versatility and the ability to kill infantry efficiently is a key part of this role. Consider these units to be claws: once the main lines have clashed they will emerge to begin the real work of tearing the enemy to shreds.

    The two units of cavalry are actually deployed behind and slightly closer to the centre of the formation than the flanking reserve infantry; the screenshot does not show this very well. This slightly inward position keeps them better protected until you are ready to send them galloping out. It is terribly annoying to notice that your expensive cavalry has been shot at, or mauled in a flank melee which spilled over. The inward-and-back position also makes it a bit easier to gallop them out without accidentally catching them on the evolving melee on your flanks. All types of cavalry are suitable to this position, except bow cavalry. Bow cavalry should be deployed forward and wide out on the flanks, equal to or ahead of the bow ashigaru. The cavalry have three roles. Firstly, they are to intercept and destroy enemy flanking cavalry (if you have yari cavalry) or infantry (if you have katana cavalry), if your infantry reserves are unable to deal with them. Secondly, they are to use their speed to get around the enemy line and either clean-up their archers, or charge directly into the rear of their battle line, triggering mass casualties and a rout. Thirdly, they are to head out and chase down routing units once the situation is safe for them to do so. Theirs is a supporting role: head-on do-or-die charges result in piles of expensive horsemeat.

    The staggered gun formation.

    This is a complex formation that needs several screenshots to adequately illustrate it. The first is the view from the centre-rear of the army. The second again shows the entire army, this time from an oblique angle which shows the depth between the various lines. The third is a close-up of the centre of the formation, giving a better view of the staggered yari, guns and supporting infantry set-up.

    It takes a bit of practice to get results with this formation. Success relies on the timings of your charge, and on learning to read the enemy's plans. If you misread those plans or mistime your charge you will likely find yourself overrun, or charging out too soon and so preventing your guns from doing as much damage as they could. It can be very tricky to successfully field guns against the AI as it knows that a mass charge can prevent more than a few volleys being fired.

    As you may gather, this formation is one which relies on the enemy coming to you. Whether that means growing roots and never moving, or marching out to meet the enemy and then halting so that they must close the final distance, it doesn't matter. Trying to assault the enemy with this formation will lead to your frontal yari ashigaru being shot to bits, then your guns flattened before they have chance to do much, then the rest of your army being cleaned up by a victorious foe.


    The front line is made up of 4 yari ashigaru in spearwall formation. Their job is to stand in place and get charged. They are a shield for the gun units, and a way to catch the enemy line so that your gun units can fire an extra volley or two at extreme close range.

    The second row of units comprises of the 4 gun units. Notice how, together with the yari ashigaru, they form something which looks very much like a chessboard when viewed from above.

    Behind each gun unit is a supporting infantry unit, in this example naginata samurai. You can use katana samurai, or any other reliable melee infantry unit for this role. When the tide of the enemy advance gets too close to the guns, these units will charge forward through the gun units and engage the enemy.

    The general is positioned in the centre, about equal with the supporting infantry units.

    A single unit of yari samurai is positioned near the general as an emergency reserve. As usual, they will use their special ability to sprint to wherever they are needed most.

    Cavalry is positioned in a staggered formation at the rear of the army, 2 units per flank. One is placed so its left-hand outer edge is roughly equal with the very edge of the army. The second is positioned behind it and closer in to the centre of the army formation. These units will be dealing with all threats to your flanks, so ensure that you do not use fragile light cavalry. If you can produce cavalry with upgraded armour, charge or attack values, definitely take advantage of that here - if the enemy decides to flank at all these units will be doing the heavy lifting to prevent your army being crumpled like a paper cup! As a secondary responsibility, this cavalry will hunt down and destroy any enemy archers. That's a distant second, however. It is better to absorb a few arrows than to leave your flanks vulnerable. When the guns do their work and trigger a mass rout, get your cavalry out there pursuing broken units so that they do not have chance to reform and return for another dose.

    You may have noticed that there are two units of bow samurai on the army interface in the third screenshot. These two units are occupying the 'free' slots in this formation. If you wish, you can replace them with more cavalry, or some infantry which can help guard your flanks. Having a pair of bow units does give your army a bit of long range punch however. Bow warrior monks are very good in this role thanks to their extended range. If you choose to use archers, there are two places where you can deploy them to best support the formation. These screenshots illustrate both positions by placing one unit in one arrangement and the other in the second, Normally you would deploy both units in the same arrangement. The first arrangement sees the bow unit flung forward and on the flank, angled slightly so that it can shoot into the horde as it approaches the yari and gun set-up. The unit deployed to demonstrate this arrangement can be seen in the third screenshot, on the far left-hand side. In a real battle one archer would be placed on the right flank and one on the left. This allows them to inflict damage while the enemy is at maximum range, and hopefully you will not need to move them much as the enemy will focus on your guns. If you do need to move them, there are a variety of directions they can go in and continue to shoot. This is more of a sniper's position; let your guns deal with the general bulk of the enemy army, and pick the choicest targets for your bows. The second arrangement places them about equal with the general. The unit illustrating this position can be seen in all three screenshots, but once again is most clearly visible in the third. It has been set to loose formation in order to make it easier to spot; in reality there is no need for it to be set to loose as it is very unlikely anyone will be able to shoot at it. In a real battle, one archer would be placed on the left of the general and one on the right. In this position they can shoot without the danger of enemy interruption, and will add to the withering hail of missile death which greets those attempting to charge your lines. Every little helps - the more kills you make before the enemy contacts your yari ashigaru, the more likely it is that the enemy will begin to rout without engaging you. Once that initial charge breaks and runs the battle is all but over.

    This formation absolutely requires the use of the custom group formation function mentioned at the start of the guide. Deploy the various lines, then select all of the units at once and assign them to a group via control+[number]. If you fail to do this you will have no chance of maintaining the complex collection of unit spacings. As you can see in the third screenshot, all of the guns and yari are assigned to a single group. It is actually better to add the naginata to this group as well; leaving them unassigned as per this example makes life that bit more difficult.

    Creating the various lines is pretty simple. Select all 4 gun units at once and drag them out into the required number of ranks with a simple 'hold right mouse button and drag' order. Do this at the rear of your deployment zone so that they won't get in the way while you set up the real formation. Now do the same with your yari ashigaru. This ensures that all of these units are set to a uniform size. Make sure that all of your gun units have skirmish mode turned off; you want them to hold their positions. You may or may not wish to enable 'fire at will'. Enabling it does make management easier, but you are at the mercy of the unit's choice of target selection. Now, select a single yari unit and click to deploy it where you want the left hand end of the formation to begin. Do this with a single right click so that the unit will not readjust its spacing. Now select the first gun unit and move it in the same way, setting it up behind the yari unit and so that it's right hand edge is in line with the yari's left hand edge. This ensures that the teppo unit's field of fire is clear, and that they are far enough back to be effectively shielded. Select your second yari unit and deploy him in the same way, paying careful attention to keeping it in line with the other yari unit and out of the guns' field of fire. Continue doing this until all units of guns and yari have been repositioned. At this point you can select all of the gun and yari units and assign them a numbered formation, or you can position the supporting infantry and then assign the group.

    The flanking gun formation.

    This is an alternative, simpler formation for those who wish to field teppo. It uses the same units to demonstrate as the staggered formation. While it is easier to set up and use, it is also easier for the enemy to sweep your gun units away when melee is joined. It's difficult for them to continue firing once the enemy has closed. On the positive side, the formation is less risky as it does not share the staggered formation's multiple exposed unit flanks.

    Unlike the other templates, this one is viewed from the front in the screenshot.


    The 4 units of yari ashigaru form a centre line, and are placed in spearwall formation. As with the staggered formation, their job is to stand still and take the brunt of the enemy charge.

    Behind the yari ashigaru stand the bow samurai, protected from the ebb and flow of the melee and so able to shoot constantly. Their main job is to add to the hail of death faced by the approaching enemy line, helping to weaken it and sap morale so that it breaks before or shortly after contact with the yari spearwall. They are deployed in loose formation because sometimes the enemy will use its archers to shoot into the heart of this formation. If the enemy is being coy about moving into range of your guns, you can try sending your bowmen out in front of the yari spearwall to skirmish. That's not really recommended, as the situation gets too busy if the bows then have to withdraw back through the yari as the guns open up and the enemy hurl themselves with all possible speed at your lines. You do not want to invite friendly fire, or reduce your orderly lines into a packed mess right as the charge hits. Withdrawing the archers to the sides instead of behind the spearwall would see them blasted to bits by your guns, so don't try that.

    The guns are split up, a pair of units on each flank. As you can see, they are set back a bit from the yari line. This gives them a few more seconds to shoot into the advancing mass, as it catches and entangles on the yari. Depending on how the battle evolves, you may not move the gun units at all. If the charge is broken swiftly, and turns into a rout, the guns can stand in place and continue to fire. If enemy morale holds, or if there is a second wave following closely on the heels of the first assault, you should consider relocating your guns so that they can fire into the flanks or rear of the engaged enemy. This is quite easy to do; often it's as simple as issuing an order which has them run straight to one side and about face.

    Each pair of guns has a pair of infantry located behind it. Here, naginata samurai. As with the staggered formation, any variety of strong melee infantry will work in this role. Their job is simple: when the enemy are very close to the guns they are to charge forward and engage the enemy. Do make sure that your gunners are not about to fire another volley as you do this! If they fire as the naginata run past you will kill more of your own people than the enemy. When that initial melee is resolved the infantry will select from one of two possibilities. If the guns are still standing in position and have not been redeployed to flank, the infantry will return to standing behind them, allowing the guns to resume firing without danger of friendly casualties. If the guns have been moved into a flanking position, or if the yari spearwall is struggling badly, the infantry will head over to help in that melee.

    The cavalry, general, and yari samurai reserve are deployed in the same fashion as the staggered formation, and their role is all but identical.


    Frogbeastegg's Guide to Total War: Shogun II. Please note that the guide is not up-to-date for the latest patch.

    Members thankful for this post (5):


  12. #12

    Default Re: Frogbeastegg's Guide to Total War: Shogun II

    Appendix 1: The Ikko-Ikki downloadable content.


    The Ikko-Ikki downloadable content pack (or DLC for short) is an optional extra for the game. It is only available via steam. Please check the steam store to find out how much it currently costs in your region. On purchase, steam will automatically install the DLC and it will be incorporated into the game ready for the next time you play. You do not need to start the game differently, configure any additional options, or begin a new campaign to take advantage of the content unless you wish to play as the Ikko-Ikki faction.

    This section is intended as an overview of the DLC's contents and the changes it makes to the game. It won't tell you how to win as the Ikko-Ikki. Some of the changes are clearly apparent from the store page listing. Others are subtle, and only revealed once play has commenced.

    The Ikko-Ikki DLC adds the following main features into Shogun II:
    • A new clan for use in single or multiplayer Campaign modes and Custom and Multiplayer Battles
    • 8 new unit-variants specific to the Ikko-Ikki clan
    • New skill trees
    • New Ikko-Ikki Monk Agent with his own specific skill tree
    • The Warrior Nun unit – can be trained by any clan except the Ikko-Ikki
    • New Naginata Warrior Monk hero
    • New Historical Battle: Nagashima (Ikko-Ikki VS Oda)
    • Ikko-Ikki armour set for Avatar - includes hood, robes and barefoot leg-pieces.
    • New Retainers for use in the Avatar Conquest mode


    It does not add any new steam achievements. The DLC does not act as a 'patch' fixing game issues, and ownership is not required in order to benefit from future patches. Nor is it required for playing multiplayer mode against owners of the Ikko-Ikki pack, as the patch released just prior to the DLC adds in the new unit models to all versions of the game. The DLC is required if a player wishes to command the new units, however.

    Detailed information on all of the units, buildings and other features added by the DLC can be found in the Shogun II in-game encyclopaedia. This information is part of the patch, and so can be viewed by players who do not own the DLC.

    Playing as the Ikko-Ikki.

    The Ikko-Ikki are unique in terms of the campaign experience they offer. The Ikko-Ikki religion belongs to them alone, and so they must convert conquered provinces in much the same way as a Christian clan. The 'different religion' diplomacy penalty applies to their relationship with every other clan in Japan. On the bright side, they have an easier time spreading their religion due to factors like generals spreading the religion, and buildings like the 'Jodo Shinshu temple' chain. The Ikko-Ikki will have a slightly easier time causing rebellions in enemy provinces with their monk agents, as having a high percentage of the target population following your own religion makes it slightly harder to successfully cause a revolt. When a province revolts anywhere in Japan, there is a small chance that it will elect to join the Ikko-Ikki, whether you had direct involvement in causing the rebellion or not. This means that it is sometimes possible to expand without expending any effort! This unique bonus can be a double-edged sword; free land is nice, but you need to be able to hold on to it in order to benefit from it.

    In terms of units, the Ikko-Ikki have a lot of unique soldier types. Their ashigaru units are all larger than the basic version and have slightly higher morale, but have weaker defence and attack scores. This means that each individual man is weaker than the standard. Collectively, the Ikko-Ikki version is about even with the basic one, as the extra men and morale allow it to fight for longer before it routs. The larger number of men means that a single one of these units outnumbers every other individual unit on the battlefield. The Ikko-Ikki also benefit from fearsome warrior monks. Their special version of the naginata warrior monk has slightly higher attack, charge and defence values. The bow warrior monks have slightly better accuracy and reloading skills. Finally, they have access to the unique naginata warrior monk cavalry, and matchlock warrior monks. Due to the nature of their ideology, the Ikko-Ikki do not have access to the normal samurai units. Instead they have ronin versions, which tend to be stronger in some areas compared to the standard versions. I recommend checking the encyclopaedia's unit section for more details.

    The Ikko-Ikki have a lot of morale-related traits. In addition to the higher morale values allocated to some of their units, their generals have a skill development path dedicated to increasing the effectiveness of morale-related abilities like rally and inspire. This means that the winning Ikko-Ikki battlefield strategy is based on utilising morale penalties like the warrior monk's war cry to make your foes waver, and using your superior morale to make your men stand in situations where others would rout.

    The Ikko-Ikki cannot recruit the metsuke agent. This can be quite a setback, as the metsuke provides some very useful missions in addition to the economy boost gained by assigning him to oversee a settlement. Judicious use of ninja and monks will have to fill the gap as much as possible.

    The last change the Ikko-Ikki bring to the campaign is the victory condition. While in reality victory requires conquest of the capital plus certain named provinces same as any other clan, ideologically the reason is different. Other clans selfishly desire to make their Daimyo shogun. The Ikko-Ikki wish to enact social reform.

    The Ikko-Ikki are rated medium for campaign difficulty.

    Playing against the Ikko-Ikki.

    If the player is not commanding the Ikko-Ikki faction, they will notice that they now tend to be a more prominent force on the campaign map. In games without the DLC it was not unusual to observe the Ikko-Ikki being annihilated quite early on, and then surging back into life when certain regions rebelled. As a faction their lifespan was short and sporadic. Once the DLC is installed, the Ikko-Ikki tend to be much more resistant, and can even expand to control large areas of central Japan. They also work to spread their unique religion. Playing as a central clan, such as the Uesugi, the Hojo, or the Oda, is now noticeably more difficult due to the increased strength of the Ikko-Ikki.

    Previously, central clans could pay little attention to religion. Christianity tends to remain confined in the far west of Japan. Now the Ikko-Ikki's unique religion is at play in central Japan, and clans must pay attention to any inroads it may be making in their own territory. Converting freshly conquered provinces is also now a concern.

    New units for existing factions.

    All factions aside from the Ikko-Ikki are able to recruit the new warrior nun unit. This unit is a twist on the naginata warrior monk, possessing greater melee attack, charge and melee defence values, but weaker morale. They make excellent shock troops, attacking the enemy line at a crucial weak point where they can slay large numbers of foes swiftly. They should be kept protected from ranged units as they have very little armour to guard them against arrows. The low armour rating also makes them a poor choice for receiving cavalry charges, despite their strong anti-cavalry rating. Instead, let another unit take the charge and use the warrior nuns to charge the now-stationary cavalry.

    The naginata warrior monk hero is precisely what you would expect based on the other hero units. It is a small unit of ultra-elite warriors, that takes the naginata warrior monk's strengths to the maximum. In addition to their fearsome melee abilities, the monk hero also has a pair of powerful morale influencing skills: 'war cry' and 'stand firm'. War cry is the same ability possessed by the naginata warrior monks; it gives a powerful blow to enemy morale. Stand firm gives a significant boost to the morale of nearby friendly units, allowing them to fight on in situations which would normally cause a rout.


    . . .
    The warrior nun, and the naginata warrior monk cavalry

    Frogbeastegg's Guide to Total War: Shogun II. Please note that the guide is not up-to-date for the latest patch.

    Members thankful for this post (4):


  13. #13

    Default Re: Frogbeastegg's Guide to Total War: Shogun II

    Credits.


    This guide could not have been created without the community's many, many discussions on strategy, and tireless research into gameplay mechanics. The questions asked by new players on major game forums provided the best indication of what this guide needed to cover. Thank you to the hundreds of people on totalwar.org, totalwar.com, totalwarcentre.net, eurogamer.net's Shogun II topic, steam's Shogun II forums, gamefaqs.com's Shogun II forum and quartertothree.com's Shogun II topic.

    Assisting me in making the guide were:
    Andres, for general support and for raising awareness of the guide.
    Crazed Rabbit, for creating the title image, and proof reading.
    Econ21, for general guide feedback.
    GeneralHankerchief, for taking screenshots for the unit section.
    Gregoshi, for proof reading.
    Hosakawa Tito, for proof reading.
    Kagemusha, for creating various images.
    Lord Preston, for proof reading.
    Ludens, for acting as proof reading coordinator.
    Monk, for helping with in-game research and creating the agent images.
    Myddraal, for creating various images.
    Peasant Phill, for editing the unit images.
    Sigurd, for some technical forum fixes.
    Tamur, for helping with in-game research.
    Therother, for forum based support, and helping with in-game research.
    Tincow, for loads of forum based support.
    Voigtkampf, for proof reading.
    Yaseikhaan, for taking screenshots for the unit section.

    Thank you to CA, for creating such an excellent game, and for providing me with the occasional bit of information.
    Frogbeastegg's Guide to Total War: Shogun II. Please note that the guide is not up-to-date for the latest patch.

    Members thankful for this post (2):


  14. #14

    Default Re: Frogbeastegg's Guide to Total War: Shogun II

    Thank you, Lady Frog, for creating an excellent TW guide once again!
    Balloons are opium for the Orgah's

  15. #15
    ..fears no adversary Senior Member Jochi Khan's Avatar
    Join Date
    May 2002
    Location
    South Wales UK
    Posts
    1,213

    Default Re: Frogbeastegg's Guide to Total War: Shogun II

    Just what I have been waiting for.
    Now perhaps the mysteries of the 'Campaign' part of the game will become clearer to me.
    R.I.P Great Warrior Ja mata TosaInu


    sat at the..Nomad Alliance..campfire


    Do your best and do it according to your own inner standard
    --call it conscience--
    not just according to society's knowledge and judgement of your deeds.

  16. #16
    Boy's Guard Senior Member LeftEyeNine's Avatar
    Join Date
    Sep 2003
    Location
    Yozgat
    Posts
    5,168

    Default Re: Frogbeastegg's Guide to Total War: Shogun II

    Woot, this misses a price tag.


  17. #17
    The Abominable Senior Member Hexxagon Champion Monk's Avatar
    Join Date
    Jan 2003
    Location
    YU-ESS-AY
    Posts
    6,667

    Default Re: Frogbeastegg's Guide to Total War: Shogun II

    Quote Originally Posted by LeftEyeNine View Post
    Woot, this misses a price tag.

    Damn straight. The stats alone she shared with us are absurd. Over 50,000 words, 300,000 letters, 800 paragraphs. Now that's dedication.

    Our thanks, froggy.. now get some rest. You deserve it.

  18. #18
    Moderator Moderator Gregoshi's Avatar
    Join Date
    Oct 2000
    Location
    Central Pennsylvania, USA
    Posts
    12,981

    Default Re: Frogbeastegg's Guide to Total War: Shogun II

    Quote Originally Posted by Monk View Post
    Our thanks, froggy.. now get some rest. You deserve it.


    ---( The words are written, the work is done. Now its time for the frog to have fun. )
    This space intentionally left blank

  19. #19

    Default Re: Frogbeastegg's Guide to Total War: Shogun II

    An excellent peice of work,CA should use thiS!
    And Frogbeast,I thank you for creating this,it does take a long time to do this!
    One thing,I'm stuck here,Let me show you.


    Now,in your campagin section,it would work perfectly.

  20. #20
    Member Member Cash's Avatar
    Join Date
    Sep 2002
    Location
    Florida, USA
    Posts
    26

    Default Re: Frogbeastegg's Guide to Total War: Shogun II

    Well done. Explains a lot. Thank You for the time put into this guide.

  21. #21
    Guest Member Populus Romanus's Avatar
    Join Date
    Jan 2011
    Location
    Seattle Suburbs
    Posts
    1,335

    Default Re: Frogbeastegg's Guide to Total War: Shogun II

    Absolutely mind boggleingly incredible amount of work put into this truely massive guide!

    Just one thing, are you going to do a guide for the new DLC with the Gempei War and the new agents?

  22. #22

    Default Re: Frogbeastegg's Guide to Total War: Shogun II

    Well done on an Epic compilation of great strategies and tips.

    Section "How to survive the first 4 turns", para 9, " If you forget to assign a choice the game will not prompt you";One of the patches changed it so the game will make a random choice if you do not choose on turn 1 and this dosen't appear to be noted.

    TWC's Wealthmonger had this correction also
    Good guide alot of work put into it, one small correction. Page #3 "If your Daimyo has low honour it will cause a happiness penalty. If he has 2 honour then there is a -1 penalty, if he has 1 honour then it's -2, and 0 honour gives a nasty -3 penalty."
    I purposely ruined Oda Nobuhide's Honour to see the outcome and although his honour was technically -2 it was actually showing as 1, being the minimum Honour your Daimyo can have. So the -3 penalty can't happen because the game won't allow it. Please correct me if I'm wrong. I'm not a member of .org so I'll put it here and hope they see it.
    Last edited by crzyrndm; 08-15-2011 at 07:04.

  23. #23
    Liar and Trickster Senior Member Andres's Avatar
    Join Date
    Jul 2006
    Location
    In my own skin.
    Posts
    13,208

    Default Re: Frogbeastegg's Guide to Total War: Shogun II

    froggy, you're fantastic

    Andres is our Lord and Master and could strike us down with thunderbolts or beer cans at any time. ~Askthepizzaguy

    Ja mata, TosaInu

  24. #24

    Default Re: Frogbeastegg's Guide to Total War: Shogun II

    Thanks, everyone.

    Quote Originally Posted by Takeda Shogunate View Post
    One thing,I'm stuck here
    That's a touch situation! I think the main problem is the fact that your borders are quite sprawling. That means you need to maintain more troops than you would if you had compact borders, which means more expense and less funding for development, which makes bankruptcy easier.

    It's hard to say what you can do. I'd say your first priority has to be reducing costs and/or increasing income. Check to see if you can safely disband some units. Since 90% of your provinces share a border with an enemy, you probably can't, but maybe you can disband some samurai and then buy cheap ashigaru instead as a temporary measure. That would save you approximately 100 koku per unit. If you have some ships, try and claim a trade node or two ASAP. Check to see if you can get trade agreements with anyone.

    Or you could take drastic action: abandon some of those hard to defend, isolated provinces, bundle the units which garrisoned them up into an army, and go and take some of the provinces in areas which will give you shorter borders. For example, if you manage to take Ise, Owari and Iga, you won't need to garrison two of those provinces and can also remove garrisons from Echizen and Hida. Even if you manage to scrape through without abandoning provinces, you need to take action to shorten your borders.

    Quote Originally Posted by Populus Romanus View Post
    Just one thing, are you going to do a guide for the new DLC with the Gempei War and the new agents?
    Probably not, for two reasons. The first is time: I had to cut a lot of planned content in order to get the guide out, simply because the time I have available to work on it has decreased drastically. There should have been a battlefield strategy and tactics section, a battlefield controls section, a massive useful links section, a large navy section, skill development plans for the agents, a section on generals and their development, a clan management chapter, and more. All cut. The army template chapter should have been longer and far more useful.

    Secondly, I have not played Shogun II for fun since I began work on the guide back in April. Everything has been about research, testing, more research, and more testing, to the point where the game feels like work. You wouldn't believe how badly that warps the way you play - using units, and tactics, and strategies that you dislike, repeating the same tedious actions over and over in order to record the results, watching the turn limit tick away as you spend time trying to figure out something which you don't actually care about knowing that you will have to rush later in order to catch up on the aspects you are being forced to neglect now. There's a reason I get a funny twitch every time someone mentions agent success chances ...

    Quote Originally Posted by crzyrndm View Post
    Section "How to survive the first 4 turns", para 9, " If you forget to assign a choice the game will not prompt you";One of the patches changed it so the game will make a random choice if you do not choose on turn 1 and this dosen't appear to be noted.
    Ah, that's useful.

    Page #3 "If your Daimyo has low honour it will cause a happiness penalty. If he has 2 honour then there is a -1 penalty, if he has 1 honour then it's -2, and 0 honour gives a nasty -3 penalty."
    I purposely ruined Oda Nobuhide's Honour to see the outcome and although his honour was technically -2 it was actually showing as 1, being the minimum Honour your Daimyo can have. So the -3 penalty can't happen because the game won't allow it. Please correct me if I'm wrong. I'm not a member of .org so I'll put it here and hope they see it.
    That must have changed in a patch. I observed that effect in one of my earliest games, the one where I went Christian as Shimazu. Can't remember if that was the release version or the first patch. I haven't tried it again since. Thanks for copying that over; I'll copy of my response over so he knows it's been seen.

    I'll see if I can find time to edit both in.
    Last edited by frogbeastegg; 08-15-2011 at 12:29. Reason: typo; 100 koku, not 200
    Frogbeastegg's Guide to Total War: Shogun II. Please note that the guide is not up-to-date for the latest patch.


  25. #25

    Default Re: Frogbeastegg's Guide to Total War: Shogun II

    Any chance of getting this into .pdf form ?
    Say: O unbelievers, I serve not what you serve, nor do you serve what I serve, nor shall I serve what you are serving, nor shall you be serving what I serve.
    To you your religion, and to me my religion.

  26. #26

    Default Re: Frogbeastegg's Guide to Total War: Shogun II

    Quote Originally Posted by LestaT View Post
    Any chance of getting this into .pdf form ?
    A PDF version will be available in a week or two; Tincow's making it. We're waiting a little bit in case I make any edits.
    Frogbeastegg's Guide to Total War: Shogun II. Please note that the guide is not up-to-date for the latest patch.


  27. #27
    Arrogant Ashigaru Moderator Ludens's Avatar
    Join Date
    Nov 2003
    Posts
    9,062
    Blog Entries
    1

    Default Re: Frogbeastegg's Guide to Total War: Shogun II

    Congratulations on finishing it, Froggy.

    Looking for a good read? Visit the Library!

  28. #28

    Default Re: Frogbeastegg's Guide to Total War: Shogun II

    Great and helpful guide! That's a lot of work! Good dedication on your part! I have a hard time finishing projects so I know how it's easy to get bogged-down on a long task. Nice work!

  29. #29
    Illuminated Moderator Pogo Panic Champion, Graveyard Champion, Missle Attack Champion, Ninja Kid Champion, Pop-Up Killer Champion, Ratman Ralph Champion GeneralHankerchief's Avatar
    Join Date
    Mar 2006
    Location
    On a pirate ship
    Posts
    12,544
    Blog Entries
    1

    Default Re: Frogbeastegg's Guide to Total War: Shogun II

    Absolutely brilliant. Congratulations, froggy.
    "I'm going to die anyway, and therefore have nothing more to do except deliberately annoy Lemur." -Orb, in the chat
    "Lemur. Even if he's innocent, he's a pain; so kill him." -Ignoramus
    "I'm going to need to collect all of the rants about the guilty lemur, and put them in a pretty box with ponies and pink bows. Then I'm going to sprinkle sparkly magic dust on the box, and kiss it." -Lemur
    Mafia: Promoting peace and love since June 2006

    Quote Originally Posted by TosaInu
    At times I read back my own posts [...]. It's not always clear at first glance.


  30. #30
    Kaishakunin Member smooth_operator's Avatar
    Join Date
    May 2010
    Location
    --somewhere where there's lots of peanuts-- --and beef--
    Posts
    109

    Default Re: Frogbeastegg's Guide to Total War: Shogun II

    This guide is so good I can cry! I'll be waiting for the PDF version. It's a major advantage getting to know the nitty-gritty of the Shoggy campaign. Thanks a lot froggy! :)
    a totally innocent sig...


Page 1 of 5 12345 LastLast

Bookmarks

Posting Permissions

  • You may not post new threads
  • You may not post replies
  • You may not post attachments
  • You may not edit your posts
  •  
Single Sign On provided by vBSSO