View Poll Results: Three choices to you

Voters
3. This poll is closed
  • Directive 21 *or* Eastern Front 1941-1945

    1 33.33%
  • Autumn Fog

    0 0%
  • Festung Kolberg

    0 0%
  • Kharkov 1943

    2 66.67%
  • Operation Neva - Leningrad 1944

    0 0%
  • Call to Arms

    0 0%
  • Road to Moscow series - 8 scenarios

    0 0%
  • Poland 1939

    0 0%
  • The Great War 1914-1918

    2 66.67%
  • Campaign for North Africa

    1 33.33%
  • Operation Torch 1942

    0 0%
  • Race for Tunis 1942

    1 33.33%
  • Aegean 2008

    0 0%
  • Cyprus 1974 - Operation Attila

    0 0%
  • South American Conflict series - 4 scenarios

    0 0%
  • Vietnam Combat Operations series - 15 scenarios

    0 0%
  • Weserebung 1940

    0 0%
  • Holland - A Bridge Too Far 1944 *or* Nijmegen 1944 *or* Arnhem *or* Koblenz '44

    0 0%
  • Operation Ortsac 1962

    0 0%
  • On To Philadelphia 1914

    1 33.33%
  • Fall Grau *or* 1945 - What if

    0 0%
  • Israel's Next War 2006

    0 0%
  • Operation Cartwheel 1943-44

    0 0%
  • Demyansk

    0 0%
  • Fourth Strategic Attack

    0 0%
  • Konrad

    0 0%
  • Operation Varsity 1945

    0 0%
  • Crete - Operation Merkur 1941

    0 0%
  • Anzio 1944

    1 33.33%
  • Gah!

    0 0%
Multiple Choice Poll.
Results 1 to 24 of 24

Thread: The Next TOAW DAR/AAR

Hybrid View

Previous Post Previous Post   Next Post Next Post
  1. #1

    Default Re: The Next TOAW DAR/AAR

    Just the two, then? Going by view counts, I anticipated at least 10! Very well...

    Anzio 1944 has been rolled out of the 6-way tie. I will begin in a week or two.

    A setup post will be promulgated within a day or two.

    The "runner-up" roll () is Option 1, of which Directive 21 has been selected because it is a solo scenario designed to be played against the Computer.
    It will serve as part of a series of frequent 'Extras'.

    Stand by while I make the arrangements. I intend to put together a quality AAR for posterity, regardless of other considerations!
    Vitiate Man.

    History repeats the old conceits
    The glib replies, the same defeats


    Spoiler Alert, click show to read: 


  2. #2

    Default Re: The Next TOAW DAR/AAR

    OPERATION SHINGLE: FROM ANZIO TO ROME


    BRIEFING

    Date: January - February 1944
    Location: Anzio, Italy
    Map scale: 1km per hex
    Time scale: 6 hour turns
    Unit scale: Company
    Length: 40 - 120 turns

    HISTORICAL BACKGROUND

    "I had hoped that we are hurling a wild cat on the shore, but all we got was a stranded whale"
    (W. Churchill)

    At the end of January 1944 US VI Corps executed an amphibious assault behind German lines at the city of Anzio, just 50 km south of Rome, in an attempt to break the stalemate at the Gustav Line. To achieve this VI Corps was to advance onto the Alban Hills, a key feature dominating the southeastern approaches to the eternal city, thus cutting off German 10th Army's lines of communication and forcing a retreat from the Gustav line. Despite total tactical surprise a combination of over-cautiousness, hesitation and willingly ambiguous orders failed to exploit the situation. The Germans reacted swiftly and brought in substantial forces to not only contain the beachhead, but also to release a determined counterattack. After the climax of the battles by mid February the beachhead front line came to a stalemate with neither side having achieved its operational objectives.
    The scenario covers the initial landings and the opening phase of "Shingle" (the codename for the operation) until mid-February with the possibility of an earlier end. It also incooperates some small what-ifs.
    This scenario is as close to tactical as the TOAW engine can reasonably approach. As such, there will be plenty of tactical details included in writeups, though tempered by the new doctrine in a visible manner.

    METT-T

    Mission

    The historical mission is to break the stalemate at the Gustav Line further south by cutting German lines of supply and Communication, thus forcing a general retreat from the FLET (Forward Line of Enemy Troops). This can be accomplished by taking sufficient strategic terrain in the enemy's rear, though the destruction of OPFOR combat elements is of course a vital part of the process and a goal in its own right.

    Spoiler Alert, click show to read: 


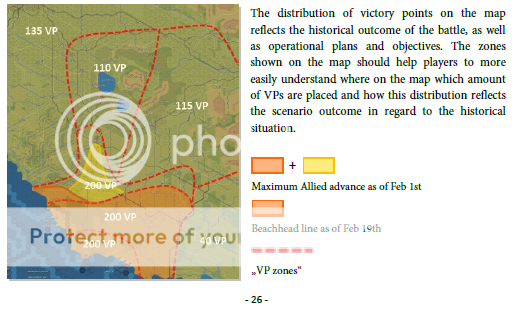
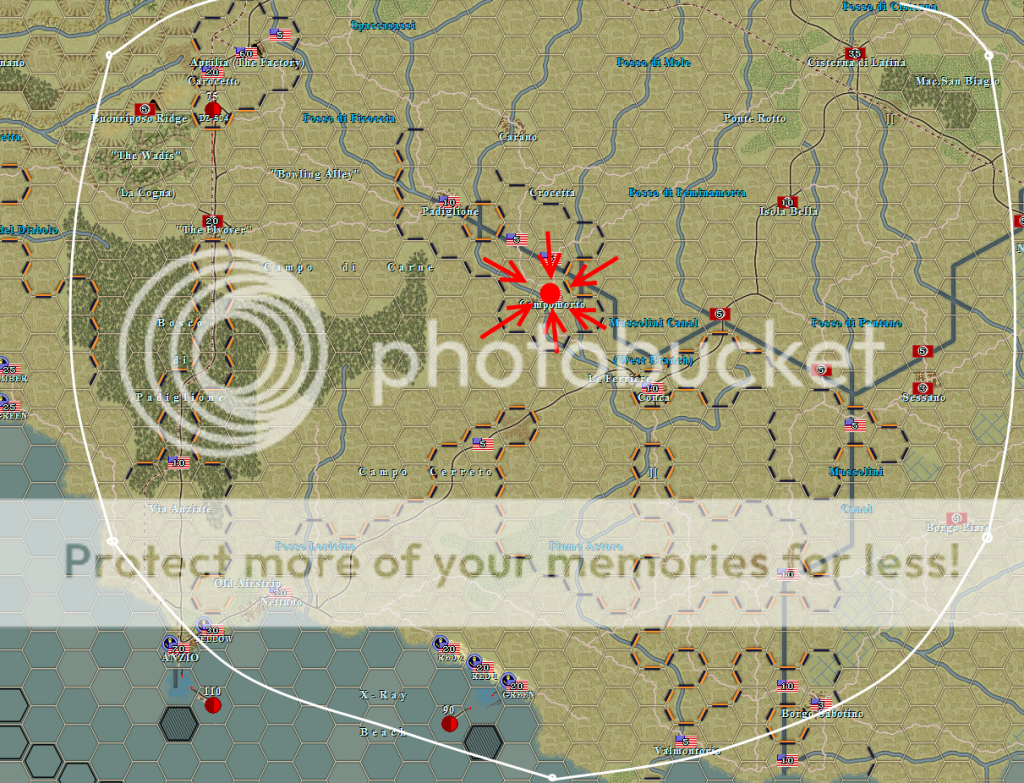
    This image describes the concentration of valued terrain within the AO (Area of Operations). As you can see, out of the 1000 "Victory Points" available, 50% or so are located within the historical Allied beachhead. Thus, I can achieve a historical draw by maintaining a historical stalemate roughly around the historical occupied area.

    The highest concentrations of victory points:
    *Beaches - 190 VP
    *Alban Hills - 130 VP
    *Aprilia/Carocetto - 85 VP
    *Mussolini Canal - 83 VP
    *Rome - 80 VP
    *Anzio - 70 VP
    *Cisterna di Latina - 35 VP
    *Nettuno - 30 VP
    *And myriad smaller ones...

    Spoiler Alert, click show to read: 


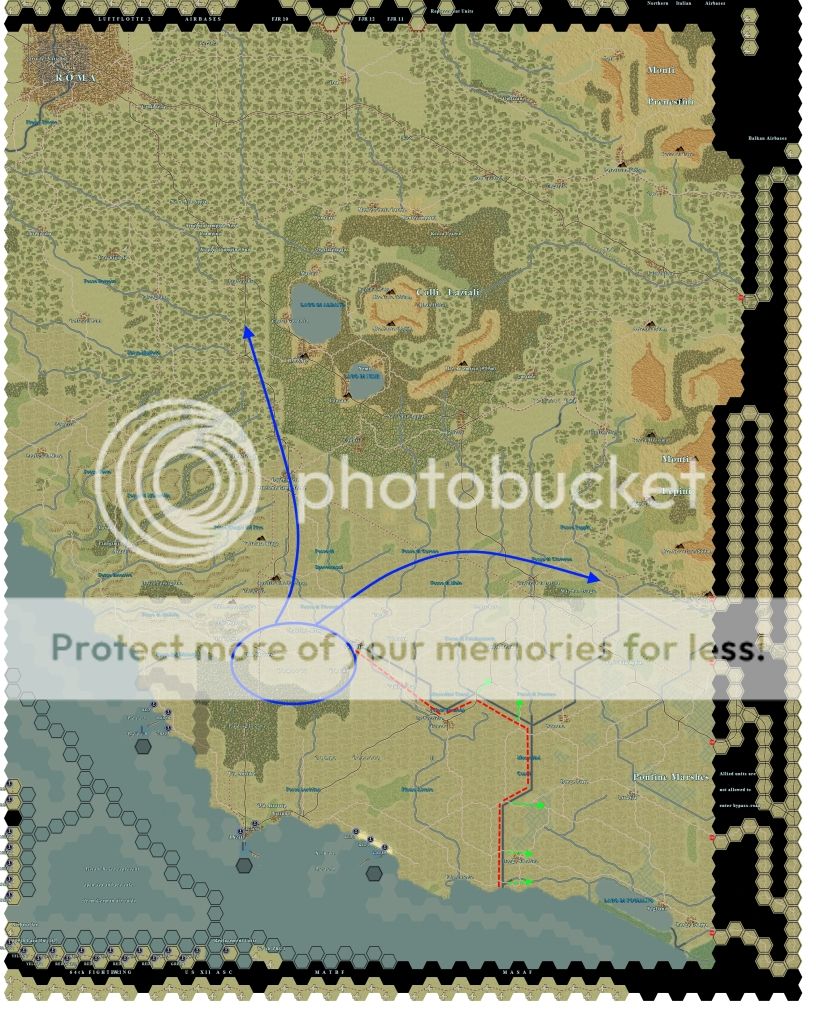
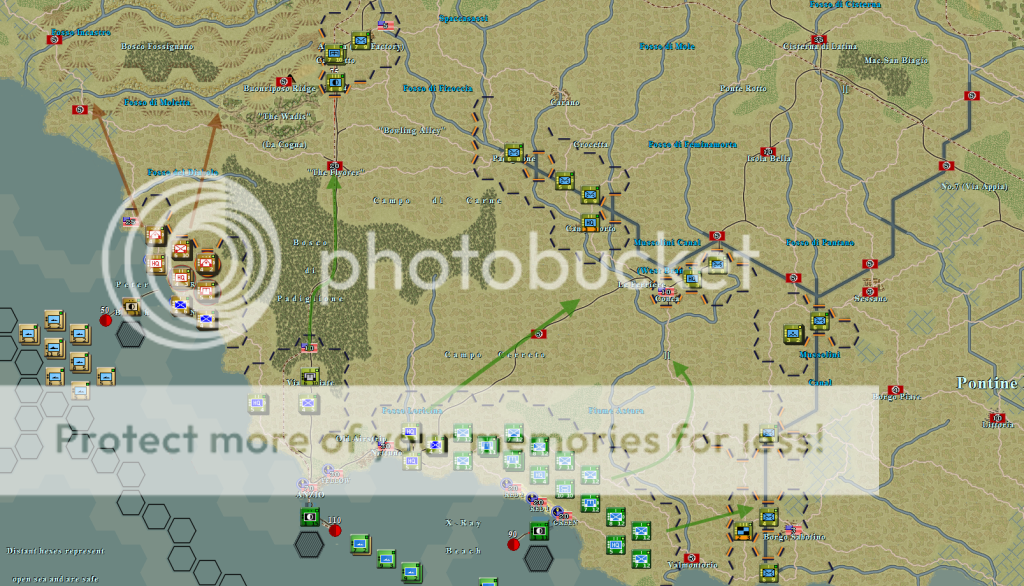
    Given this, my operational COA (Course of Action) is to, create a beachhead, quickly secure the crossings over the Mussolini Canal, particularly with airborne units (red), and to launch an offensive across it once the enemy arrives in force (green).
    The object is to convince the enemy that I intend to focus my forces on the eastern half of the map, while building up a strike force west of the canal (blue) with which to envelop the enemy all along the canal while dispatching a contingent to secure Rome.

    Spoiler Alert, click show to read: 


    Note that this plan is full of holes and is surely unworkable. Enemy intelligence and deductive logic would certainly reveal it before it could be sprung, resulting in a historical impasse at best and a drive to the beaches at worst.
    Perhaps I'll be able to deploy a heavily modified variant. Generally, however, I'd like to keep some sort of enveloping swing around the Mussolini Canal with a simultaneous march on Rome, or at least the Alban Hills in the center of the map.

    I need to be quick and decisive to secure as much favorable terrain as possible in the first few days, while not overextending myself to the point where his reinforcements can pick apart my columns piecemeal.

    Enemy

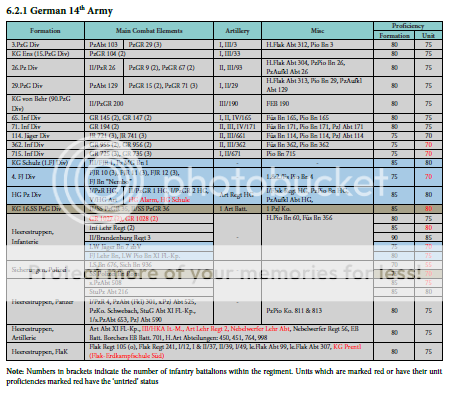
    The 14. Armee is a mixed bag, containing many elite units, many veterans, but also many green units newly raised or composed of low-quality troops. All told, it has a slight edge on the Allies in terms of experience, training, and skill.

    Unit Icons

    Spoiler Alert, click show to read: 


    OOB

    Spoiler Alert, click show to read: 


    Other

    Spoiler Alert, click show to read: 


    Terrain

    Spoiler Alert, click show to read: 
    It is recommended to view this image in its original size.


    The AO is something not much more than 2300 sq. km. of ground.

    Within 20 km of the shore, the terrain is mostly marshy and cut by many rivers. The major waterway in the area is the Mussolini Canal. East of it are further marshes: the Pontine Marshes.
    Note that defenders in marshy terrain get a 2x bonus to their AT capability.

    A couple of miles north of Anzio is a wooded area, the Bosco di Padiglione.

    In the center of the map is the thickly wooded Alban Hills region.

    There are several mountains along the eastern edge of the AO.

    On the west edge of the map, S or SW of Rome, is:
    Players may note the number of minor escarpments and badland terrain on the western part of the
    map, north of the Moletta creek. The low coastal plain in this area was cut by a series of rough stream
    gullies. These gullies, though their small streams were easily fordable, were often fifty feet deep and
    offered difficult obstacles to armor. Note that only foot movement units are able to move through
    badland terrain and that units within a badland hex can’t resupply though they are nominally in a
    supplied state.
    Beyond the coastal region, the western "gullies", the urban Rome in the NW corner, the Alban Hills, and the eastern mountains, is a heartland of flat cultivated land, mottled by the occasional town. The road network here is better than on the coast.

    The Via Appia is a highway that runs from Rome to Anzio and the southeast map-edge. It cuts across the SW Alban Hills. This is the road to follow in the event of a march on Rome.
    In the northern part of the map, there is another highway (No. 6) but it will never be accessed by Allied troops except in the event of a total victory.

    The German rail lines typically follow the two named highways.

    Troops

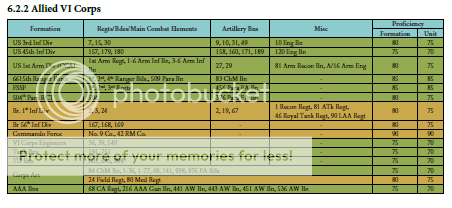
    The VI Corps is well-enough trained, and most of its men have seen combat before. There are, however, issues with cooperation between British and American elements.

    Unit Icons

    Spoiler Alert, click show to read: 


    OOB

    Spoiler Alert, click show to read: 

    3.2.3 Allied Supply Dynamics

    Supply Radius and Supply Stockpile
    Allied supply radius and supply stockpile are initially low to reflect the circumstances of an
    amphibious landing, but as this particular landing faced no initial opposition and plans could have
    been carried out almost under maneuver conditions the supply radius and stockpiled supply will
    increase rapidly:

    Turn 1: Supply Stockpile: 8 Supply Radius: 4
    Turn 2: Supply Stockpile: 18 Supply Radius: 6
    Turn 3: Supply Stockpile: 28 Supply Radius: 8

    The supply radius will increase to 10 if the Allies are in control of Aprilia, Osteriaccia, Cisterna and
    four other small villages in the Alban Hills and/or the Lepini mountains. Or technically spoken: If the
    EEV rises to 64, Allied supply radius will climb to 10. Historically resupply was difficult for the Allies,
    especially in clear visibility and absence of smoke screens (of which was made excessive use) due to
    German artillery observation positions in the higher terrain of the Alban Hills and the Lepini
    Mountains. A drop of the EEV below 64 will set the radius back to 8 again. The events are repeatable;
    this means the supply radius will switch back and forth depending on the EEV value.

    Beach Supply
    Beach supply is modeled with sea supply roads and ferry
    bridging units. There is one supply point per beach
    (Peter Beach, Anzio (X-Ray yellow) and X-Ray
    red/green) which is placed in a deep water location. A
    road on an arid terrain hex connects the supply point
    with the actual beaches/harbor. The arid terrain graphics
    have been altered to resemble the look of deep water
    hexes. On this road the hex connecting the supply point
    with the beach contains a destroyed bridge over a major
    canal. VI Corps supply units are positioned in these
    hexes. Their major ferry capability will allow them to
    trace supply over to the beaches and with the supply unit
    adjacent, friendly units get a 50% supply boost. Note that Peter Beach supply will be removed on turn
    10 (see → 3.1.2 Weather Influence on Supplies and Air Activity). These supply units have assigned a
    slightly different amount of equipment to model the different size of the respective pontoon
    installations and the harbor. As the amount of supply actually traced over to land is relative to the
    major ferry percentage value of the tracing unit, this set-up allows the Germans to try to hamper Allied
    supply unloadings by artillery shelling and air raids as they did historically, although with little or
    negligible effect. The equipment of the supply units has a high replacement rate to ensure that any
    losses can be replaced fast and supply reductions are only a short time temporary nuisance. If such a
    supply unit is destroyed, a replacement unit will appear one turn after the respective beach's supply
    unit is destroyed.

    Anzio is a 110% level supply source, X-Ray red/green is a 90% level supply source while Peter beach is
    a 50% level supply source.

    3.2.4 Allied Withdrawals
    No.9 Commando and 42 RM Commando will be withdrawn on turn 11. There will be a warning in the
    news string to remember the Allied player of their withdrawal.
    Time


    In this scenario, the turns are 6 hours each. This highly tactical timeframe means that, despite the small hex-scale, units can not move very much in a single turn.
    This is practically speaking. In fact, on one of the highways (if controlled by friendly forces) it is possible for a motorized or armored unit to cover in excess of 30 km in 6 hours.
    What this means is that the Germans have much operational depth to deploy their reserves quickly and wherever they deem necessary, while any Allied advance will have a lower circumscribed rate, and in the early days movement around the beachhead will be difficult - until sufficient friendly control is attained over the area of the beachhead.

    The turn-length being as it is, half the time will be spent in night turns. Night combat is a chancy thing, so I'd better keep in mind the penalties and concentrate my offensive maneuvers in the days.

    In total, there are 40-120 turns, or 10 days to a month. The variability is accounted for below.

    3.1.3 Early End (or accepting the stalemate)
    I didn’t want to force the players to play the entire 120 turns of the scenario, especially to prevent them
    from resembling WW I style trench warfare. To give a more official touch to a possible player
    agreement, players can agree upon an earlier end of the scenario after turn 40 by selecting the theater
    option “End game with current victory levels”. If one of the players chooses this option the other
    player will receive a theater option to accept his opponent’s offer on the following turn. If he accepts
    this offer the game will end with the normal victory tally the next turn.
    3.1.1 Victory Conditions

    General Thoughts and Sudden Death
    What constitutes an Allied or a German victory? Looking at history, an Allied victory regarding
    operational plans would be ‘establishing and securing a beachhead and advancing onto the Alban
    Hills’. The Allied player can get an overwhelming victory in achieving this and holding the gained
    ground until the end of the scenario. An instant victory can be achieved if the Allies reach their main
    goal – the withdrawal of German 10th Army from the Gustav Line. This is handled in detail by the
    EEV (Event Editor Variable) and can lead to a “Sudden Death” victory for the Allies.
    The German aim was, as Hitler clearly stated, to ‘erase the abscess’. A German victory can be achieved
    by pushing beyond the front lines of February 19th, the last day of Fischfang. If the Germans capture
    Anzio the game will end with a German instant victory
    Any outcome along the historical front lines between February 3rd, the beginning for the battle of the
    thumb, and February 19th, the day Fischfang was canceled, is regarded as a draw.

    Rome
    The Allied player can take Rome, but it will not produce an instant Allied victory and except for the
    release of German reserves, which will be released before the Allies reach the outskirts of the city, it
    won’t influence German actions at all - Rome was not the objective, pushing to Rome means exposing
    Allied flanks in open terrain. Advancing to Valmontone and or the Alban Hills on the other hand sees
    VI Corps' flanks in formidable defensive terrain (Moletta Creek, Alban Hills, Monti Lepini, Mussolini
    Canal). As General Penney, commander of British 1st Infantry Division stated: “We could have had
    one night in Rome and one and a half years in POW camps.”

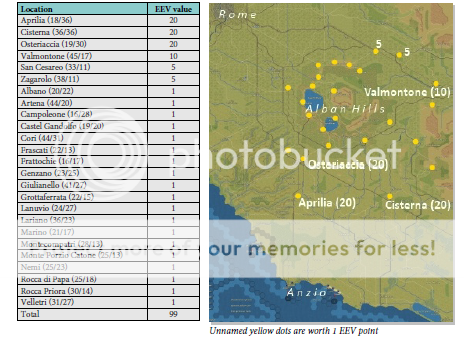
    The EEV
    The occupation of certain locations will increase the EEV value. On reaching certain values‚ a
    simulated dice-roll determines whether the German 10th Army retreats from the Gustav Line due to
    the danger of their lines of communication getting cut-off. Failing such a check leads to 10th Army's
    withdrawal and results in an Allied Sudden Death victory.

    EEV Values and Victory Chances
    German re-occupations of EEV locations will lower the variable value
    accordingly. The trigger locations can change hands multiple (in fact:
    infinite) times with the variable value going up and down with each
    occupation/re-occupation event. Important: Once a probability check has
    failed it won’t be repeated a second time should the according variable
    value be reached again. It wouldn’t make sense if the Germans decided to
    abandon the Gustav Line under the same circumstances under which they
    had decided to stand fast just a couple of hours or days ago. This also
    prevents gamey play: Abandoning such an objective after a failed check and leaving it to the German
    player with the purpose of taking it back again to get a second chance for a successful sudden death roll
    won’t work. Furthermore, the Allied player is advised to protect the base of his beachhead accordingly
    as a permanent loss of one of the 20 EEV point locations makes it almost impossible to achieve a
    variable value required for a sudden death roll. The following chart and map give an overview of the
    locations contributing to the EEV value:
    Spoiler Alert, click show to read: 


    Variable Value Victory Chance
    75 ................... 40%
    80 ................... 50%
    85 ................... 65%
    90 ................... 80%
    95 ................... 90%
    99 ................... 95%


    All this is to be considered later on - remind me! - as if I can achieve an EEV of 60 or more, it likely means that the campaign as a whole is turning in my favor.


    Theater Options:
    Spoiler Alert, click show to read: 

    4.1.1 Airborne Operations

    The 504th PRCT
    Initial plans for Shingle called for the 504th PRCT (Parachute Regimental Combat Team) to be
    dropped on the Via Anziate, approximately ten miles north of Anzio in the vicinity of Aprilia, to block
    German reinforcements from counterattacking the landings early. This was canceled a few days before
    the landings due to the fear that they could be brought under friendly fire, either by the British troops
    operating from Peter Beach and/or by naval fire. Actually it was considered to be too risky as it also
    could have revealed Allied intentions a few hours prior to H-Hour.
    On turn 1 the Allied player may drop the Regiment into its designated drop zone (17/38) south of
    Aprilia at a cost of 100 VPs. Units may also be dropped into hexes adjacent to the drop zone. On turn 2
    a ‘foot movement’ supply unit and a supply point will appear at 17/38. The supply point will be
    removed on turn 4 as it is estimated that a link-up with the forces advancing from the beaches will
    have been established by then. Dropping the Regiment into another area, i.e. Cisterna will not trigger a
    supply point - in order to be in supply the RCT must be dropped into the pre-designated landing zone.
    The ‘foot-movement’ supply unit will be withdrawn one turn after the regiment’s supply trucks have
    been landed at Anzio (turn 8).
    If the Allied player doesn’t wish to paradrop the 504th he must chose the theater option (on turn 1) to
    bring in the RCT via sea transport as was historically the case. If the TO is selected, the initial 504th
    PRCT will be withdrawn and an identical formation will appear at Anzio on turns 6 and 7. The 100
    victory points penalty will be removed. The truck-borne supply unit of the RCT will in each case land
    at Anzio on turn 8.

    The 509th Parachute Battalion
    Historically this independent battalion was attached to the Ranger force landing at Anzio. But the
    Allied player has the option to use it in an airdrop as a second wave to follow the 504 th PRCT. The
    theater option is available on turn 1 only. If the Allied player selects the theater option he must move
    the battalion from its initial position (0/59) to the airfield in the hex north of it. On turn 2 it can be
    flown into the 504th’s drop zone; like the PRCT it is only allowed to land in the dropzone (17/38) or an
    adjacent hex. The costs for this are 30 VPs.

    4.1.2 Allied Air Support Options
    Allied airfields are situated on the bottom of the map in
    separate rows of airfields for each high level formation.
    As US 64th Fighter Wing, which actually is part of US
    XII ASC, is the only air formation that is permanently
    available to the Allied player, a separate row of airfields
    for this formation is located on the southwestern map
    edge. Note that except for 64th Fighter Wing all other
    formations are in garrison status. Beginning on turn 2,
    the Allied player receives a series of theater options to
    release these formations. The activated air formation
    will be available for orders on the turn following the
    selection of a theater option for a duration of three
    turns. Four turns after a theater option is selected a new theater option for an additional release of the
    according formation will be available. Activation limitations and costs are as follows:

    US XII ASC: 5 activations, first two activations without cost, thereafter 10 VPs per activation
    MATBF: 5 activations, first activation without cost, thereafter 10, 20, 30, 40 VPs
    MASAF*: 3 activations, first activation 15, second activation 30, third activation 60 VPs
    *For play-balance, but also historical/realism reasons only roughly half of MASAF’s assigned
    squadrons will be available to the Allied player. This is still quite an impressive force.
    ASC = Air Service Command ???
    MATBF = Mediterranean Allied Tactical Bomber Force
    MASAF = Mediterranean Allied Strategical Air Force

    Despite the VP hit to not selecting the first PO, the 504 is integral to my plan, for the speedy capture of the crossings over the Mussolini Canal. I can not allow even one to become contested before the forward line is established. Hopefully, this will pay off by the end of the scenario. (Also note a further drawback - going forward with the drop gives the German player the option of activating the 4. FsJ. (Fallschirmjager) Div. early, for relatively low cost.

    The second TO - we'll come to it later.

    I will save the valuable but circumscribed Air Support TOs for when the major offensives are underway - when I need to put real muscle in my operations.

    The Germans have many TOs of their own, but I won't go into those. Better for it to be a surprise.


    Other Notes:
    Spoiler Alert, click show to read: 

    3.1.10 Loss of Allied Ships
    The German player will be awarded VPs for sinking Allied shipping. This will be 5 VPs for a destroyer
    class and 10 VPs for a cruiser.

    3.2.2 Handling of Naval Units
    Naval fire support is only possible from within the swept channel; this is represented on the map by
    the normal, non-distant deep water hexes. Along this swept channel there is a row of distant hexes
    (+199) which represents the open sea. Naval units in those hexes can’t lend fire support to land units
    but are safe from German air raids. Historically a large number of naval vessels were withdrawn to the
    open sea each day in the afternoon after the first German air raids harassed the Allied fleet.
    On turn 1, both Task Force 81 and Task Force X-Ray, are in reserve and not available for fire support;
    they will be released on turn 2.
    Incentive to end turns with ships in the deep-sea hexes.

    3.1.2 Weather Influence on Supplies and Air Activity
    From January 24th to 26th stormy weather prevented almost any air activity. On the morning of the 24th
    Peter Beach had been closed as the two pontoons had broached in rough sea. X-Ray beach pontoons
    broached on the 26th, but were again operational on the next day. Unloadings at Anzio harbour
    however were not that seriously affected. In the scenario this will have the following effect:
    Both sides will suffer a 25% air shock from turn 10 – 22. Peter Beach's supply unit will be withdrawn
    permanently on turn 10. X-Ray beaches will be closed temporarily from turns 10 – 14 and 18 – 22.
    Weather in the opening phase is historical. After that (after Jan. 26th) it is managed by a weather
    engine, with probabilities for storm/bad weather based on historical weather conditions. Each day
    there is a 40% chance for stormy weather which will last two turns. On storm turns theater recon is set
    to zero and air shock for both sides is 25%, returning to normal on the third turn. Each day at predawn
    the news string will contain a weather report that warns the player of an impending storm. This
    is to prevent the Allied player from ‘wasting’ his Air Support Options on a storm turn
    See also → 3.2.2 Handling of Naval Units for weather effects on naval units.
    In that case, I definitely shouldn't call in any air support until 4 days in, at the least.

    3.1.4 Theater Recon and Peak Hexes
    Theater recon for both sides is set to zero during PM turns. On AM turns both sides’ theater recon is
    set to 8, but the Germans (and certainly also the Allies if possible) can make use of the peak hexes in
    the Colli Laziali which historically provided excellent observation points.

    3.1.5 Force Pestilence
    To reflect historical conditions on the battlefield and their consequences for men and material, like
    trench foot and mechanical breakdown, force pestilence is set to 1% for each side, beginning on turn
    18 (January 26th).

    3.1.6 German Air Raids and Nettuno Airfield
    During the first weeks of the Anzio campaign the Germans launched regular and partially devastating
    air raids against the Allied navies and the shipping anchoring before Anzio harbor. The usual
    procedure was to sneak in at dusk when Allied fighters were returning to their 100 mile distant bases
    as they needed daylight to land. To counter these tactics Allied engineers began to renovate the old
    Italian air strip at Nettuno which became operational on February 1st. It was US 307th Fighter Squadron
    which had the doubtful honor to be based within enemy artillery range. Consequently the airfield had
    to be abandoned later in the campaign due to constant shelling.
    To represent this in the game the Germans have a 105% air shock while the Allies suffer an 95% air
    shock on afternoon turns. There is no such bonus on storm/bad weather turns, including the long bad
    weather period from turns 10 to 22. On turn 42 Nettuno airfield becomes operational, removing the
    German air bonus permanently. In game terms an “airfield” unit will appear on turn 41 with some
    construction engineers and 0/1 “airfields”. The “airfield” equipment is actually a modified aircraft
    carrier (combat values zeroed) and can base one air unit. The equipment will be filled up on turn 42
    after 7 “airfields” will have been dumped into the replacement pool the previous turn as otherwise it
    would not have been possible to deploy the unit on a land hex. This setup also allows the Germans to
    render the airfield unusable (when the unit is destroyed). Any Allied fighter unit can be placed on this
    airfield; they have all been designated ‘naval aircraft’ with an equipment editor (BioEd) to be able to
    actually be deployed there.

    3.1.7 Valmontone – Littoria Bypass Road
    To enable the Germans to shift troops between the southeastern wing of the front line (Littoria,
    Pontine Marshes) and the other parts of the beachhead front an ‘off-map’ road has been added to the
    eastern map edge with approximately 80 km length. Part of that road is in distant hexes and can’t be
    interdicted or bombed directly by Allied aircraft. The Allied player is not allowed to enter or attack
    into any hex of this bypass road.

    3.1.8 Additional Replacements
    Both sides receive additional replacements for specific ‘low rate’ equipment in the form of disband
    units. The replacement units are categorized into infantry, AFVs, artillery and planes in the case of the
    Germans. They arrive at a semi-random basis on hex 15/60 for the Allies and 30/0 for the Germans
    and can be disbanded at the players’ will; there is no enforced rule about it. Only the German planes, of
    which only few will be available, will be disbanded directly into the pool by the event engine.

    3.1.9 Opening, Shock and Theater Options
    With version 1.81 a new concept and new dynamics for the
    opening turns have been introduced in regard to the initial
    Allied advance in-game compared to the historical Allied
    performance and defensive agenda in the early phase of
    Shingle. One can basically speak of two different ‘openings’,
    resulting in two different courses the scenario can, but must
    not, take:
    The ‘pattonesque’ opening sees the 504th Parachute RCT land
    near Aprilia and will most probably be followed by an all out
    Allied attack (see section → 4.1.1 Airborne Operations for
    details about this theater option). This still costs 100 victory
    points.
    The second one, introduced in version 1.81, could be called
    ‘the historical opening’. It is designed for a possible limited
    Allied advance, but however must not necessarily lead to
    such a limitation. When the Allied player opts for bringing in the 504th Parachute RCT by sea on turn
    6, a set of shock events and related theater options will come into effect which are designed to force the
    Allied player to resemble the historical cautiousness of the Allied advance until the first major
    offensive actions took place towards the end of January. Allied shock will fall to 90% on turn 3, rise to
    95% on turn 13 and will be restored to 100% on turn 25 – if the Allied (or the German player) doesn’t
    influence these events by selecting one of the related theater options: On turn 2 the Allied player has
    the chance to remove the 80% shock at a cost of 45 victory points. This will also cancel the later 90%
    shock and all related theater options. The option is only available on turn 2. If the Allied player
    removes the shock, the German player will receive a theater option on turn 3 to restore the Allied
    shock to 90% at a cost of 40 victory points which will further re-enable the later 95% shock event and
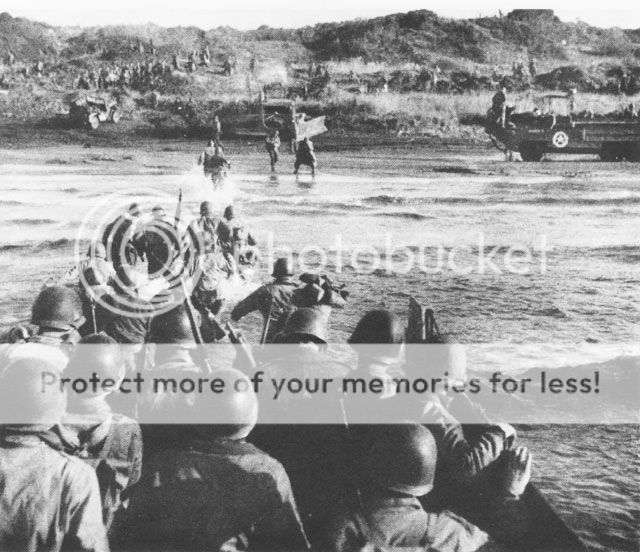
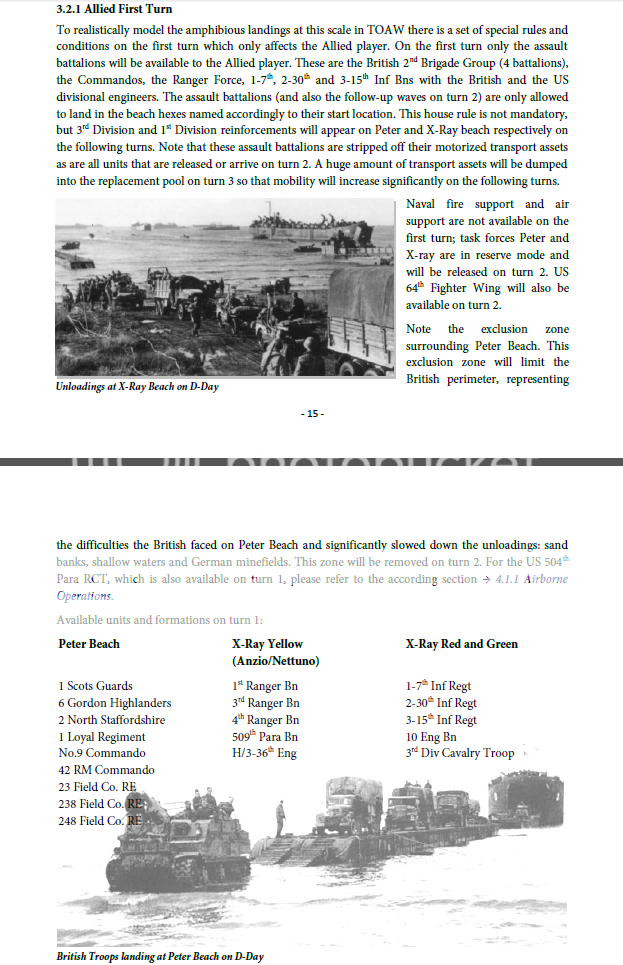
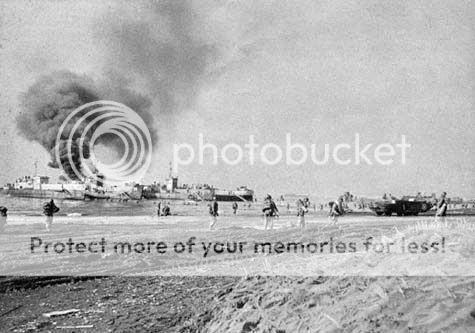
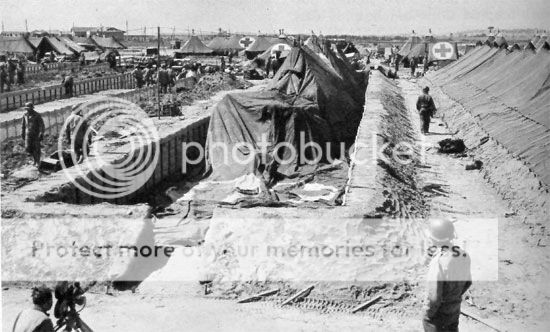
    Unloadings at X-Ray Beach on D-Day
    related theater options. Like the Allied theater option, the German theater option is only available for
    one turn. The same game starts again on turn 12 when the Allied player will have the option to prevent
    the following 95% shock at a cost of 25 victory points while the German player will have the option to
    restore the 95% shock on the next turn with a 20 victory point penalty. Both options are again available
    for only one turn (turn 12 for the Allied player and turn 13 for the German player).
    Certainly the players can agree upon the course of the action regarding the shock events before they
    start the game, but they also could leave it open. They should consider that the shock event setup will
    help a weak German player against a more skilled opponent.
    As mentionend further above, this has been designed to force the Allied player to be more cautious in
    his early actions, similar to the historical course of events. Note that shock not only affects combat
    effectiveness of units, but can also force formations to go into reorganization, making them immobile
    and unavailable for player orders, which could leave some units in quite vulnerable positions to
    German counterattacks. Also note that the German player, if all four TOs are selected, gets out of this
    with 10 VPs ahead.
    In each case the Allied player will have to pay in victory points if he wants to use the initial German
    weakness in the opening turns to conduct offensive actions that go beyond the scope of those
    historically performed by VI Corps during the early days of Shingle.
    I'm not a skilled opponent! Well, I think this is more cause to take the aggressive though costly roue of dropping the 504th PRCT.

    I don't think I will be taking the shock-negation events - far too costly. My attack will have to proceed under inadequate conditions, even if for a little while. Anyway, I envision not an all-out blitz but a race to acquire the good defensive terrain of the Mussolini Canal, while building up along its western extent for the two-pronged strike. Surely this would take at least a week.

    The Order of Battle
    As other scenario designers also might have encountered there is always an inconsistency in OOB data
    from source to source. This was not different with the various sources I used, especially when it went
    into the details and as I decided to go with the 1 km/hex and company scale there could never be
    enough detailed information. Luckily the inconsistencies were only with the German part of the OOB.
    The main sources for the German OOB were of course the War diaries of 14th army which can be
    downloaded from the cgsc website in an English translation (see link in 7.0 Sources); together with
    Greiner/Schramm’s War Diary of OKW, “Lo sbarco di Anzio” by Lagomarsini/Lombardi (which
    provided some scanned original documents – grazie!) and some excellent postings at the Axis History
    Forums I was able to compile a reasonable OOB and reinforcement/arrival schedule for the German
    side. However I still had to do some guesswork, and there where I had no certain or exact information
    about the actual arrival of a certain unit I based my decisions on gameplay and balance.
    For some units and formations from both sides I had exact information about the replacements they
    received during the campaign, but I decided not to apply them 1:1; the main reason being the TOAW
    replacement calculations and gameplay (i.e. 3rd PzGren might take fewer losses than historically, so
    why should they receive the replacements they received historically?). Maybe this will change in future
    versions depending on players’ feedback and own observations with the replacement pool and units’
    health.

    TO&E Issues
    There’s not much to say about the Allied tables of equipment which should be quite accurate, however
    it was not as easy with the German side. A lot of compromises, especially with rather exotic and special
    units, such as the LW Jäger Bn 7 zbV, the SS Polizei Bn Rom, the Nembo FJ Bn or the Brandenburgers
    had to be done while at the same time units like the 3rd PzGren Div and other regular formations have
    been set up with more accurate information.Heavy Weapons companies and the like have been
    distributed among the other combat companies within the battalion and/or the HQ unit of the
    battalion (mainly mortars) in some cases.

    Artillery and Formation Support
    With the huge amount of artillery in both sides’ OOB something had to be done in regard to formation
    cooperation. The idea was to prevent divisional and regimental artillery from providing defensive fire
    support to non-divisional and non-regimental units. The initial ‘free support’ setup did not only
    misrepresent historical procedures and facts, but also distorted combat results when ground combat
    was mostly decided by the amount of artillery support each side could add to a certain combat. Not
    always, but often, this greatly distorted combat results and lead to extremely huge combat losses.
    Therefore only both sides’ Corps artillery is set to free support. All other artillery formations are set to
    army support.

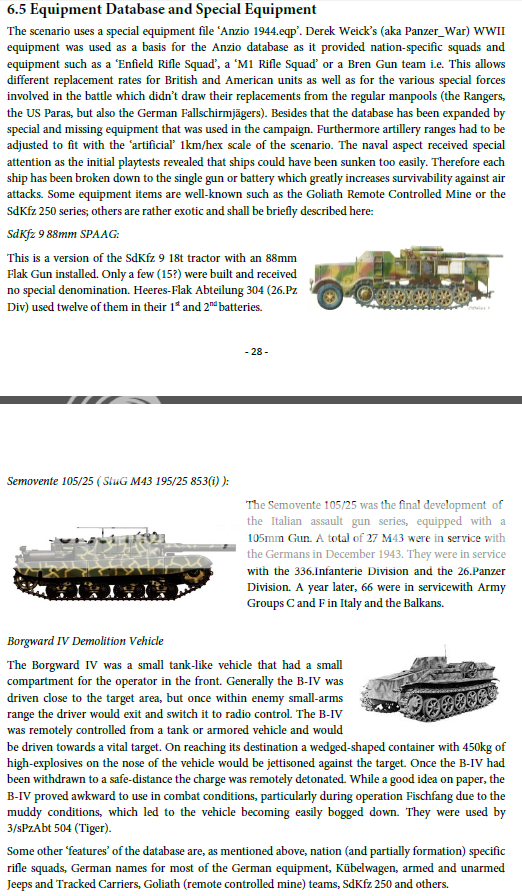
    Playing Anzio 1944
    This is not a simulation of what historically happened, it is a game. Given the historical course of
    events, Anzio 1944 is more a ‘what if?’ than other historical scenarios. No wargamer (at least those that
    I know) ever will be as cautious and hesitating as Lucas was (he had his reasons, but the players have
    their hindsight), or can you imagine to land a whole Corps without any opposition and with great
    tactical surprise and doing nothing for three days? Most historians agree that Lucas’ cautiousness and
    defensive posture eventually saved the beachhead, but also most historians agree upon the blunder of
    not taking Osteriaccia and Cisterna early in order to gain more depth for a better defense against the
    inevitable German counterattack.

    Why was so much effort put into limiting the initial Allied advance rate?
    Play balance and historical facts: it was the operational plan that limited their advance. The Allies were
    surprised by themselves that they took the Germans by surprise with the landing – the plans were
    worked out with serious German resistance to be expected. Securing the initial beachhead and
    preparing for first counterattacks were the orders of the assault battalions.
    Spoiler Alert, click show to read: 


    ***
    The scenario and documentation can be located at the scenario creator's - S. Goehring's - site. Due credit to him, &c.
    Last edited by Montmorency; 01-09-2013 at 22:06.
    Vitiate Man.

    History repeats the old conceits
    The glib replies, the same defeats


    Spoiler Alert, click show to read: 


  3. #3

    Default Re: The Next TOAW DAR/AAR

    Are you not entertained?! \

    *Reserved for procedural notes*

    Spoiler Alert, click show to read: 


    *Include big map in each
    *First turn include TOE and that one screen
    *Every 10 turns, new TOE screen
    *Print News String for each turn
    *Discuss available TOs each turn
    *Reinforcement Schedule
    *Enemy Dispositions


    Note: A House Rule that I didn't mention in the writeup is that my ships must be moved into the deep sea on storm turns.
    Last edited by Montmorency; 01-10-2013 at 09:49.
    Vitiate Man.

    History repeats the old conceits
    The glib replies, the same defeats


    Spoiler Alert, click show to read: 


  4. #4

    Default Re: The Next TOAW DAR/AAR

    A third voter? GAH

    Alright, this is embarassing.

    I'm truly sorry to have screwed the pooch or whatever they say, but I can make amends: once this AAR is coming to a close, I'll re-roll the winner and make an AAR of that. I can't change course now as I've found an opponent - much sooner than anticipated - and will actually begin the AAR-proper tomorrow.

    Vitiate Man.

    History repeats the old conceits
    The glib replies, the same defeats


    Spoiler Alert, click show to read: 


  5. #5

    Default Re: The Next TOAW DAR/AAR

    TURN 1 (JANUARY 22 PRE-DAWN)


    • Operation Shingle begins - H-Hour at 2:00 AM
    • Beaches hit by rocket bombardment from British LCTs (Landing Craft Tanks)
    • VI Corps achieves total surprise!
    • 504 Para Rgt may be dropped only this turn!

    It is time to carry out the landings.

    Spoiler Alert, click show to read: 


    TO: I will not take either of the TOs. The airdrop must proceed, and the 509th Para Btn will be landed as part of the assault force storming the beaches at zero-hour.

    TOE:
    Spoiler Alert, click show to read: 


    This is the sort of stuff I will be working with during the battle. Note the time-delays to many of the items. Many types of equipment will be dropped off onto the beach much later, once the "coast is clear", literally speaking. Replacement tanks come in only after a week-and-a-half, replacement planes after a week, and the men and bare necessities of infantry close-combat after a couple of days; some vehicles and other pieces, only after two weeks.

    I'm sure the disband pools will help some, but the fact remains that what I get is what I get - my frontline units are what count, and there won't be much chance to rebuild them in the event of serious losses.

    LANDINGS

    Spoiler Alert, click show to read: 

    My only air cover for the landings is the RAF No. 600 Sdn, composed of 16 Beaufighters.

    I will not need much air support, however, as intelligence reveals that the beach is unoccupied save for a company of non-combat engineers in Anzio. They will be dealt with. Let no more mention be made of them.

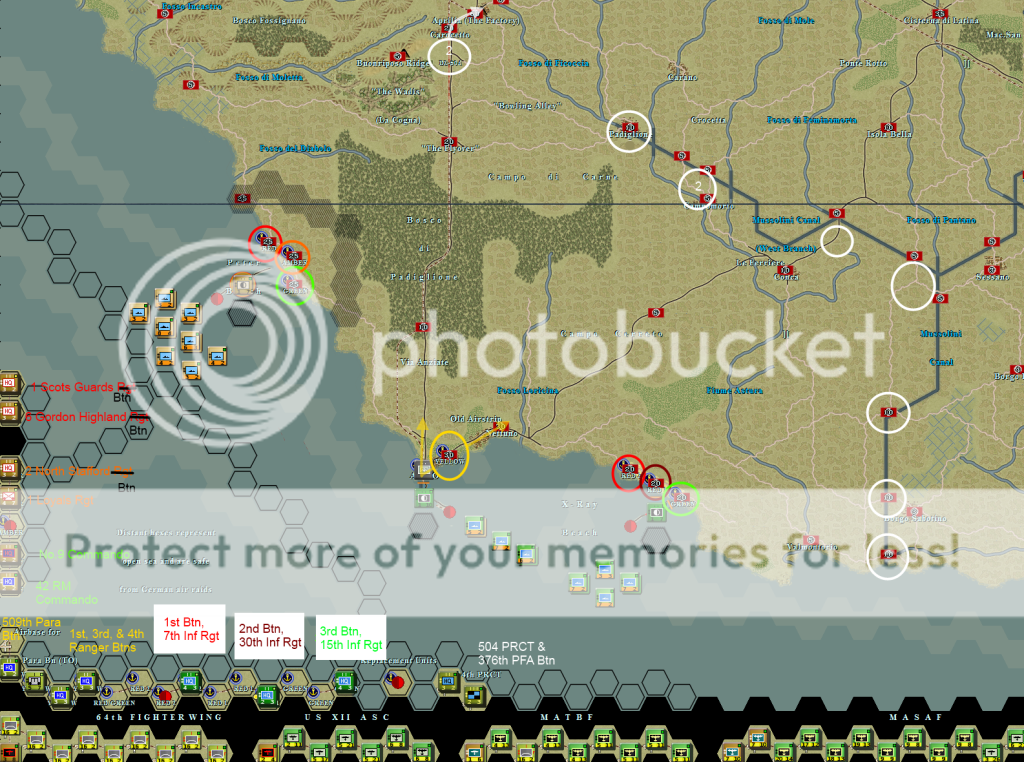
    X-Ray Beach: *The 10th Eng. Btn is to be spread out across the three zones

    *Zone Green - 3 Btn, 15th Inf. Rgt. is headed here

    *Zone Red 1 - 2 Btn, 30th Inf. Rgt. is headed here;3rd Cavalry Troop, attached directly to US 3rd ID Divisional Command, lands here as well

    *Zone Red 2 -1 Btn, 7th Inf. Rgt. is headed here

    Spoiler Alert, click show to read: 
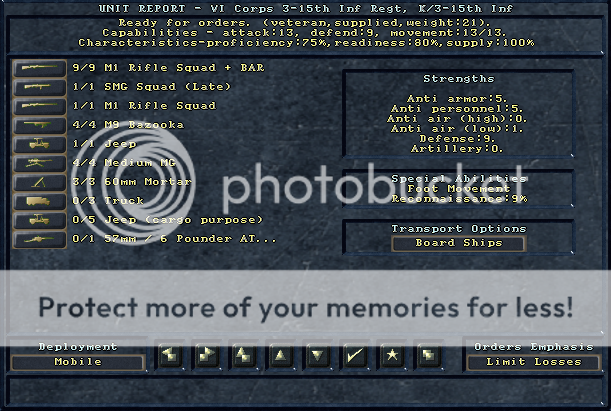
    This is what an American infantry company looks like...


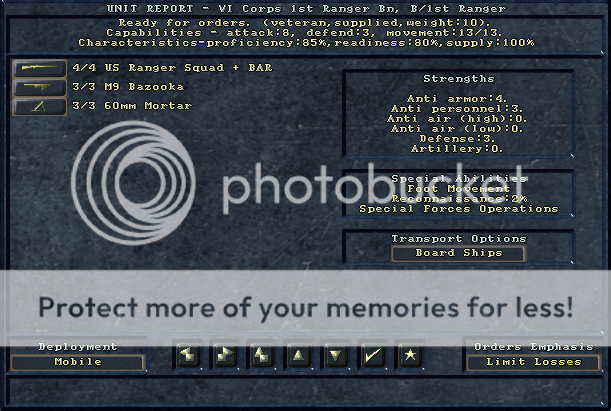
    Anzio: *Zone Yellow - 509th Para Btn and the 1st, 3rd, and 4th Ranger Btns land here and capture both Anzio and Nettuno; H Company of the 3rd Btn, 36th Combat Engineer Rgt accompanies the rangers

    Spoiler Alert, click show to read: 
    This is what a ranger company looks like...


    Peter Beach: *Three field companies of Royal Engineers, attached directly to BR 1st ID Divisional Command, are to be distributed throughout the beach

    *Zone Green - No. 9 Commando Btn and 42nd Royal Marine Commando Btn are headed here

    *Zone Amber - 2 North Stafford Btn & 1 Loyals Rgt are headed here

    *Zone Red - 1 Scots Guards Btn and 6 Gordon Highland Btn are headed here

    *These British battaliosn are composed of 4 line companies and an AT company, plus regimental HQ - American battalions only have three line companies

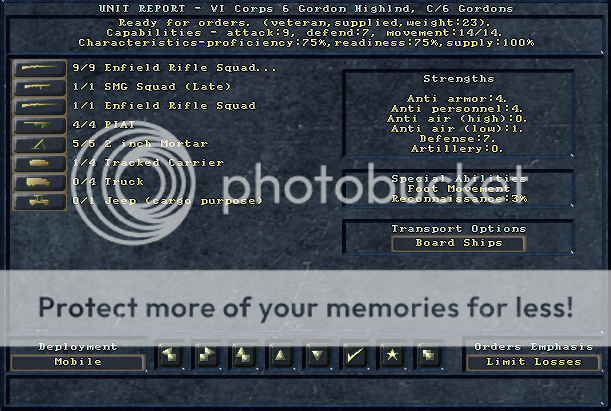
    Spoiler Alert, click show to read: 
    This is what a British infantry company looks like...


    504 PRCT: *Two companies of the regiment will land just south of Carocetto, the historical planned DZ, and advance on Carocetto and Aprilia, which cover the Via Appia and provide good defensive terrain, all in one throw; additionally, the British are only 10 km away and should be able to provide speedy succor in the event...

    *One will drop in Padiglione

    *Two will drop north of Campomorto

    *One will drop NE of Conca, and another 5 km east of it; the 376th PFA (Parachute Field Artillery) Btn will also drop 5km east of it, as from there the 75mm pack howitzers can cover almost all of the MussoCanal

    *The last three companies will drop at the crossings between Valmontorio and Borgo Sabotino

    Spoiler Alert, click show to read: 
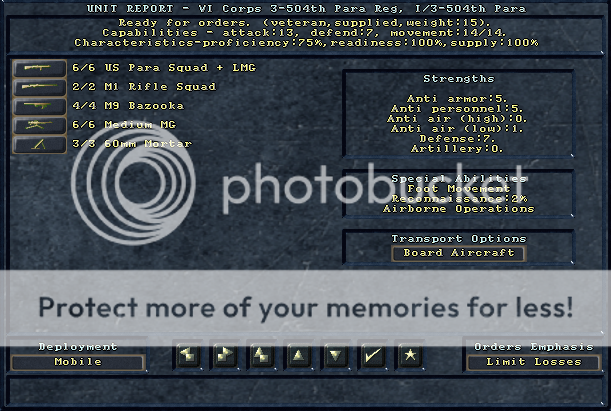
    This is what an American paratrooper company looks like...


    Results: *All landings go smoothly, and advance up to two miles from their landing zones (except of course for the Brits)

    *The paratroops suffer some casualties during their drops, on the level of two full companies + arty battery; such is the life of a parachutist

    *Parachutists scattered west of Borgo Sabotino discover an enemy mechanized company in the village, though no contact is made


    Spoiler Alert, click show to read: 
    Spoiler Alert, click show to read: 
    I will not be doing the Extras series with Directive 21, conscious of the possibility, however small, that a surge of voting might propel it into first place for the follow-on AAR.
    Last edited by Montmorency; 01-11-2013 at 01:51.
    Vitiate Man.

    History repeats the old conceits
    The glib replies, the same defeats


    Spoiler Alert, click show to read: 


  6. #6

    Default Re: The Next TOAW DAR/AAR

    TURN 2 (JANUARY 22 MORNING)


    • Kesselring announces Fall Richard!
    • Unloadings proceed excellent and are ahead of schedule
    • Allies take Aprilia (EEV +20)
    Spoiler Alert, click show to read: 
    The situation at dawn...


    Previous Enemy Actions: The mechanized company in Borgo Sabotino abandoned the village and moved on to parts unknown. The paratrooper company 2 km SW of Sessano noted an enemy formation passing through the area; it is suspected to have been the battalion HQ of the aforementioned mech company. These are ominous tidings - could this merely be a panicked flight to avoid perceived impending encirclement? Could it be prelude to a massive counterattack?* Even worse, could it mean that Kesselring intends to fall back on prepared defensive positions?

    Aerial reconnaissance discovered a German assault-gun company stationed in Lanuvio, a village in the southern Alban Hills.

    *I will not frequently be referring to the posted German OOB other than to mark off observed formations; I will certainly not sneak looks at the German reinforcement table.

    TOs: No requests for extra air support yet. I will inform you when my position shifts.

    MANEUVERS

    *504th PRCT will hold at Aprilia and the MussoCanal bridges, at least until relief arrives in force

    *The rest of the troops are to spread out from the beach-head - simple enough; all are headed in some variant of "Northward", to be slightly more specific

    *The British in particular I will give a more detailed treatment; they are headed to the Fosso di Moletta, which marks the border between the coastal marshlands and the coastal gullies; the object is to either seize or block off the crossings, for as you will recall, the gullies are impassable to armor and other vehicles

    *American advance proceeds smoothly

    *The British run into an enemy company, identified to be the 7th of the II Btn, 71. PzGr (Panzer-Grenadier) Div, sitting on the only crossing over the Fosso di Moletta; the 6 Gordon Highland Btn assumes its place here and attacks with extensive air and naval arty support, taking the bridge with minimal losses while eliminating an enemy platoon; the enemy falls back along the road, where another enemy detachment of unknown nature is sighted

    *British commandos encounter another company, probably also of the 71. PzGr Div.; attacking with extensive aerial and naval arty support, the enemy is force back for minimal losses; however, the Germans only lose 3 trucks captured, and nothing else

    Spoiler Alert, click show to read: 
    The disposition of the VI Corps prior to the British assaults...


    LANDINGS PHASE 2

    *I have received many reinforcements for the second wave of landings; these are armor, artillery, follow-on infantry btns, and division-level support elements; in addition, I have gained access to 5 groups/wings of fighter aircraft

    X-Ray Beach (US): *The remaining two battalions of the 7th Inf Rgt, as well as the regimental command, regimental arty, regimental AT coy, regimental depot, and regimental recon platoon

    *The remaining two battalions of the 30th Inf Rgt, as well as the regimental command, regimental arty, regimental AT coy, regimental depot, and regimental recon platoon

    *The remaining two battalions of the 15th Inf Rgt, as well as the regimental command, regimental arty, regimental AT coy, regimental depot, and regimental recon platoon

    *These three regiments constitute the US 3rd ID, the HQ of which, headed by General L. Truscott, as well as the MP platoon, will arrive on shore now

    *10th, 41st, and 49th FA (Field Artillery) Btns, bearing a dozen 105mm M2 howitzers each

    *9th FA Btn, consisting of heavy artillery - a dozen 155mm M1 howitzers

    *69th Armored FA Btn, with 18 M7 Priest SPGs

    *A company of Shermans from the 751st Tank Btn

    *The dozen M10s of the A Company, 601st TD Btn

    *2 companies of the 441 AAA AW (Automatic Weapons) Btn, composed entirely of SPAAMG (Self-propelled Anti-Air Machine-Guns)

    *The MP platoon of the 1st AD (Armored Division) will land

    Anzio (US): *The 6615th Ranger Force top-level elements, including the famous COL William Darby's command, a battery of halftrack-mounted 75mm howitzers, two mortar companies, and finally a mobile depot

    Peter Beach (BR): *BR 2nd Inf Bde's brigade-level assets, including BRIG E. Moore's command, an MG battalion, and a mobile depot

    *2nd, 19th, and 67th Field Regiments of the Royal Artillery, bringing along 6 dozen 25-pounders

    *The BR 1 ID command, led by MAJ-GEN W. Penney, as well as the divisional Field Park Coy (which contained stores for the field companies of the Royal Engineers, as well as pontooneering equipment and personnel)

    *A Company (Company A) of the 1st Recon Rgt

    From now on, reinforcements will appear on the beaches themselves


    Tactical Note: All American artillery (aside from the battalion HQs, each of which has an organic battery of 81mm morars) should head toward the central point of Campomorto near the MussoCanal. From there, they can cover an area from Cisterna di Latina to the coast, from Borgo Piave to Aprilia.

    Spoiler Alert, click show to read: 
    A rough sketch demonstrating my point...


    Additional Note: The commander of the 504 PRCT is of course COL R. Tucker. I should have mentioned earlier that he dropped with the regiment during the assault phase.
    Last edited by Montmorency; 01-12-2013 at 04:43.
    Vitiate Man.

    History repeats the old conceits
    The glib replies, the same defeats


    Spoiler Alert, click show to read: 


  7. #7

    Default Re: The Next TOAW DAR/AAR

    TURN 3 (JANUARY 22 AFTERNOON)


    • Anzio Harbour is operational!
    • VI Corps has landed 19575 tons of supplies of all kinds
    • WAR NEWS: Cassino: US 36th Div's attack finally failed
    • Allied Air Shock 95
    • German Air Shock 105
    ALBAN HILLS

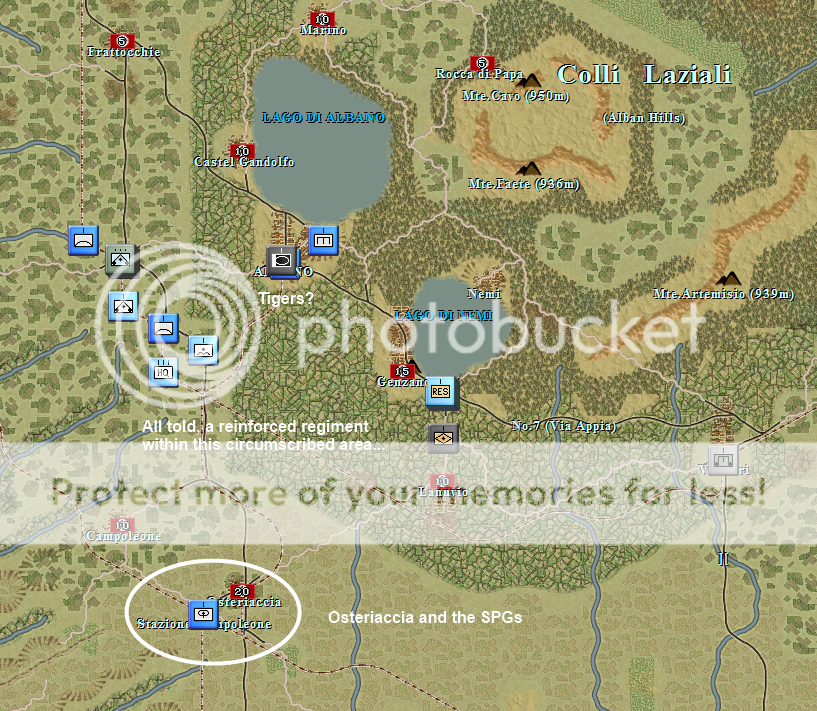
    Many enemy contacts in the southern Alban Hills. Among those counted are a pioneer battalion, an AA battalion, a reserve battalion, a company of heavy tanks thought to be Tigers, and, a few km south of the hills, in Stazione Campoleone, a company of assault guns. Stazione Campoleone is just SW of Osteriacchia, a major objective in the area. This assault-gun company is probably the same one seen earlier in Lanuvio...

    This and other developments to be noted at a later point in the report lead me to believe that the enemy intends to form up a defensive line, well back from the front. The fact that it's well back from the current extent of Allied advance could either signal the determination and cool-headedness of my opponent, or could be a miscalculation that will allow me to take a substantial area with minimal work. Then again, it might even be a trap.

    Spoiler Alert, click show to read: 

    WEST OF THE CANAL


    Reinforcements: *MAJ-GEN John "Johnnie" Lucas has debarked at Nettuno with his staff and will set up his HQ tent in Anzio, where it shall remain for the remainder of the battle. We will hear no more of Lucas unless he is forced to move by a deep-penetrating German spearhead...

    *5 Grenadier Guards Btn

    *1 Irish Guards Btn

    *24th Guards Bde brigade-level elements, including BRIG A. Murray's command, the brigade depot, and an MG company

    Enemy Dispositions:

    Spoiler Alert, click show to read: 
    Situation just after noon...


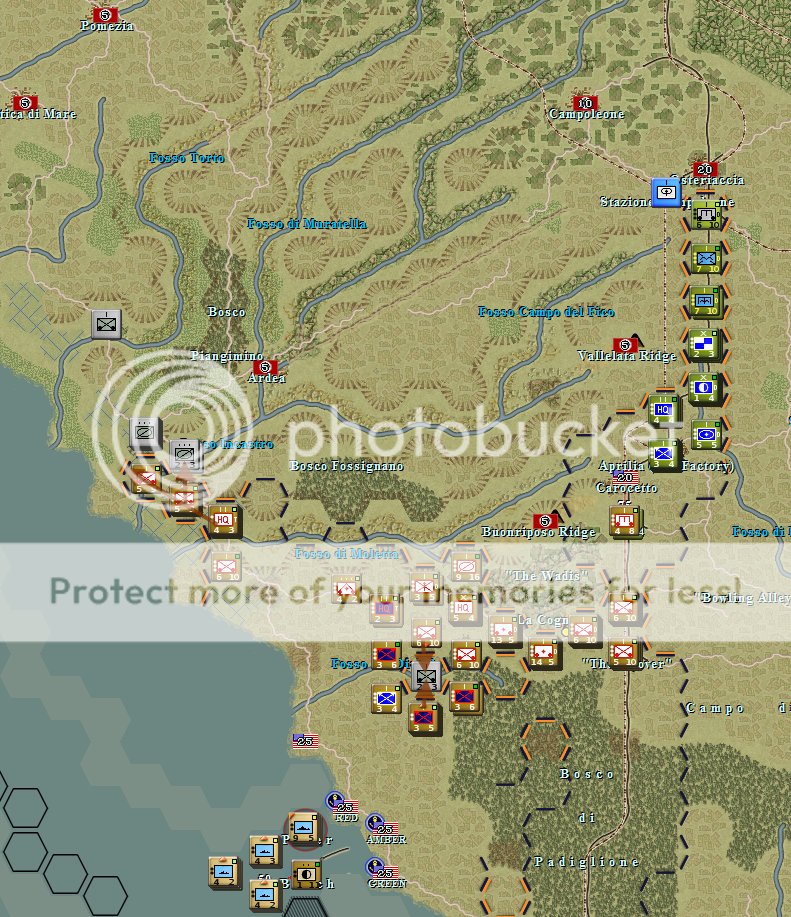
    The enemy company engaged by the Commandos seems not to have moved - perhaps it was shocked by the force of the assault. Along the road through the gully-land, however, it's a different story. Locking down the road for a few miles is a full battalion of Panzergrenadiers. We're seeing a battalion HQ, 3 line companies, and what looks like a recon company.

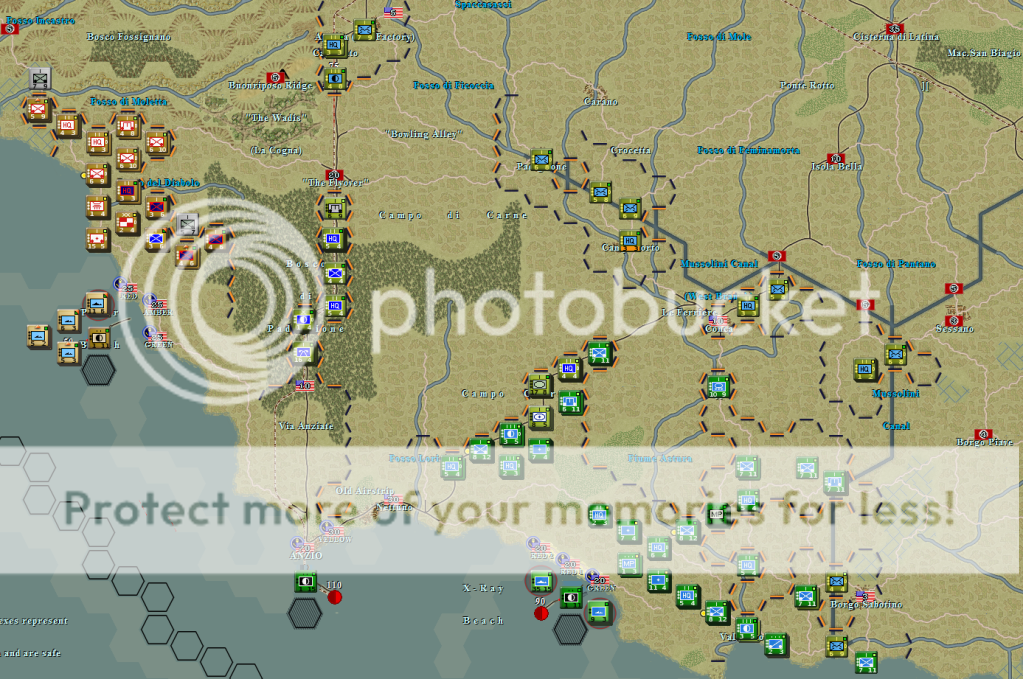
    Maneuvers: It will be up to 6 Gordon Highland Btn to bust through the . They will received considerable artillery support, and the Irish Guards will be behind to lend a hand if necessary. This is certainly a sideshow and not a place to commit many men, but it would be nice to, if possible, bust a path through this difficult terrain and use it as a route to the enemy's flank. Ultimately, if the enemy proves unbudgeable, I could always leave behind a battalion or two to stand guard and whatnot. Attempting to force my way through, the enemy lose a platoon while Brit casualties are low. However, the position is retained. The next attempt, the enemy simply retreats toward the recon platoon behind them, and my men advance, pushing away another recon platoon on the shore. The final attack, on the weakened company + platoon, is successful, and the stretch of road is taken. The Germans lose slightly more.

    The commandos, with help from nearby battalions, will surround the isolated enemy company and finish it off. The first attack is repulsed, though casualties are light and the enemy suffers disproportionately. The second time around, the enemy simply surrendered.

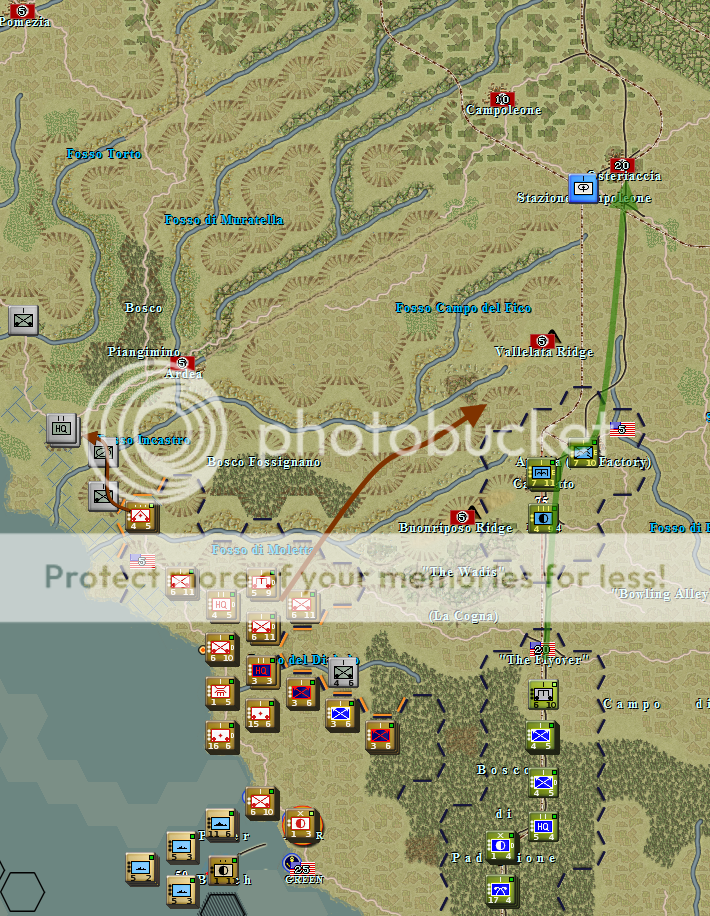
    The rest of the the British force will proceed past La Cogna ("The Wadis") and toward Vallelata Ridge, where they will establish a strong defensive line overlooking the Fosso Campo del Fico, which terminates just SW of Osteriacchia.

    The American rangers and what airborne elements are in the area will move on Osteriacchia, of course keeping the rearguard strong in case of ambush.

    What all this serves to do is to anchor my left flank along difficult terrain that needs only a regiment for hold down over say 15 km. On the right, it anchors the flank in urban terrain, in an important objective of the mission.

    From Osteriacchia, I would extend the line down to the Mussolini Canal, but along and behind the Fosso di Ficoccia, a waterway which meanders out of the Canal's western extent.

    I get it now... The enemy is conserving the main body of his force until sufficient reinforcements arrive from elsewhere in Italy and occupied Europe... He may just mean to strike once "en kairo", so to speak.

    Spoiler Alert, click show to read: 
    Situation toward dusk...


    MUSSOLINI CANAL


    Reinforcements: *Remainder of 751st Tank Btn, bringing total tanks of battalion present to 57 Sherman, 17 Stuart

    *Remainder of 601st TD Btn, bringing along 2 dozen fresh M10s as well as a cavalry company

    *Remainder of 441st AAA AW (Automatic Weapons) Btn, making 4 dozen infantry-chopping SPAAMGs operational within the beach-head

    *3rd ID Divisional Depot

    Enemy Dispositions:
    Spoiler Alert, click show to read: 


    Situation just after noon...

    ... Sorry, I forgot to snap this shot.


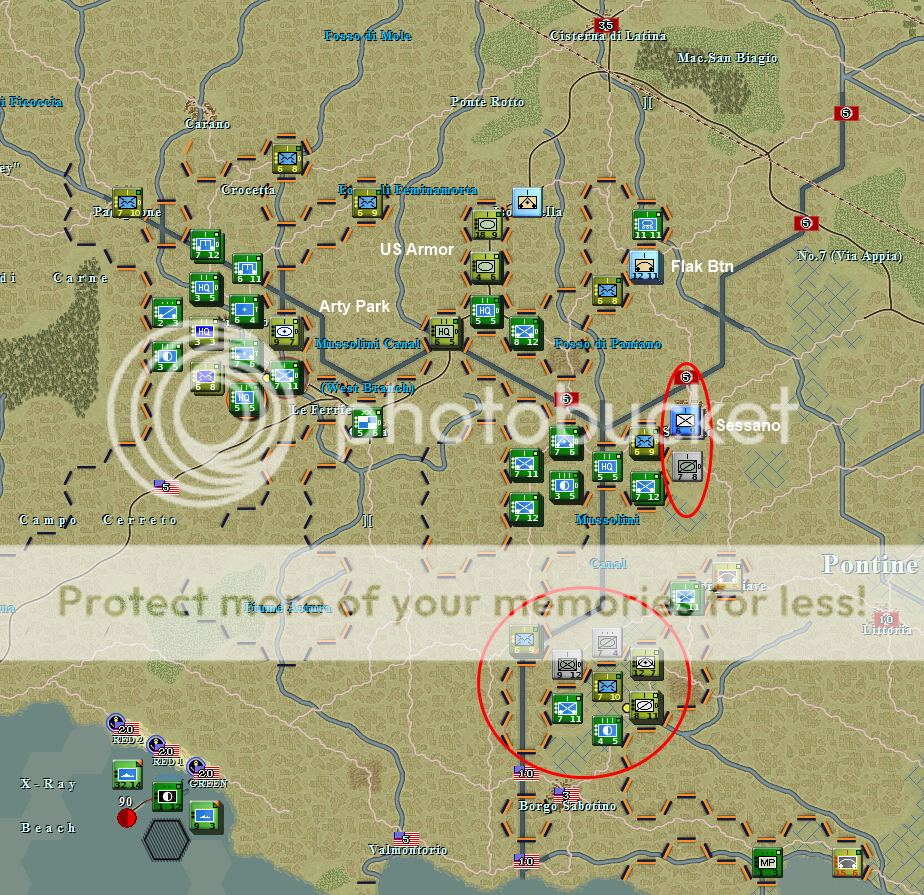
    North of the Canal, around Isola Bella, two motor AAA companies and a motor AT company have been spotted. They seem to be part of some Luftwaffe ground formation: Hermann Goehring Div, perhaps? Good thing my own panzers are moving up...

    3 km N of Borgo Sabotino, a mech company of the enemy has turned up at a crossing, as seen by my three line companies there. This must be the same one that abandoned the aforementioned village early in the morning. Is this a trick? A trap? It's so tempting to make an attempt to surround and destroy. If there's nothing in the way, it would be so easy...

    Manuevers: Continue to move up forces per their current headings.

    Artillery to Campomorto, as noted previously. Airborne arty stays where it is, as pack howitzers have shorter range than other pieces.

    Even armor continues on current headings, though it seems likely that the TDs (Tank Destroyers) will be needed in the north soon (if HG Div. is around). The 751st to head up, past either Campomorto or Conca, into enemy-controlled zone. The TD Btn will head east, into the Pontine Marshes. Not good terrain for tanks, but then again nowhere on the coastal plain is good for tanks.

    504 PRCT elements will tentatively move past the Canal to reconnoiter in force. Near the coast, they will work with other formations to surround the seemingly isolated enemy company, and to destroy it.

    There are 5 enemy openings into the marshes from an abstracted 'rear area', and these entrances must be garrisoned by both sides to represent the stabilized front along the edges of the AO (Area of Operations). This is a House Rule. The Germans need only garrison with 5 platoons each entrance, while I need a full battalion + company. Obviously, the bulk of a division tied down there while holding up only a regiment of the enemy...and my opponent has a very weak grasp of English. Let's hope he at least understands the need to maintain this, or I will be at a severe disadvantage if pressing the attack...Oh no, I misunderstood. The garrison is for the entire area (of the Pontine Marshes), I see. So it's one line unit per entrance. Disregard my earlier elaboration.

    It begins! E Company of the 2nd Btn, 504th PRCT advances over the bridge toward Sessano, and runs into a prepared enemy. A company of infantry and a battalion HQ are in the village itself, the HQ probably of the previously noted company. S of the village is a recon company of the same formation. I though I might be able to go as far as the crossing just north of Sessano...

    K Coy, 3rd Btn, 15th IR (Infantry Regiment) encounters an enemy artillery company and forces it to surrender. A nice catch.

    The flank of the aforementioned enemy mech company N of Borgo Sabotino is guarded by a recon platoon, of the same formation. It prevents the full encirclement of the company. Still, this should be enough for now. Pressing the attack over the bridge, the company is not shifted, though both sides take some casualties. The PzAuf company and the recon platoon do inexplicably switch positions, though. This should actually make things easier for me.

    The mech company and the cavalry company (and platoon) have been identified by interrogating the prisoners from the captured arty. They are of the Panzer-Aufklarungs Abt (Abteilung) 129, and they are rather powerful units. Even the platoon is strong, and I will likely need my M10s to take on it. The M10s do make an attack, though suddenly against the company of course but wait! The infantry on the bridge attacked the platoon before the Wolverines moved in, and took out most of the platoons vehicles for no losses and forced it toward the company. So, both enemy units were present for the M10s assault. That assault proved somewhat successful. The enemy remains, but are encircled and probably won't manage to escape or be relieved.

    2nd Btn, 30 IR, moves toward Sessano to set up a line against the enemy there. For now, they are too strong to overwhelm. Well, alright, I'll try an attack on the recon company. I am badly beaten, losing half a platoon for nothing. The men, before pulling back, at least manage to identify 19 enemy halftracks present at the skirmish.

    3rd ID's cavalry troop ventures past the Canal toward the AAA contacts, and discovers, after knocking about one company and a battalion HQ, that this is the bulk of the I Btn of the Hermann Goehring Flak Rgt. Retribution will not be slow in coming, I'm sure... The cavalry troop is in a very compromising situation far from friendly lines, with enemies between those lines and itself. Hopefully it will survive.

    The arty is in place around Campomorto. So many guns and men that the advance of the line companies behind them is significantly slowed. That's what I get for not paying attention to that sort of thing.

    Para companies advance past the Canal N of Campomorto, 3 km each, but encounter no signs of hostiles.

    Spoiler Alert, click show to read: 
    Situation prior to attacks...


    Additional Note: This afternoon, hundreds of transport vehicles were offloaded onto the beach, to be absorbed by all wanting units in the beach-head. This will boost supply distribution as well as movement rates. It will take about a day for everything to get where it is needed, however.

    ***
    Feedback would be tolerable. How much of a faux pas was it to jump the gun by over a week, even if the turnout seemed anemic at the time? Hopefully, history will vindicate me.
    Vitiate Man.

    History repeats the old conceits
    The glib replies, the same defeats


    Spoiler Alert, click show to read: 


Bookmarks

Posting Permissions

  • You may not post new threads
  • You may not post replies
  • You may not post attachments
  • You may not edit your posts
  •  
Single Sign On provided by vBSSO