


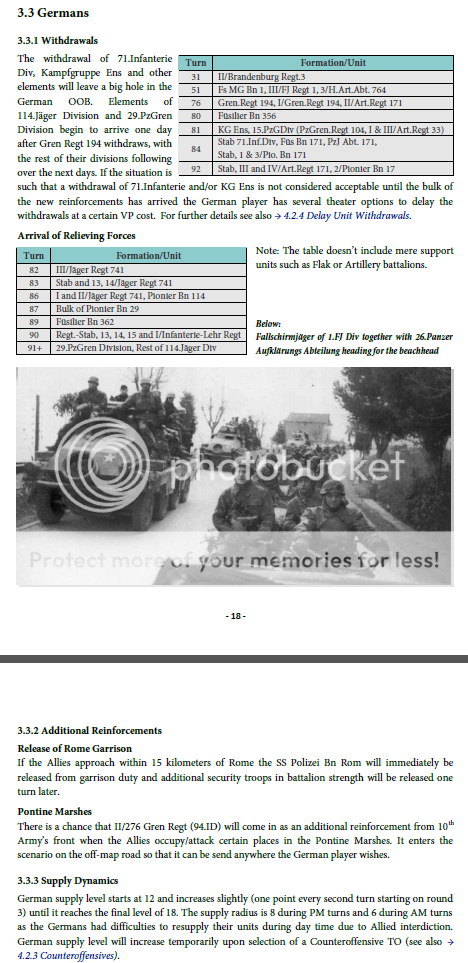
OPERATION SHINGLE: FROM ANZIO TO ROME
BRIEFING
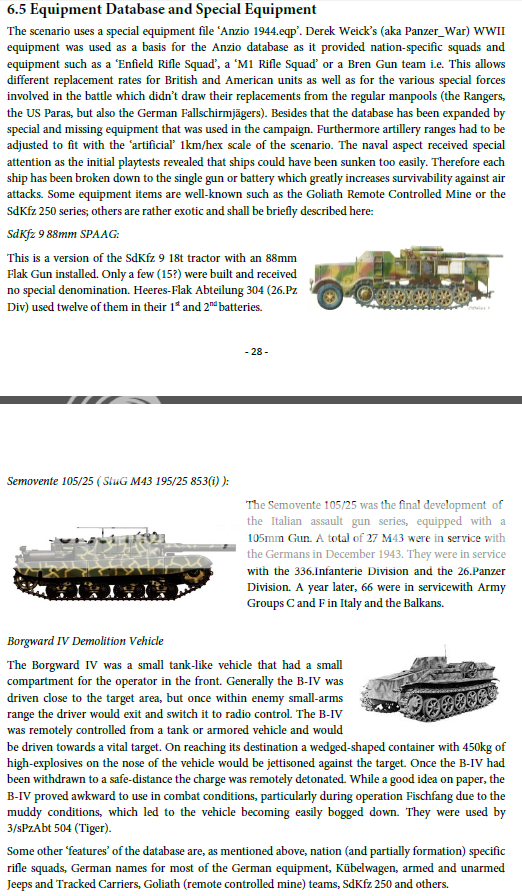
This scenario is as close to tactical as the TOAW engine can reasonably approach. As such, there will be plenty of tactical details included in writeups, though tempered by the new doctrine in a visible manner.Date: January - February 1944
Location: Anzio, Italy
Map scale: 1km per hex
Time scale: 6 hour turns
Unit scale: Company
Length: 40 - 120 turns
HISTORICAL BACKGROUND
"I had hoped that we are hurling a wild cat on the shore, but all we got was a stranded whale"
(W. Churchill)
At the end of January 1944 US VI Corps executed an amphibious assault behind German lines at the city of Anzio, just 50 km south of Rome, in an attempt to break the stalemate at the Gustav Line. To achieve this VI Corps was to advance onto the Alban Hills, a key feature dominating the southeastern approaches to the eternal city, thus cutting off German 10th Army's lines of communication and forcing a retreat from the Gustav line. Despite total tactical surprise a combination of over-cautiousness, hesitation and willingly ambiguous orders failed to exploit the situation. The Germans reacted swiftly and brought in substantial forces to not only contain the beachhead, but also to release a determined counterattack. After the climax of the battles by mid February the beachhead front line came to a stalemate with neither side having achieved its operational objectives.
The scenario covers the initial landings and the opening phase of "Shingle" (the codename for the operation) until mid-February with the possibility of an earlier end. It also incooperates some small what-ifs.
METT-T
Mission
The historical mission is to break the stalemate at the Gustav Line further south by cutting German lines of supply and Communication, thus forcing a general retreat from the FLET (Forward Line of Enemy Troops). This can be accomplished by taking sufficient strategic terrain in the enemy's rear, though the destruction of OPFOR combat elements is of course a vital part of the process and a goal in its own right.
Spoiler Alert, click show to read:
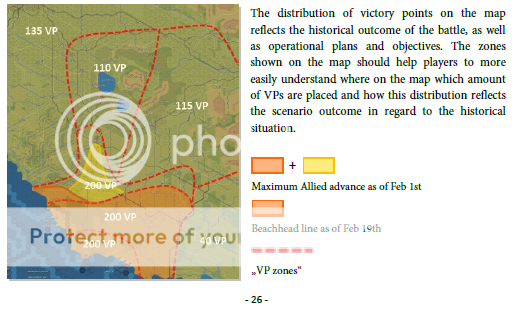
This image describes the concentration of valued terrain within the AO (Area of Operations). As you can see, out of the 1000 "Victory Points" available, 50% or so are located within the historical Allied beachhead. Thus, I can achieve a historical draw by maintaining a historical stalemate roughly around the historical occupied area.
The highest concentrations of victory points:
*Beaches - 190 VP
*Alban Hills - 130 VP
*Aprilia/Carocetto - 85 VP
*Mussolini Canal - 83 VP
*Rome - 80 VP
*Anzio - 70 VP
*Cisterna di Latina - 35 VP
*Nettuno - 30 VP
*And myriad smaller ones...
Spoiler Alert, click show to read:
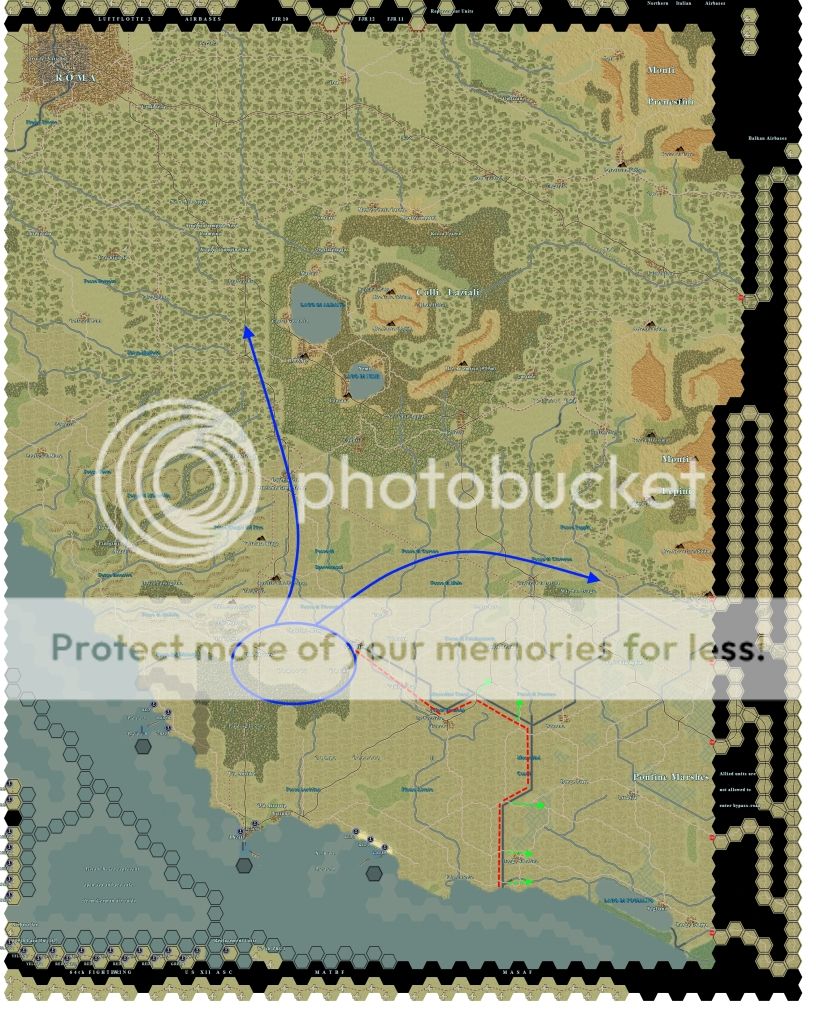
Given this, my operational COA (Course of Action) is to, create a beachhead, quickly secure the crossings over the Mussolini Canal, particularly with airborne units (red), and to launch an offensive across it once the enemy arrives in force (green).
The object is to convince the enemy that I intend to focus my forces on the eastern half of the map, while building up a strike force west of the canal (blue) with which to envelop the enemy all along the canal while dispatching a contingent to secure Rome.
Spoiler Alert, click show to read:
Note that this plan is full of holes and is surely unworkable. Enemy intelligence and deductive logic would certainly reveal it before it could be sprung, resulting in a historical impasse at best and a drive to the beaches at worst.
Perhaps I'll be able to deploy a heavily modified variant. Generally, however, I'd like to keep some sort of enveloping swing around the Mussolini Canal with a simultaneous march on Rome, or at least the Alban Hills in the center of the map.
I need to be quick and decisive to secure as much favorable terrain as possible in the first few days, while not overextending myself to the point where his reinforcements can pick apart my columns piecemeal.
Enemy
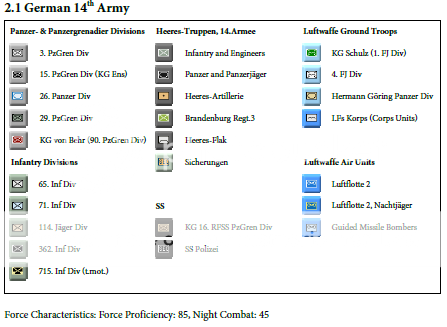
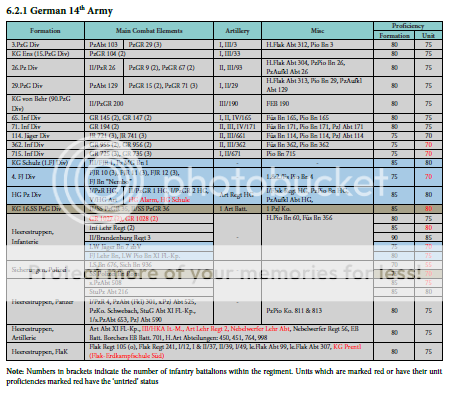
The 14. Armee is a mixed bag, containing many elite units, many veterans, but also many green units newly raised or composed of low-quality troops. All told, it has a slight edge on the Allies in terms of experience, training, and skill.
Unit Icons
Spoiler Alert, click show to read:
OOB
Spoiler Alert, click show to read:
Other
Spoiler Alert, click show to read:
Terrain
Spoiler Alert, click show to read:
The AO is something not much more than 2300 sq. km. of ground.
Within 20 km of the shore, the terrain is mostly marshy and cut by many rivers. The major waterway in the area is the Mussolini Canal. East of it are further marshes: the Pontine Marshes.
Note that defenders in marshy terrain get a 2x bonus to their AT capability.
A couple of miles north of Anzio is a wooded area, the Bosco di Padiglione.
In the center of the map is the thickly wooded Alban Hills region.
There are several mountains along the eastern edge of the AO.
On the west edge of the map, S or SW of Rome, is:Beyond the coastal region, the western "gullies", the urban Rome in the NW corner, the Alban Hills, and the eastern mountains, is a heartland of flat cultivated land, mottled by the occasional town. The road network here is better than on the coast.Players may note the number of minor escarpments and badland terrain on the western part of the
map, north of the Moletta creek. The low coastal plain in this area was cut by a series of rough stream
gullies. These gullies, though their small streams were easily fordable, were often fifty feet deep and
offered difficult obstacles to armor. Note that only foot movement units are able to move through
badland terrain and that units within a badland hex can’t resupply though they are nominally in a
supplied state.
The Via Appia is a highway that runs from Rome to Anzio and the southeast map-edge. It cuts across the SW Alban Hills. This is the road to follow in the event of a march on Rome.
In the northern part of the map, there is another highway (No. 6) but it will never be accessed by Allied troops except in the event of a total victory.
The German rail lines typically follow the two named highways.
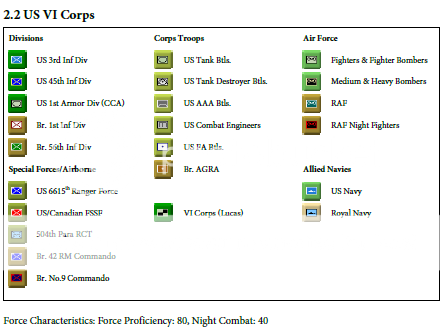
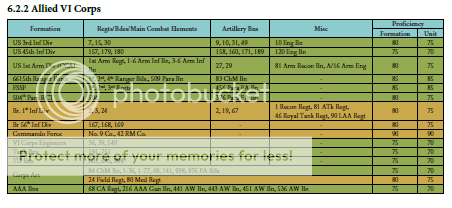
Troops
The VI Corps is well-enough trained, and most of its men have seen combat before. There are, however, issues with cooperation between British and American elements.
Unit Icons
Spoiler Alert, click show to read:
OOB
Spoiler Alert, click show to read:
3.2.3 Allied Supply Dynamics
Supply Radius and Supply Stockpile
Allied supply radius and supply stockpile are initially low to reflect the circumstances of an
amphibious landing, but as this particular landing faced no initial opposition and plans could have
been carried out almost under maneuver conditions the supply radius and stockpiled supply will
increase rapidly:
Turn 1: Supply Stockpile: 8 Supply Radius: 4
Turn 2: Supply Stockpile: 18 Supply Radius: 6
Turn 3: Supply Stockpile: 28 Supply Radius: 8
The supply radius will increase to 10 if the Allies are in control of Aprilia, Osteriaccia, Cisterna and
four other small villages in the Alban Hills and/or the Lepini mountains. Or technically spoken: If the
EEV rises to 64, Allied supply radius will climb to 10. Historically resupply was difficult for the Allies,
especially in clear visibility and absence of smoke screens (of which was made excessive use) due to
German artillery observation positions in the higher terrain of the Alban Hills and the Lepini
Mountains. A drop of the EEV below 64 will set the radius back to 8 again. The events are repeatable;
this means the supply radius will switch back and forth depending on the EEV value.
Beach Supply
Beach supply is modeled with sea supply roads and ferry
bridging units. There is one supply point per beach
(Peter Beach, Anzio (X-Ray yellow) and X-Ray
red/green) which is placed in a deep water location. A
road on an arid terrain hex connects the supply point
with the actual beaches/harbor. The arid terrain graphics
have been altered to resemble the look of deep water
hexes. On this road the hex connecting the supply point
with the beach contains a destroyed bridge over a major
canal. VI Corps supply units are positioned in these
hexes. Their major ferry capability will allow them to
trace supply over to the beaches and with the supply unit
adjacent, friendly units get a 50% supply boost. Note that Peter Beach supply will be removed on turn
10 (see → 3.1.2 Weather Influence on Supplies and Air Activity). These supply units have assigned a
slightly different amount of equipment to model the different size of the respective pontoon
installations and the harbor. As the amount of supply actually traced over to land is relative to the
major ferry percentage value of the tracing unit, this set-up allows the Germans to try to hamper Allied
supply unloadings by artillery shelling and air raids as they did historically, although with little or
negligible effect. The equipment of the supply units has a high replacement rate to ensure that any
losses can be replaced fast and supply reductions are only a short time temporary nuisance. If such a
supply unit is destroyed, a replacement unit will appear one turn after the respective beach's supply
unit is destroyed.
Anzio is a 110% level supply source, X-Ray red/green is a 90% level supply source while Peter beach is
a 50% level supply source.
3.2.4 Allied Withdrawals
No.9 Commando and 42 RM Commando will be withdrawn on turn 11. There will be a warning in the
news string to remember the Allied player of their withdrawal.Time
In this scenario, the turns are 6 hours each. This highly tactical timeframe means that, despite the small hex-scale, units can not move very much in a single turn.
This is practically speaking. In fact, on one of the highways (if controlled by friendly forces) it is possible for a motorized or armored unit to cover in excess of 30 km in 6 hours.
What this means is that the Germans have much operational depth to deploy their reserves quickly and wherever they deem necessary, while any Allied advance will have a lower circumscribed rate, and in the early days movement around the beachhead will be difficult - until sufficient friendly control is attained over the area of the beachhead.
The turn-length being as it is, half the time will be spent in night turns. Night combat is a chancy thing, so I'd better keep in mind the penalties and concentrate my offensive maneuvers in the days.
In total, there are 40-120 turns, or 10 days to a month. The variability is accounted for below.
3.1.3 Early End (or accepting the stalemate)
I didn’t want to force the players to play the entire 120 turns of the scenario, especially to prevent them
from resembling WW I style trench warfare. To give a more official touch to a possible player
agreement, players can agree upon an earlier end of the scenario after turn 40 by selecting the theater
option “End game with current victory levels”. If one of the players chooses this option the other
player will receive a theater option to accept his opponent’s offer on the following turn. If he accepts
this offer the game will end with the normal victory tally the next turn.3.1.1 Victory Conditions
General Thoughts and Sudden Death
What constitutes an Allied or a German victory? Looking at history, an Allied victory regarding
operational plans would be ‘establishing and securing a beachhead and advancing onto the Alban
Hills’. The Allied player can get an overwhelming victory in achieving this and holding the gained
ground until the end of the scenario. An instant victory can be achieved if the Allies reach their main
goal – the withdrawal of German 10th Army from the Gustav Line. This is handled in detail by the
EEV (Event Editor Variable) and can lead to a “Sudden Death” victory for the Allies.
The German aim was, as Hitler clearly stated, to ‘erase the abscess’. A German victory can be achieved
by pushing beyond the front lines of February 19th, the last day of Fischfang. If the Germans capture
Anzio the game will end with a German instant victory
Any outcome along the historical front lines between February 3rd, the beginning for the battle of the
thumb, and February 19th, the day Fischfang was canceled, is regarded as a draw.
Rome
The Allied player can take Rome, but it will not produce an instant Allied victory and except for the
release of German reserves, which will be released before the Allies reach the outskirts of the city, it
won’t influence German actions at all - Rome was not the objective, pushing to Rome means exposing
Allied flanks in open terrain. Advancing to Valmontone and or the Alban Hills on the other hand sees
VI Corps' flanks in formidable defensive terrain (Moletta Creek, Alban Hills, Monti Lepini, Mussolini
Canal). As General Penney, commander of British 1st Infantry Division stated: “We could have had
one night in Rome and one and a half years in POW camps.”
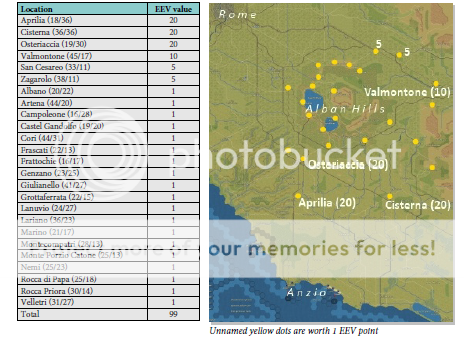
The EEV
The occupation of certain locations will increase the EEV value. On reaching certain values‚ a
simulated dice-roll determines whether the German 10th Army retreats from the Gustav Line due to
the danger of their lines of communication getting cut-off. Failing such a check leads to 10th Army's
withdrawal and results in an Allied Sudden Death victory.
EEV Values and Victory Chances
German re-occupations of EEV locations will lower the variable value
accordingly. The trigger locations can change hands multiple (in fact:
infinite) times with the variable value going up and down with each
occupation/re-occupation event. Important: Once a probability check has
failed it won’t be repeated a second time should the according variable
value be reached again. It wouldn’t make sense if the Germans decided to
abandon the Gustav Line under the same circumstances under which they
had decided to stand fast just a couple of hours or days ago. This also
prevents gamey play: Abandoning such an objective after a failed check and leaving it to the German
player with the purpose of taking it back again to get a second chance for a successful sudden death roll
won’t work. Furthermore, the Allied player is advised to protect the base of his beachhead accordingly
as a permanent loss of one of the 20 EEV point locations makes it almost impossible to achieve a
variable value required for a sudden death roll. The following chart and map give an overview of the
locations contributing to the EEV value:Spoiler Alert, click show to read:
All this is to be considered later on - remind me! - as if I can achieve an EEV of 60 or more, it likely means that the campaign as a whole is turning in my favor.
Theater Options:
Spoiler Alert, click show to read:
Other Notes:
Spoiler Alert, click show to read:
***
The scenario and documentation can be located at the scenario creator's - S. Goehring's - site. Due credit to him, &c.


 Reply With Quote
Bookmarks