Page 1 of 8 12345 ... LastLast
Results 1 to 30 of 226

Thread: A Beginners Guide to Medieval: Total War

  1. #1

    Post

    A Beginners Guide to Medieval: Total War by frogbeastegg

    I regret to say that I will no longer be updating this guide with corrections or suggestions; I just don't have the time any more. This is the final version.

    This document is entirely the work of frogbeastegg unless otherwise indicated. You may do what you wish with this document as long as you do not make money from it, alter it in any way, or claim it as your own work. I did this for free and I worked hard. Don't steal my stuff. I prefer it if people ask my permission before doing anything with this that may go public, if you are doing something for just yourself then fine, but if you plan to distribute it please ASK me. Leave a note in this topic or something, and I will get back to you. The same applies if you want to use this on your website, I get a lot of mail on this guide and I like to know what is happening, being asked questions based on versions I don't know exist is not fun. I almost always grant permission if asked.

    There is now a PDF version of this guide. It is more up to date than the word version below, and also looks a lot better. You can download it here. Thanks to Tricky Lady for compiling this PDF.

    There is now a printer friendly version of this guide available You can download it from two locations:
    1.Click on this link and go through 3D Downloads Link to guide, the file is called (surprise) printable beginners guide and the author is frogbeastegg.

    A HTML version of this guide is now available complete with links to the assorted sections. You can view it here. This version of the guide was made by TosaInu.

    2. JUNIOR MEMBERS ONLY - if you have junior member status (or better) you can access the orgs built in download thingy, look above the grey bar telling you which forum you are in. You should see a link called 'files' in small letters. The guide is listed under faqs -> printable beginners guide by frogbeastegg.

    The printable guide is never going to be updated - this online guide will be the most current version at all times. If you don't have Microsoft Word you can use open office, a free program to view it. Alternatively you can get Microsoft's own free Word reader here

    Index
    1.Getting started
    1.1 Useful resources
    1.2 What to practise before starting a main game
    1.3 Choosing your faction, difficulty, mode and era
    -On era
    -On difficulty
    -On factions
    -Faction and religion - which is easier for a beginner?
    -On mode - Glorious achievement or conquest?
    2.The campaign game
    2.1 Your main aims
    2.2 Buildings and the tech tree
    2.3 Armies and units
    -Army types
    -Unit availability
    -Should I save my cash by building lesser units?
    -Should I build now or wait for better units?
    -What does unit X do?
    -Retraining Vs making new units
    -What do my cavalry dismount into?
    -What is valour?
    -What is disciplined and elite?
    -Why does morale matter when choosing troops?
    2.4 Mercenaries
    2.5 Finances and provinces
    -Farming, mining and trade
    -The payback factor
    -Special province bonuses
    -Rebellions and loyalty
    -What about faction re-emergences?
    2.6 Securing your borders
    2.7 Diplomacy
    2.8 The Pope
    -Excommunication
    -Getting recommunicated
    -Avoiding getting excommunicated in the first place
    -Wouldn't it be easier to get rid of the Pope?
    -So I can't conquer the Pope entirely then?
    -You can use the Pope to help you
    -Getting on the Pope train...
    2.9 Agents
    -By province
    -By type
    2.10 War
    -When should I attack?
    -Where should I attack?
    -Amphibious attacks
    -Castle attacks
    -So I've attacked, now what?
    2.11 Events
    -All those handy dates.
    2.12 Crusades and Jihads
    -How to have a successful crusade
    -What do I do about other faction's crusades?
    -Crusader knights
    3. The battle map
    3.1 Basic aims
    -When attacking
    -When defending
    3.2 Unit types
    -A quick rundown of what is what and a link to a source of more detailed information
    -Morale
    -What are those little flags visible on each unit?
    -Charging
    3.3 The landscape
    -Height
    -Trees
    -Bridges
    -Desert
    3.4 Generals and kings
    -Killing and preserving
    3.5 When to fight and when to withdraw
    -Running for it with grace Know when you cannot win and when you can win
    3.6 Sieges
    -Both defending and attacking strategies
    3.7 Tactics and fighting styles
    -Catholics
    -Muslims
    -Orthodox
    4. Moving to intermediate
    -Links to more advanced stuff
    5. Appendix
    5.1 Hotkeys
    -Battle map
    -Campaign map
    5.2 Multiplayer
    -basic do's and don'ts.
    5.3 Modding the missile units
    -Step by step guide to basic missile stat modding
    5.4 Unit size chart
    -How many men are in each unit type at each size setting
    5.5 Cheat codes and command lines
    -Cheats for medieval and Vikings
    -Command lines for Vikings
    6. Credits

    1. Getting Started
    Welcome to Total War This guide is intended to aid the new player adjust to the complex and, at first, bewildering world of the Total War games. This guide has been written with Medieval: Total War in mind, although many of its tips can be applied to Shogun: Total war. The Total War series is made by Creative Assembly, a British company. Here is a brief rundown of the series so far:
    -Shogun: Total War (2000) The Original game, set in Japan
    -The Mongol Invasion (2001) The add-on for Shogun featuring the Mongol invasion of Japan
    -Shogun Warlords Edition (2001) Shogun and its add-on combined in one package
    -Medieval: Total War (2002) The second full game. Set in medieval Europe it is bigger and more complex than Shogun.
    -The Viking Invasion (2003) The add-on for Medieval. Covers the factional fighting that took place in Britain during the 9th - 11th centuries.
    -Rome: Total War (N/A) The next full game in the series. Not yet available.

    1.1 Useful resources
    Firstly if you just have Medieval: Total War and not the Viking Invasion add-on get the medieval 1.1. patch here. If you have the Viking Invasion add-on you don't need the patch, as it is included in the install of VI. The patch for the Viking Invasion is now available from the same link as the MTW patch.

    Next on your list should be a visit to Clan Berserk for a free copy of their excellent unit stat and comparison tool. This handy tool will allow you to look at the stats of any unit from Medieval and the Viking Invasion. When you want to know why a certain unit is better than another this tool is your bible.

    You should also consider finding a few minutes to read through The Medieval: Total War and Viking Invasion FAQ by Obake Date, it has some information this guide does not, just as this guide has some information the FAQ doesn't.

    For those who want to take their game even further I would recommend Bushface's Total War Information Pack. The pack contains 1 MTW map, 1 VI map of Britain, 1 set of 4 pages detailing unit availability and build requirements, 1 Catholic specific tech tree, 1 Orthodox specific tech tree and 1 Muslim specific tech tree. The two maps are a miniature version of the campaign map from both the main medieval game and the Viking add-on. They show each province along with relevant information like trade goods, iron, borders, sea zones and ports. They can easily be coloured in to show which provinces are owned by who at each of the three starting points in the campaign, this will allow you to make a better informed choice about which faction to start with, as well as where to attack next, the locations of handy resources etc. If you have the Viking Invasion add-on you will need Bushface's tech tree. Unlike the PDF that comes with the game this tree prints legibly onto A4 paper. It also corrects no less than seven errors that were on the PDF. The tree contains extra information such as the price and build times of each building and the valour bonuses are far clearer. The three MTW specific tech trees show exactly what a religion can and cannot build as well as integrating the new units and buildings added into the medieval game by VI. All the VI additions are clearly labelled so you can use it with plain MTW if you wish. The unit sheets come on four A4 pages and pack in details on every single unit in both MTW and VI. The information includes what eras the unit is limited to, which factions can build it, which provinces give it a valour bonus, what building and events are required to build it, and what units a faction can expect to get on a crusade. The sheets also have some 'hidden' provincial valour bonuses listed, for example Janissary heavy infantry get a bonus in Bulgaria but the game doesn't tell you this. You can download them from the org here, just look for the file called MTW_VI_Sheets by Bushface/frogbeastegg. As you can tell from that I did help Bushface make this pack, I was the researcher, but that has nothing to do with my recommendation, as the pack is excellent. An alternate download location can be found here.

    Another set of documents that you might like to get is made by Nefarious. He has:
    1. MTW Heroes document. A faction by faction listing of names, dates, types, and V&V's. Included is a brief history on each character.
    2. VI Heroes document. A faction by faction listing of names, dates, and V&V's.
    3. MTW Provinces listing. Spreadsheet showing each province's capital, resources, trade goods, and specialty troops.
    4. VI Provinces listing. Spreadsheet showing each province's capital, resources, trade goods, and specialty troops.
    5. Glorious achievement listing. A faction by faction list of the original glorious achievements and their points scores.
    These documents are very worthwhile, you will need Microsoft Word and Microsoft Excel to view them, fortunately there are free readers for both those programs available: excel reader word reader
    To get the files send an email to tugowar@(blahblah)mchsi.com leaving out the blahblah, as that is to baffle email sniffing bots.

    The Complete Total War Unit Guide has the stats, classification, and general information and tactics for all unit types in Medieval and Shogun. It is aimed more at the intermediate to advanced player, but with a basic grounding in TW principles you should be fine.

    There are two main websites I would recommend. First is the official site. Take a look in the forums, there are often interesting discussions going on. The second is the org, the site that is hosting this guide.

    If you can find a copy of Bradygames official Medieval: Total War strategy guide take a look through it. It has plenty of detail on the unit stats and battle factors that decide morale penalties, hit chances etc. If you want a look at how Medieval works out its combat sums than this is for you

    1.2 What to do before starting your first campaign game
    Firstly READ THE MANUAL. I don't care if you think you can manage without reading it, you will not be able to. There is a wealth of information in there, it is well written, clear and will set up with a basic understanding of what you can do and how to do it. I will not be reiterating the manual in this guide, so go and read the manual cover to cover and then come back.

    Done that? Good. Now you are going to play the tutorials, both the battle tutorials and the campaign map tutorial. Finish them all. It may even be worth playing the last few battle map tutorials several times to make sure you are comfortable commanding an army.

    Now you can choose between doing several custom battles and starting your first campaign. I would recommend the custom battles, as they will allow you to try out different units and factions, as well as giving you necessary practise. You can find more on the battle map in chapter 3. For advice in choosing a faction go to chapter 1.3.

    Get accustomed to the idea that you have plenty of time in the campaign to conquer everything There is no need to rush, in fact rushing will make your life much harder so calm down and take life slowly.

    1.3 Choosing your faction, difficulty, mode and era
    This is a very important subject. Once you have made your choices you will not be able to alter then without restarting your campaign. These few settings will define how long your campaign lasts, what units and buildings you start with, how the AI behaves and many other things. You must choose carefully if you want to get a game tailored to you.

    On era.
    If you just have Medieval you will be able to choose between early, high and late. If you have the Viking Invasion add-on you will also be able to choose Viking. The Viking campaign takes place on its own separate map, which is smaller than the main medieval one. All three medieval start dates take place on the same map, however pre-built armies and buildings, province ownership and unit availability will change. Early has the least pre-built stuff so you can customise your empire with ease. Early begins in 1088 and provides the longest time to finish a game. You will start with poor units like peasants and have to build your way up to better units. High starts in 1205 with more buildings already placed. You can still customise your empire but it is harder due to the development that is already there. Chivalric and feudal units are available at the start of a high game. You will have a medium length of time to finish your game in high. Late starts in 1321 and a lot of development is present in the provinces, also you don't have much time to customise your empire. Gothic units will be available at the start of the campaign, along with chivalric and feudal. This is the shortest medieval campaign. Recommendations: If you play the main medieval game start on early. If you have the Viking campaign available you may like to try it instead. Be aware that some people find the Viking campaign much harder, although I find it easier as it has less to do and is generally more manageable. The lack of the Pope and his interference also helps.

    On difficulty
    There are four difficulties, easy, normal, hard and expert. Your difficulty will decide how much money you start off with, any bonuses given to you or the AI and what tactics the AI will use on the two maps. Starting funds are as follows:
    Easy = 10000 florins
    Normal= 8000 florins
    Hard = 6000 florins
    Expert = 4000 florins
    On easy the player will get an extra +4 to morale in battle, making it harder for the AI to rout your troops. On expert the AI get this bonus. Normal and hard don't give anyone a bonus. The AI will use different tactics on the battlefield depending on your difficulty. Here is a list provided by GilJaySmith, one of the developers of Total War:
    - On expert the AI gets a morale bonus - on easy the player gets one
    - On hard and above, AI skirmishers will try to avoid being pincered
    - On easy the AI will not consider going into loose formation to avoid being shot at
    - On easy the AI will not consider outflanking, double-envelopment, or stop-and-shoot tactics
    - On easy the AI won't move troops out of the way of castle walls that may be about to collapse
    - On easy the AI will try to hide rather than flee if the battle is going badly
    - On easy the AI will not try ambushes
    - On easy the AI will not try the 'appear weak' battle plan
    - The AI is more likely to deploy in woods on harder difficulties, and less likely to camp near the red zone on easier difficulties
    - The AI is more likely to consider scouting the map to find the rest of your army if it can't see it all on higher difficulties
    - On easy the AI will not skirmish
    - On higher than easy, the AI will specifically consider sh00ting at your artillery
    - On easy the AI will generally attack rather than defend, and will not consider withdrawing for a much longer time
    - On higher than easy, the AI will check to see if it's marching into enfilade fire when attacking your main body
    - On easy the AI may come out of a wall breach to chase you if you attack and are repulsed

    In addition to these changes LongJohn (another developer) says the following: The combat strength of the a.i. units is affected by the difficulty level.
    On easy its combat effectiveness is reduced by 30-40% (can't remember the exact figure).
    On hard it's increased by 10-15%, and on expert its 30%. 30% being around 75% of the increase you'd get from 1 valour upgrade.

    Recommendations: For your first game choose either easy or normal.

    On factions
    This one is a real biggy. Your faction will decide your religion, unit selection, starting provinces, colour, diplomatic relations and succession to the throne. There are three religions you can play as (four if you play the Viking campaign, as the Vikings are pagan) Catholic, Muslim and Orthodox. The Catholics have the largest unit selection; they have many strong units with lots of armour. They also have to deal with the Pope (see chapter 2.8 ). The Muslim and Orthodox factions do not have to worry about the Pope. However they don't get as many units and their units are aimed more at hit and run tactics than the heavily armed and armoured Catholics. Each faction is rated for difficulty on the selection screen.
    Recommendations: For the Viking campaign try the Vikings (excellent units, raiding tactics, good boats and generally a lot of fun), the Mercians (reasonable units, good starting location, rich provinces) or the Saxons (good units, easier to defend provinces, compact kingdom, quite rich). For the medieval game try the English (nice location, good units with even better ones available when the clock hits 1205, reasonable income), the Byzantines (no need to worry about the Pope, awesome units which slowly become outdated, potential for massive income), the Egyptians (no Pope, isolated position which is easy to protect, potentially large income), the Danes (only one province to manage) or the Spanish (really good units, small at the start so they are easy to manage, can expand into Muslim territory easily, quite rich and they have easy access to iron).

    Faction and religion - which is easier for a beginner?
    That depends on several factors such as what tactics you like to use on the battlefield, what kind of position you want on the campaign map, whether you want to deal with the Pope or not, etc. I always find the Catholic factions easier because I like their armies and I fight well with them, enabling me to win battles that are very unfavourable in odds or conditions. Easier Catholic factions include England and Spain, while Spain is rated hard by the game it is actually very easy because it has rich lands, easy access to iron for troop upgrades, an enemy that is made for attacking without upsetting the Pope (Almohads), reasonable trade with access to both the Med and North seas, and a narrow set of borders with France and co. There are also many gold mines along the trail leading to the Crusader provinces and you can sweep them up while moving to grab the hideously rich and worthwhile trio of Antioch, Tripoli, and Edessa. Spain has the typical Catholic army with a couple of extra units thrown in; Jinetes are very good when you get the hang of them. Lancers are devastating but only around in late and you will probably have finished your campaign by then. England, well, once they hit high they have some excellent unique units (billmen and longbows) and if you have taken out France and got Wales and Scotland you are in a very healthy position to pursue a multitude of possibilities. Both these factions benefit from an aggressive start - flatten those who pose a threat to you before settling back to build your borders and stabilise your empire. All Catholic factions have to deal with the Pope and that is their biggest drawback. However once you learn how to take care of the Pope (poisoned chocolates work well, as do visiting armies kicking over his sandcastles) life becomes much sunnier

    The Muslim factions don't have to deal with the Pope screaming at them each time they do anything and this is part of their appeal to many players. However they do tend to be on the receiving end of crusades, but as long as you keep strong borders they shouldn't pose a problem. Muslim factions tend to have more flexible armies as they often get a lot of speedy cavalry and mounted missile units. Infantry wise they don't have the punch of the Catholics except for certain eras where they do have a very nice advantage. The Almohads have strong infantry in early but less so in high and late, the Egyptians have a few nice spear units like Saracens, and the Turks trample the opposition when they get their Janissary units in High. However generally speaking you can't just assemble an army, march straight at the foe and squish them like you sometimes can with the Catholics. The Almohads are a good faction for a beginner as they start with a good position and have easy access to one of the best units in early - the Almohad urban militia. The Turks are easy in high or late. The Egyptians are supposed to be easy in early, but I don't get on with their armies too well so I find them harder.

    Orthodox factions are a mixture. The Byzantines start off incredibly strong but by late they are as weak as anything because, in terms of units, they have everything at the start and that is basically it for them - no real upgrades like the other factions. You need to get going in early and basically kick ass for lack of a better description Stabilise your empire and then destroy the foe with all possible speed, but be careful not to over reach and trigger a lot of rebellions. They have good enough units to pursue either strong arm Catholic style infantry and heavy cavalry pounding the enemy or to take a more mobile approach with their mounted archer types and faster cavalry. The Russians are not available in early and they are usually classed as quite hard. Orthodox factions don't deal with the Pope and they can be common targets for crusades but as long as you keep your borders protected this shouldn't be a problem.

    Decide whether you want to faff around with the Pope and then try out some of the factions. If you like the armies then try the faction in the campaign.

    On mode, Glorious Achievements or Conquest?
    Basically on GA mode you will have to fulfil objectives given to you by the game for points. The faction with the most points at the end wins. There is no Glorious Achievement mode in the Viking campaign. In Conquest you are free to do your own thing. You are offered a lesser victory when you take 60% of the map. To get the greater victory you must conquer 100% of the map. Unfortunately there is no province counter so you can see how close you are to winning.
    Recommendations: I would go with conquest for your first game so you can experiment freely.

    2. The campaign game
    So you are ready to start your first campaign, but you want to know what you should aim for? This is the chapter for you This chapter is for both the main medieval game and the Viking game, the strategies are valid in both unless they rely on something that is clearly not in that campaign, for example inquisitors are not available in the Viking campaign.

    2.1 Your main aims
    Your main overriding aim is to win either by conquering 60% or 100% of the map, or by having the most GA points. To achieve this aim you will need to break it down into a series of smaller aims.
    1. Secure your kingdom. Defeat any immediate threats and build up border defence armies. (See chapter 2.3)
    2.Build a set of troop producing provinces. Most people go with one melee infantry province, one ranged unit province and one cavalry province. It is possible, and desirable, to build two melee infantry provinces to speed construction of armies. (See chapter 2.2)
    3.Get a good income. Build farming improvements, mines and trade. (see chapter 2.5)
    4. Moving out and expanding. Having achieved the three aims above you are in a position to take the battle to the enemy and start attacking for reasons beyond self defence. (See chapter 2.10)

    2.2 Buildings and the tech tree.
    The tech tree is quite easy to follow once you understand how it works. There are several levels for each building (troop production, farming etc). Most buildings require a certain level of castle to produce (the exceptions are farmland, mines, watch towers/border forts. I think that's all of them). You will always have to upgrade the castle one level to build the next building in a family e.g. if you have a spear maker you will need to upgrade the castle to the next level before building the spear makers workshop. The family evolution goes whatever -> whatever workshop -> whatever guild -> master whatever. For buildings that don't need a castle you can just build the next one straightaway. Some buildings are time limited; you can't build any of the gunsmiths or foundries until you get the message about gunpowder being discovered. One of the ship builders is dependant on the compass but I can't remember which. Generally for the Catholics you want to build each level of a building until the 'feudal' unit becomes available. After that you will need to wait until 1205 before the chivalric units are available so it's not always worth building up to master level straight away. However each master level building gives a valour bonus to it's units so you do need to decide whether you are going to pursue this bonus early by building a chain of buildings that won't give any units for quite a while.

    A suggested build order for a Catholic faction starting in early would be:
    Province 1 = cavalry. Build a royal estate, armourer's workshop, horse breeder, town watch, spear makers workshop, improved farmland 20% and castle. This will allow you to build the best Feudal cavalry. This is a slow and expensive process, which gives you Feudal Knights at the end, with other good cavalry in between like mounted sergeants. If you are using cavalry heavy armies having two or more provinces capable of building good quality cavalry will really aid you as it speeds troop construction and retraining.

    Province 2 = archers. Build a fort, town watch and bowyer. Archers are cheap and easy.

    Province 3 = infantry. Build a spear makers workshop, sword smith, keep, and town guard. This will give you feudal sergeants, feudal men at arms, peasants, militia sergeants as well as their inferior counterparts like plain spearmen. Some people split infantry between two provinces either as one for sword/heavy infantry and one for spear/pikes etc or as two identical provinces capable of producing all melee infantry. This is a good idea if you use infantry heavy armies as it allows you to raise troops twice as fast.

    Province 4 = agents. Build a castle, brothel, tavern, royal palace, church, chapter house and monastery. This gives you all the agents except grand inquisitors and cardinals who aren't available till 1205 (Grand Inquisitors definitely aren't available till 1205, I'm not so sure about cardinals) If you plan on using a lot of a certain type of agent then you may wish to build another province capable of producing that type so you can pump them put quickly.

    Other provinces = economic upgrades (See chapter 2.5)

    At this point you could leave each province before building up further or you could keep going towards higher castle levels to get the master valour bonus and to have the chivalric troops available as soon as it's 1205. If money is tight you should stop military upgrading at this point until you get more cash. If you have plenty of florins keep going. You may also want to add an armourer to each province to give armour bonuses. If you have iron in your province the same applies to metal smiths (attack bonus). Churches/mosques and religious buildings add to morale so you can build those too.

    Unless you want to be mobbed by spies/ assassins etc build border forts in all your provinces. In troublesome provinces like Scotland, Portugal etc build a keep along with a church and maybe a tavern as these increase happiness and reduce the chance of a revolt.

    Economic build up is more complicated but basically the more farming income you get from a province the faster you get your investment back. Upgrade your richer provinces first. Always build mines no matter what type as they are guaranteed income and pay for themselves quickly. Mines are the first priority for quick reliable cash. Trade can be very rewarding but its subject to wars and blockades, which can make it unreliable. It is also slower to set up and quite expensive. There is a lot more about finances in chapter 2.5.

    That should get you through the first few turns, after that you should be able to cope. Bear in mind that this is a highly subjective area and some people will disagree with my build order. Also it doesn't do as much for the Orthodox or Muslim factions (they need different buildings to access all their units, however this build order will get you most of them). It's really just a matter of practise, after you spend a while staring at the tech tree and unit info you start to remember it so don't give up.

    The unit build information on the back of the MTW tech tree is quite clear once you know the building upgrade process. It basically works on the principle of new building = new troop which is an upgrade of the previous one. Chivalric units are only available after 1205, gothic after 1321. The ranged units go archers in feudal, crossbows at 1205 and arbalesters at 1321. For the Muslims and Orthodox there are few units limited to different eras so most of their units are available as soon as the building is complete.

    2.3 Armies and units
    There are three different types of armies in the campaign, attacking armies, defending armies and garrison armies. You will need to make and use all three if you want to be successful.

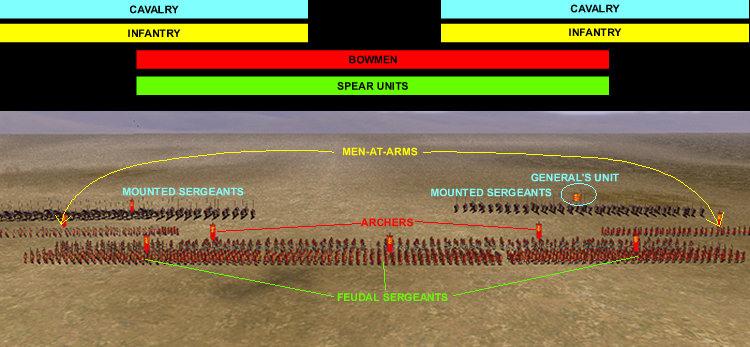
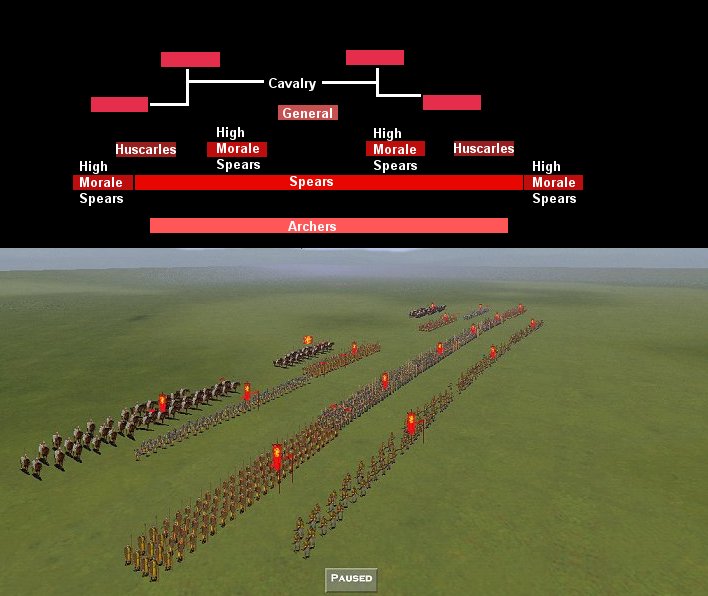
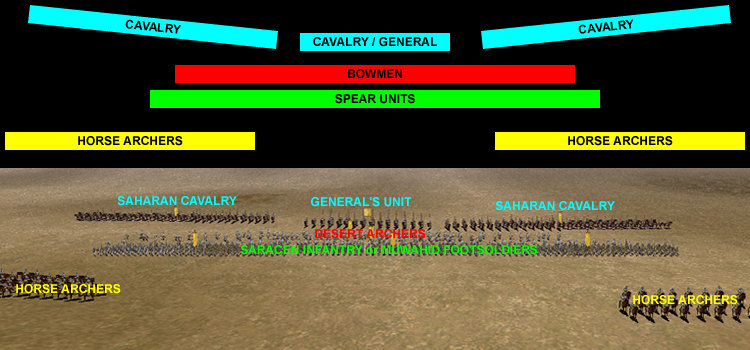
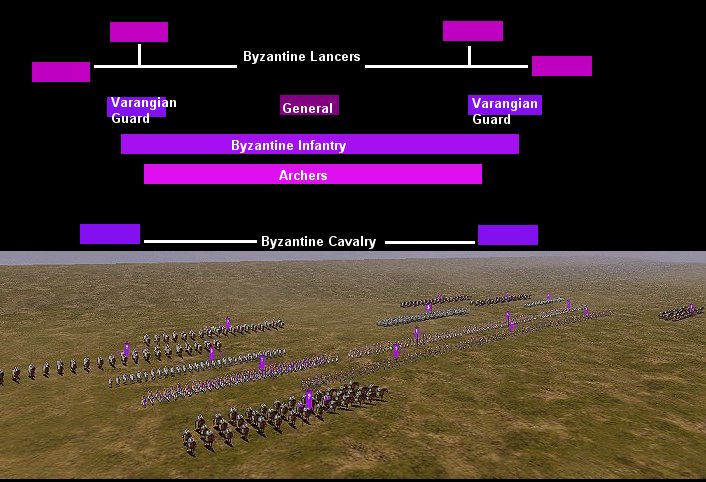
    1.Attacking armies. These armies are custom built to attack other factions. They generally consist of some strong infantry like men at arms, some strong cavalry like knights, some fast cavalry like Alan mercenary cavalry, a few spear troops and a few ranged troops. A suggested attacking army for a Catholic faction would be 4 men at arms (use the most recent available to you), 4 spears (use sergeants of the most recent type), 3 ranged troops (archers, crossbows or arbalesters depending on the era), 2 heavy cavalry (knights of the most recent type), 1 light cavalry (the faster the better, these guys will be used to run down routing enemy troops) and 2 anti armour troops (militia units until 1205, after then use a unit with pole arms like halberdiers). All of these units should have the best armour and weapon upgrades you can supply from armourers and metal smiths. However if you are going to fight in the desert don't use troops with armour above 5 as the heat will tire them out very quickly. When going on a desert offensive forget the armour upgrades For non-Catholic factions try to get a balance of missile units, tough cavalry (Kataphraktoi, Ghulams etc), missile cavalry (cavalry archers, Byzantine cavalry etc), fast cavalry (Saharan cavalry etc) and infantry (Saracen infantry, Byzantine infantry etc). If you know you will be fighting horses as a Muslim build camels. As a non-Catholic you will be relying on your speed and manoeuvrability more than on brute strength, so use you cavalry to the max Attacking armies should try to use the 16 slots available in each army stack so they can scare the enemy with numbers. All attacking armies should be lead by a good general with as many stars as you can get.

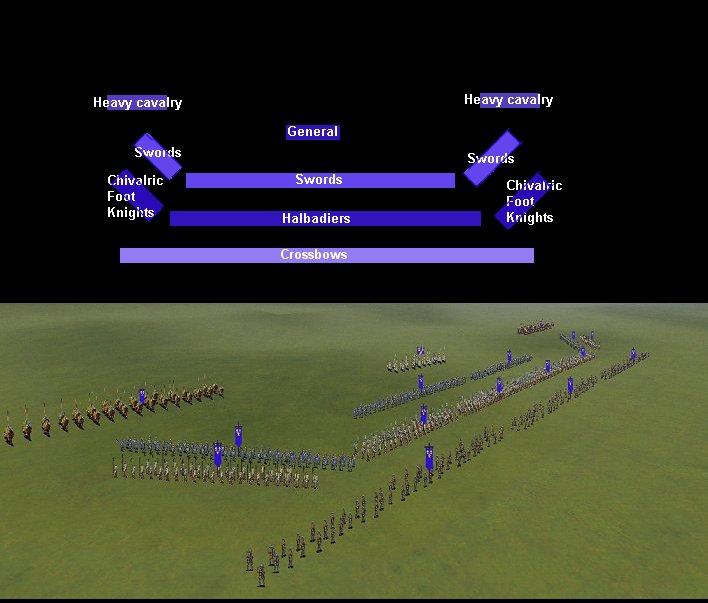
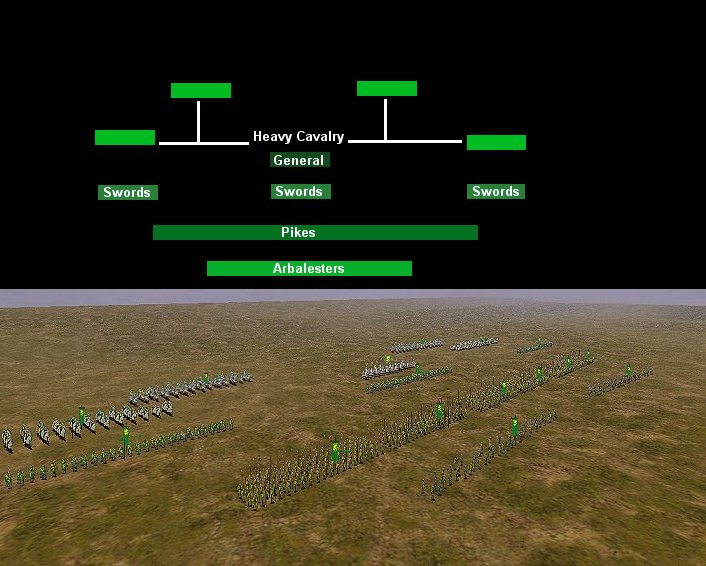
    2.Defending armies. A defending army is created only to protect your border provinces. Because of this they tend to have a lot of missile troops and spear types. A suggested Catholic defence army would be 4 spears (again use your latest), 6 ranged (mix between archers and crossbows/arbalesters. The archers can fire over the heads of the crossbow types), 2 cavalry (use cavalry that can fight, but not necessarily knights. Mounted sergeants are good here), 2 men at arms (use the latest) and 2 others (these two are optional, you don't need to fill the army. Put any unit you like and feel you need in). Non-Catholic factions can produce a similar army using a lot of spears and foot archers, however they can also use a lot of cavalry and cavalry archers to provide a more mobile defence. Give these armies all the upgrades you can.

    3.Garrison armies. These are the simplest and cheapest armies. Basically you need one in each province that is not in danger of attack across a land border, they increase loyalty and prevent revolt. One unit of peasants will do the job; just make sure there are 100 or more men in the unit. Some provinces like Portugal and Scotland are particularly rebellious and may need more than one unit of peasants. NEVER leave a province without at least one unit of 100 men unless you are trying to get it to revolt These armies don't need upgrades of any kind, as they are never intended to actually fight.

    Cheetah has kindly lent me his own style of army, which suits a more cavalry/melee heavy army (very different to my play style so I didn't think of it). He uses one style of army for all his military needs, both attacking and defending. This one is well suited to factions like the Byzantines that rely more on cavalry. Cheetahs all-in-one army is made up of 3-4 ranged units, 6-7 melee units (men at arms, militias etc), 2 ranged cavalry and the rest heavier cavalry. He doesn't use spears unless he expects to meet large quantities of cavalry or camels. He uses the occasional unit of javelins in the ranged group; otherwise they are foot archers or men with crossbow/arbalesters. Try it - you might like it (But if you don't like it don't complain to me ;) )

    It is important to note several things about unit availability.
    1. Some units become available when the game clock hits a certain date. These are:
    -All units with chivalric in the name become available at 1205
    -All units with Gothic in the name become available at 1321
    -Crossbows, arbalesters, longbows, billmen, Mamluk cavalry, trebuchets, mortars, halberdiers, boyars, steppe horsemen, Janissary archers and Janissary infantry become available at 1205
    -Gunpowder units, pikes, Lithuanian cavalry, Demi cannon, serpentine, siege cannon, Demi culverin, culverin, gendarmes, lancers, Janissary heavy infantry, Ottoman Sipahi and Sipahi of the Porte become available at 1321.
    -Check the VI manual for the limitations on the new units.
    2. You can NEVER build foot knights. Instead you must tell the horse knight to dismount in battle by right clicking on the unit and selecting dismount in the deployment phase BEFORE the battle begins. Some units, like feudal knights, can only dismount in a siege; others can dismount whenever you want.
    3. Some units will disappear after a certain date. You can no longer build Varangian Guardsmen or Ghulam bodyguards (as the Turks) after 1321. Check the VI manual for the limitations on the new units.

    Should I save my cash by building lesser units?
    In the campaign you should always use the best units available to you unless you really can't afford to. The more expensive units are often several miles better than their cheaper counterparts. However this is not to say that you should use chivalric sergeants for garrison duty instead of peasants, which would be a waste of money, as the garrisons are never intended to fight. Half the fun of the campaign is in using massive armies of elite troops that cost thousands of florins to squash your enemy.

    Should I build now or wait for better troops?
    If you are very close (within a couple of turns) to getting a new, superior unit and you are not urgently in need of troops then yes you can wait. If you need troops to guard provinces etc then you shouldn't wait because you will be endangering your security. You should never start a game in the early era and wait for the high era to start before building an army just because chivalric troops are better than feudal ones. Build what you need when you need it. It is very easy to replace lesser troops with their new counterparts, all you have to do is build one unit of the new type, send it to join it's army and then disband the older unit the turn its replacement arrives.

    What does unit X do? What is the difference between unit A and unit B?
    Check the Complete Total War Unit Guide for information and tactics for each and every unit in Shogun, Medieval and Vikings.

    Retraining versus making new units
    Should you retrain damaged units for build a new unit to merge with them? This depends on your situation. If you are in the middle of a war and need to keep your armies at the front you should build a new unit of each type that needs more men and send them forward to meet up with your army. You can then use these newly trained men to top up damaged units. If you are in a peacetime situation you can recall one army at a time to your production bases to retrain them back up to full strength. Retraining also gives a unit any extra bonuses like improved armour or morale that are above the bonuses they already possess.
    This next point is important: A UNIT NEVER LOOSES VALOUR When you merge or retrain a unit the valour rating may appear to go down. This is because the valour of a unit is an average of all the men in the unit. Thus green troops can lower the overall, however as valour is tracked on an individual basis nothing is actually lost it only looks like it. If you have one particularly high valour individual in a unit and he dies the overall valour of the unit may seem to go down. This is because the man gave a large boost to the average. Again nothing is lost (apart from the dead man) it only looks like it. Check the battle log files (MTW directory, then log file folder. Only recorded if you set log files to 'on' in the options menu) if you don't believe me - valour is tracked on a per man basis and is visible in the log files.

    What do my cavalry units dismount into?
    Alan Mercenary Cavalry -> Archers
    Steppe Cavalry -> Spearmen
    Turcopole -> Archers
    Berber Camel -> Desert Archers (yes)
    Mamluk Horse Archers -> Desert Archers
    Turcoman Horse -> Turcoman Foot
    Horse Archers -> Archers
    Golden Horde Horse Archers -> Golden Horde Warriors (yes)
    Byzantine Cavalry -> Trebizond Archers
    Golden Horde Heavy Cavalry -> Golden Horde Warriors (yes)
    Gothic Knights -> Gothic Foot Knights (yes)
    Saharan Cavalry -> Murabitin Infantry
    Mamluk Cavalry -> Saracen Infantry
    Armenian Heavy Cavalry -> Feudal Sergeants
    Bedouin Camel Warriors -> Muslim (yes)
    Hobilars -> Feudal Sergeants
    Ghulam Cavalry -> Saracen Infantry
    Khwarazmian Cavalry Saracen Infantry
    Pronoiai Allagion -> Byzantine Infantry
    Kataphraktoi -> Byzantine Infantry
    Ottoman Sipahi -> Turcoman Foot
    Feudal Knights -> Feudal Foot Knights
    Teutonic Sergeants -> Order Foot Soldiers
    Knights Hospitaller -> Hospitaller Foot Knights (yes)
    Knights Santiago -> Chivalric Foot Knights (yes)
    Knights Templar -> Chivalric Foot Knights (yes)
    Teutonic Knights -> Chivalric Foot Knights (yes)
    Lancers -> Chivalric Foot Knights
    Chivalric Knights -> Chivalric Foot Knights (yes)
    Gendarmes -> Chivalric Man-at-Arms (yes)
    Early Royal Knights ->Feudal Foot Knights
    High Royal Knights -> Chivalric Foot Knights (yes)
    Late Royal Knights -> Chivalric Foot Knights (yes)
    Early Royal Ghulam Knights -> Saracen Infantry
    High Royal Ghulam Knights -> Saracen Infantry
    Late Royal Ghulam Knights -> Saracen Infantry
    Spanish Jinetes -> Feudal Sergeants
    Sipahi of the Porte -> Janissary Infantry
    Boyar -> Feudal Man-at-Arms
    Lithuanian Cavalry -> Archers (yes)
    Polish Retainer -> Feudal Sergeants
    Mounted Crossbows -> Crossbows
    Mounted Sergeants -> Feudal Sergeants
    Avar Nobles -> Armoured Spearmen
    Byzantine Lancers -> Armoured Spearmen
    Druzhina Cavalry -> Feudal Foot Knights (yes)
    Faris -> Dismounted Faris
    Khazar Royal Cavalry -> Armoured Spearmen
    Medium Cavalry -> Round Shield Spearmen
    Pictish Cavalry -> Celtic Warriors
    Dark Age Royal Knights -> Early Royal Foot Knights
    Dark Age Knights -> Early Foot Knights
    Steppe Heavy Cavalry -> Armoured Spearmen
    Szekely -> Slav Warriors
    Viking Raider Cavalry -> Viking Carls (yes)

    The units that can dismount in any battle have been marked with a (yes). If there is no (yes), then the units may only dismount in castle assaults. NB: This list is courtesy of RabTheRab.

    What is valour?
    Valour is a measure of how experienced a unit is. Each point of valour is earned in battle by killing non-routing enemies. It adds +1 attack +1 defence +2 morale, you can probably see from this why veterans with high valour are to be feared. Valour can also be gained from the general, for every second star he receives the men in his army get a point of special valour which adds +1 attack +1 defence.

    A unit is always constructed at 0 valour, however there are two exceptions to this.
    1.The province the unit comes from has a special bonus for that kind of unit (for example Wales gives all longbowmen +1 valour if they are built there). In this case the unit will start with 1 valour.
    2.The unit is constructed in a master level building. A master level building gives any unit that comes from it a +1 valour bonus, so they start with 1 valour. This bonus is cumulative with any province bonuses enabling you to build a unit with 2 starting valour. Generally the master bonuses are easy to figure out, if it uses a bow it gets it bonus from the bowyers, swords from sword smiths and so on. There are several units that require many different types of building (e.g. Byzantine cavalry which need horse breeder, bowyers workshop and sword smiths workshop) where it is not obvious which master building gives the bonus. All you can do in cases like this is build both masters.

    A side note for custom battles and multiplayer: Always make sure to buy valour for your troops, especially the generals unit. It makes the fight more interesting; it is considered bad form to show up in a multiplayer game with a large army of valour 0.

    What is disciplined and elite?
    Disciplined and elite are two special statuses that a unit can have.
    1.Disciplined means the unit is less likely to chase off after enemy units when it is in the impetuous morale state. It also means that the unit doesn't care about routing units on its own side unless they are of disciplined or elite status. The death of your general also has a reduced effect on disciplined units morale. This means that routing peasants and the like can no longer panic your army. If a unit does not possess disciplined status by default the only way to add it is to build the military academy in one of your production provinces. This will not add the disciplined tag to your unit but it will increase their discipline slightly. Units like knights still tend to be impetuous even with the discipline upgrade.

    2.Elite is a status that only the best troops have. It is similar to disciplined in that it means the unit ignores some routers, in this case anyone who isn't elite themselves. Elite does not make a unit easier to control and it can never bee added to a unit that doesn't already possess it.

    Both of these statuses are highly desirable. You should try to use more units that have one of these statuses than units that have no special status to make your army harder to rout in one go.

    Why does morale matter when choosing troops?
    Morale is vital to your army. When it gets too low units will begin to flee the field and you will loose unless you can rally them. The higher a units natural morale the harder it is to make them rout. When offered a choice between a unit with high morale and one with low morale you should try to choose the one with higher morale unless it is inferior in other ways (for example chivalric sergeants are better than feudal sergeants despite having lower morale). There is a section about morale on the battlefield in chapter 3.2 so take a look.

    You can improve a unit's morale when you build it if there is a religious building in the province. When you right click on the building it will note if it gives a bonus (if you have the Viking Invasion anyway, if not you are looking for churches, cathedrals, mosques and grand mosques). This is definitely recommended; make sure you have the first religious building in the chain in every unit-producing province.

    2.4 Mercenaries
    You should always aim to use fewer mercenaries; in fact you should avoid mercenaries unless you have no choice. Not only are they expensive but also you can't retrain them so they get outdated equipment (bad) and loose vast quantities of men just when they get to a high valour (worse). Mercenaries are good for emergencies where you need troops now, maybe even yesterday. Otherwise just use your own men, they're cheaper and can be retrained so they survive to get really good valour after a few battles.

    You can use mercenaries for suicide attacks by raising an army of them and sending them to attack immediately. Kill as many of your enemy's troops as possible in one turn with this army. If you conquer a province destroy all the buildings in it, don't try to keep it. Then disband the mercenary army. You will have paid very little and done a lot of damage. You can also put mercenaries into crusades, while they are fighting for the glory of God you don't need to pay them. Just remember to sack them the moment the crusade finishes, or you will have to pay them again.

    Finances and provinces
    Fortunately economics in Total War are quite simple. Your main income comes from three main sources:
    1. Farming Each province produces income based on farming. Some provinces are particularly rich others are very poor. To increase farming income you should build the various farming +xx% upgrades. At the start of a game building farming improvements everywhere is not a good idea. Instead you should build them in provinces that have good farming (say 200 florins) income already. This will get you your money back quicker. When you have a larger income you can then build the +20% improvements in poorer provinces. If a province has around 250 florins natural income (without any upgrades and at normal tax rates) then it is worth upgrading it to +40%. 300 florins natural income is worth upgrading to +60% and 400 florins is worth +80%. These are only guidelines; if you have tonnes of cash you can upgrade poorer provinces more. The tax levels adjust farming income. Generally speaking you should keep to normal taxes wherever possible. This is because higher taxes give your governors vices, which loose you money.

    2. Mining If a province has gold, silver, copper or salt you can build the appropriate type of mine. Each resource gives a different income with gold being the richest and salt the poorest. Each mine can be upgraded to a mine complex to increase the income. Mines give fixed income, the amount is says in the information screen (called up by right clicking on the building) is all it ever gives. Mines are not affected by taxation or acumen.

    3. Trade This is potently the biggest source of cash in the game. It is also the slowest and most expensive to set up. It is highly unreliable; you can only trade when you are at peace with a faction. Enemy ships can blockade your trade routes severing your income. To trade a province must have at least one trade item. You must then build a port and a trading post in that province. As long as there is a trading post you will get a small trickle of income based on land trade, however to get the real money you must trade over seas. To do this you must create an unbroken line of your ships going from the province with the trade good to an AI province with a port. You cannot trade with yourself or enemies. To really make trade worthwhile you must link to nearly every province on the map and stay at peace. I would not recommend becoming too reliant on trade, as the AI has been known to start a stupid war and bankrupt traders.

    You also get the occasional cash gift of 1,000 florins from the Pope if you are Catholic. It is not known how you earn these gifts so don't rely on them.

    To maximise your income give each province a governor with a minimum of three acumen. This will increase the provinces income significantly.

    At the start of the game you should build any mines you can, followed by upgrading your richest farming provinces. Try to get a little bit of trade as soon as possible but don't rely on it, keep building up your farming.

    The payback factor
    How long does it take for an economic upgrade to pay for itself and start bringing in profit? Check this chart to find out. NB: This chart is not my work, I wrote it down from a post on economics over a year ago and I don't remember who wrote it originally.
    Rich provinces are assumed to have 400 florins per turn or more in just farming income.
    Average provinces have between 200-400 florins per turn in farming income.
    Poor provinces have less than 200 florins per turn in farming income.

    Break-even points.
    Income 20% 40% 60% 80% farming upgrade
    600 5 8 13 21 turns to break even
    500 6 10 15 25
    400 8 13 19 31
    300 10 17 25 42
    200 15 25 38 63
    100 30 50 75 125
    Mines = 10 years for all types.
    Mine complexes = 15 - 18 years depending on type.

    What to build for the shortest payback.
    1.Upgrade rich provinces to 20%
    2.Build mines.
    3.Upgrade rich provinces to 40%
    4.Upgrade average provinces to 20%
    5.Upgrade rich provinces to 60%
    6.Build mine complexes.
    7.Upgrade average provinces to 40%
    8.Upgrade poor provinces to 20%
    9.Upgrade rich provinces to 80%
    Special province bonuses
    Some provinces have iron in them. Iron allows you to build the metal smith line, which upgrades the attack of your units. Provinces with iron are precious; there are only nine on the whole medieval map. If you are fortunate enough to own an iron province use it to build troops with upgraded attack.

    There are provinces that possess a special bonus for a certain type of troop when it is built there. For example Wales gives +1 valour to all longbowmen built there. These provinces are highly desirable if they give a bonus to a unit you can construct. If you own a province that gives a bonus to a unit you like to use, build it up and take advantage of it

    Rebellions and loyalty
    When a provinces loyalty dips below 100 it has a chance to rebel. This is not a Good Thing unless you are trying to train your generals up on self-created rebellions. To keep loyalty high you should always keep a garrison of at least 100 men in each province. Buildings like churches increase happiness, which in turn increases loyalty so try to build a church (or Mosque) in each province. A governor's dread rating also affects loyalty. High dread raised loyalty because the peasants are too afraid to rebel, so you may want to consider assigning high dread governors to particularly troublesome provinces. Normally acumen is more important than dread though.

    Taxes have the largest impact on loyalty; you should adjust your taxes on a province-by-province basis and check each turn to see if they need adjusting. If you have the Viking Invasion you can safely leave auto tax on to manage your taxes. If you don't have VI don't trust auto tax In Viking Invasion the minimum loyalty threshold auto tax tries to maintain is 120, in plain medieval it is only 100. This means that your provinces are likely to rebel after a tiny hiccough in your empire, for example a king dieing and being replaced by an heir without a virtue giving a happiness bonus. Always tax to maintain 120 loyalty at the minimum as it gives you a larger margin for error for those occasions where things start to go wrong.

    What about faction re-emergences?
    Faction re-emergences are easy to manage when you know how. First the basics:
    1)A faction will only re-emerge if it has been completely killed i.e. it has no provinces left and it doesn't have an army left under siege in a castle. You will receive a message each time a faction is eliminated.
    2)A faction can re-emerge in any province it has owned, even if the province was held for just one turn. This means that the Egyptians can reappear in Scotland as long as they held Scotland for one or more turns.
    3)A re-emergence is another form of rebellion and it can be managed in the same way. Keep your provinces loyal and you will probably never see a re-emergence.

    So what does a re-emergence consist of? Generally one or more provinces will be overrun by an army belonging to the faction that just reappeared. The army can be of varying size and quality, if you are lucky you will meet a handful of peasants however you could meet a horde of angry knights so make sure you know what you are up against. You can find out what units a re-emergence has by checking the army token that appears in the turn you get the message telling you that faction X has returned. The actual fighting will begin the turn after this message so take the chance to send in a good army or two so you can fight a defensive battle against the upstarts. When all the factions new armies are dead and any provinces it took are re-conquered the faction returns to the land of the dead, hopefully never to return.

    The only way to guarantee no re-emergences is to not kill the faction. Instead you should conquer all their provinces except one. Place good armies in each province that borders on this last stronghold and just ignore the faction. They will not be strong enough to attack you as long as you keep a reasonable border force, so you can keep them like a pet until the end of the game when you can send in the heavies and crush them along with any other nearly dead factions.

    2.6 Securing your borders
    All you really need to secure your borders is one defensive army (see chapter 2.3) and a border fort to catch most enemy agents. You should have a border fort in all provinces but they are especially important in the border provinces as most enemy agents enter your empire through them. The forts also allow you to keep an eye on the neighbouring provinces. You should probably build a castle in your border provinces in case your army is defeated. The army would withdraw to the castle giving you a second chance to defeat the attacker.

    Where you have your borders is very important. You should always try to keep as small a border as you can. Take advantage of the natural bottlenecks on the map to keep borders down to one or two provinces. The main body of Europe (France, Germany, the Steppes etc) are the only part of the map where this is not possible. In this part of the map you should aim to move forward in a manner that keeps the number of border provinces to the absolute minimum i.e. if you hold Ile de France, Flanders, Anjou and Toulouse don't conquer Champagne because you will add one more province to your border. Instead you should try to conquer Burgundy, as this will keep your border to four provinces. You will be able to advance your defending army from Anjou to Burgundy so you won't need to build any new defending armies.

    2.7 Diplomacy
    Diplomacy in Total War is very simple. There are three states of relations allied, neutral and at war. You can use emissaries, Catholic bishops and princesses to propose various diplomatic things like peace, alliances and marriages. Only the emissary can offer all diplomatic proposals. The AI often won't accept your offers of cease fires, marriages or alliances. I don't know why, they turn down offers made by a faction lead by a king with high influence (the higher a kings influence, the more likely factions are to accept your proposals) for no obvious reason. Try to accept any offers of alliance, they are useful when you start a war. Generally the winner of the first battle in a war will keep their allies. The loser will find their allies deserting them. If the AI offers you a princess in marriage you should accept without delay. Foreign princesses allow your heirs to marry sooner and start an alliance, killing two birds with one stone.

    Er, basically that's all you need to know about diplomacy - accept any offers of treaties and princesses, try not be the looser in the first battle of a war and don't waste too much time or effort offering the AI treaties and princesses as they rarely accept.

    2.8 The Pope
    If you want to play a Muslim or Orthodox faction then you needn't worry about the Pope. If you are Catholic however the Pope will be a major thorn in your side. I once heard the Pope compared to taking your mother on a date with you, this is truer than you might think. The Pope will step in and try to squash any fun wars you've got going against Catholics. He will send you threatening messages with an irritating sound effect. He will backstab and conquer his way to the top. Your job, should you choose to accept it, it to learn how to avoid and manipulate the Pope.

    Excommunication
    This is the main problem with the Pope. If you attack a Catholic faction he will (often) send you a cease and desist letter giving you two years to stop hostilities and a demand for ten years of peace between you and the Catholics you just attacked. If you don't do as he says you will get excommunicated. What does this mean for you? Firstly the crucifix on your king and generals info sheet will turn into a broken cross. Your king will loose some influence and the loyalty of both your generals and your provinces will drop. You are also a fair target for a crusade. Being excommunicated is not good, but it is survivable.

    Getting recomunicated
    There are only two ways to do this.
    1. Let your king die (or kill him). When your king dies your faction is recomunicated. Drastic but helpful.
    2. Wait for the Pope to die. Popes often take a while to die of disease so why not give them a helping hand? Send swarms of assassins over to kill the Pope until you succeed. You could also try burning him with a Grand Inquisitor, but this is harder, after all he is the Pope

    Avoiding getting excommunicated in the first place
    This is actually quite simple. Just attack and crush your target Catholics in two turns and the Pope won't care. Attack as many of their provinces as you can in one turn and then tidy up any sieges in the second one. Don't launch any more attacks for ten years and bingo The Pope doesn't whine. If the specified faction attacks you shouldn't get excommunicated unless you launch a counter attack into one of their provinces.

    Alternatively you could try attacking another faction before your true target, the Pope can only track one warning at a time. For example, you want to attack the Spanish. Launch a small attack on the Holy Roman Empire (Germans) and receive your warning. Now withdraw and don't attack the Germans again for ten years. Because the Pope has warned you not to attack the Germans you can clobber the Spanish in peace.

    The rules of excommunication, according to CA developer eat cold steel:
    The rules for excommunication is quite simple. If a faction with twice the number of regions attacks, he gets a warning. Any aggressive action before the warning runs out leads to excommunication. Sally out of a besieged castle is not aggressive (since the patch) but retaking lost a region does count as aggressive. Attacking the papist is automatic excommunication. Blocking a crusade in conquest mode is automatic excommunication, in glorious goals mode it depends on if the crusade's object is a goal or not.

    Being friendly with the pope has no effect on the rules. But he will send you cash if he has any spare.

    Wouldn't it be easier to just get rid of the Pope?
    Well on the face of it, yes it would be easier to conquer all the Popes' provinces. Unfortunately there are several problems:
    1. You cannot crusade without the Pope. If you don't like to crusade this is not a problem. However crusading adds flavour to the game and most Catholic factions have crusading goals in their Glorious Achievements game.
    2. You can't keep a bad Pope down. The Pope will keep re-emerge in his old provinces every few years. He will bring with him massive armies of high tech units. He will reappear every ten or so years, each time with a bigger army. In the unlikely event you survive the first reappearance the second will probably get you, if you survive the second, then the third will really do you in. It is not economic to keep two or more defensive armies in each of his old provinces, especially when you have to keep replacing heavy losses.

    So I can't conquer the Pope entirely then?
    Well, there is a slight loophole that makes keeping the Pope down easier. When you conquer all his provinces raze the buildings, put the taxes to high and pull all your armies out. The provinces should revolt. When the Pope reappears he will have to fight the rebel army first, leaving him weaker for your counter attack. However doing this robs you of the position of defender making the battle harder. You also have to keep micromanaging the provinces.

    There is another loophole you may wish to take advantage of, as jaren recommends:
    I was reading through the beginner's guide and noticed that you said that you can't keep the pope down. I've never had problems with that actually, toss an army into a couple of neighbouring provinces (leave the 100 man army in the pope's 2 provinces). When the pope returns, his power is based on the # of guys in the province at the time, since there is 100 men, it's based off 100, which will usually yield around 1500 men at the most, march your units in to defend and then afterwards just pull them back out again. jaren also adds that once the Pope vanished entirely and stopped re-remerging, but this was possibly a glitch since many players find the Pope is touchingly devoted to you, and always comes back to you no matter how many times you send him away...although he never brings you flowers and chocolates

    Inigo Monttoya has this to add:
    There is one more way to avoid excommunication when you go to war against a Catholic faction. I use it quite frequently to spank the French. This method gives you three years to wage war, but you HAVE to accomplish the final goal or you're screwed (spiritually speaking).

    Plan your war to make sure that you send armies against the King and all Princes.

    Attack in Year 1 (Get warned) - no prisoners (don't ransom back any members of the royal line)

    Year 2 - storm castles, if necessary. You can wait them out, IF they will only last one more year. Prepare as much of your army as possible to go up against any remaining members of the royal line.

    Year 3 - Take out the royal line - no mercy. If you end the royal line, the kingdom degenerates to rebel status... AND THE POPE DOESN'T CARE

    The cool thing now is that you are going up against rebel armies - or you can bribe them, and they're much cheaper than if they were a national military.

    Plus, combining this with the 10-year/1-warning effect, you can wage two big wars at the same time (I usually wipe out France and Aragon, or hit the Spanish)

    You can use the Pope to help you
    This is sneaky but it works quite well. The excommunication rules apply to the other factions inexactly the same way as they do to you. Take advantage of it If you want to attack a Catholic country try to lure them into attacking first, they will get the warning and excommunication o_loompah gives this example:
    Regarding the Pope, if the Italians/ Sicilians get too big for their boots - usually in the early game, you could also try to leave just enough units to prevent rebellion (say with a dreadful governor) but still weak enough to tempt the Italians/ Sicilians to invade. Pope reappears and excoms them leaving you able to crusade against the weakened Italians without penalty.

    So there you go, just leave a weak border force and wait for the Pope to wade in, after that it's open season. To top it of you may even get some cash from the Pope for being such a good Christian

    Getting on the Pope train...
    Swordsmaster has the following tip to simultaneously keep the Pope out of things and train your armies:
    Instead of feeding revolts to train my generals, I usually use a 3star general and make him fight the pope. That allows me to avoid excommunication (assuming I win), to raid Rome (which is quite worth it), train my general against someone more respectable, and retreat in a few turns, and also gain some influence...but the latter is just a side effect...

    2.9 Agents
    Most of what you need to know about agents is in the manual, so go read it. This section is just a collection of hints for specific agents.

    Provinces
    Try to keep one spy, one bishop/alim and one assassin in each and every province you own. This will keep loyalty and your religion high reducing the chance of revolt. This will also aid your border forts to catch enemy agents before they do some damage. If you have conquered a province of a different religion to yours you should place several holy men in the province to raise your religious percentage. Never leave inquisitors in your own provinces; they will begin burning the population reducing zeal and happiness.

    Assassins
    Send assassins after targets in packs. They often mess up and fail, especially when you are targeting a high-ranking general/king/Pope. If nine try with eight die and the last one succeeding you have a success. If one goes and fails you have nothing.

    Spies
    Don't forget spies can try your own generals for treason. This is a handy alternative to assassinating generals with low loyalty or bad vices. Spies can also open castle gates; the chances of success are very low however.

    Inquisitors and Grand Inquisitors
    Grand Inquisitors are only available after 1205. Both types of inquisitor act like assassins and they have one major advantage - if they fail they don't die. Use these guys instead of assassins if you can. Catholic only.

    2.10 War
    In the end this is that the game is all about - killing people

    When should I attack?
    At the start of the game some factions benefit from an early strike against their neighbours. The English should try to kill the French as quickly as possible to secure their lands and gain a better income. The Egyptians need to kill the Turks to reduce their borders. There are other examples but these two will do well enough. Apart from early strikes to safeguard your faction you should wait until all your borders are well protected and you have built up a set of provinces to produce high quality troops (for example the feudal series in early). When you reach this point you can build some attacking armies, usually you don't need more than three. Put each one in the command of a good general. Now you are ready to think about attacking. Before you launch an attack however you must answer these questions:
    1. What are my objectives? What are you trying to do? Which provinces do you want to capture? Which faction are you attacking? Do you want to destroy or weaken your target? Do you want to shorten your border?
    2. What is my long term aim? Are you raiding? Are you conquering? Are you conquering you way towards a certain province or faction?
    3. Why am I attacking? Do you want money? Iron? A province specific unit or valour bonus? Are you just trying to kill off a faction? Are you attacking simply because you are bored?
    4.Can I keep this province? Can you guard this province permanently or is this just a raid? Will taking this province weaken your overall defences?
    5. What can I do with this province? Are you going to build it up to produce troops? Are you going to make money from it?
    6. Will my attack succeed? Do you have enough troops for this battle? Do I have enough troops to replace losses? Will you be able to handle a counter attack? Do you have the correct troops for the battleground (e.g. lightly armoured troops for the deserts)?

    When you can answer all of these questions positively you are ready to attack.

    Where should I attack?
    You should aim for provinces that give you something, don't attack somewhere just because it is there. Here are some examples of good targets:
    1. Provinces that will narrow your border down allowing you to reduce defensive armies.
    2. Provinces that are exceptionally rich.
    3. Provinces with a good resource like iron, gold etc
    4. Provinces that pose a threat to you, for example a province capable of producing high quality troops or one that intrudes into your empire.

    Amphibious assault
    Everything you need to know about amphibious assault is in the manual, page 34 in the UK edition. Go and read it.

    Castle assaults
    Assaulting a castle is something you will need to do at some point. You can either starve the enemy into submission by keeping an army in the province until you receive a message telling you the castle has fallen (right click on the castle to find out how many years you will be waiting), or attack right away with your army in an attempt to resolve the siege much faster. Both approaches have different advantages and needs.

    Sitting and waiting: aka besieging.
    This doesn't really require a very good army; you can leave several units of peasants sat outside the castle waiting for the enemy to starve. This is because unless the enemy attempt to sally out of the castle or enemy reinforcements arrive to try and break the siege no fighting is conducted. Instead all losses from both sides come from starvation, disease, other harmless things peasants scan take just as well as knights - better as peasants are far cheaper This approach is often slow, taking years to free up the castle but it can be much cheaper in terms of lives. It is not always possible to starve the enemy out; very small forces (say 5 men) inside a castle cannot be starved. In this case you have only one choice: assault.

    Assault
    Assaulting a castle is quite simple, all you need to do is drag and drop your chosen army onto the castle and end the turn. You will then be offered the choice to command the assault personally or auto-resolve it, if you take command you will proceed to the siege battle map and fight it out the same as any other battle...well with the exception of the large castle Before assaulting any castle you should make sure you have some siege engines in your army, wooden castles can have the walls knocked down by men whereas stone walls must be demolished by siege engines. Regardless of the castle type it is always preferable to have some siege engines to breach the walls as this reduces casualties - the defenders are hardly going to sit there while your army knocks on the gates and walls Even the most basic castle has some inbuilt archers who will fire as long as your men are in range. If you are absolutely desperate to attack a stone castle without siege engines note that while the walls are impervious to your men's weapons the gates are not, so target any gatehouses. If you have the VI add-on pack gatehouses will pour boiling oil on anyone attacking the gates, sizzling.

    So I've attacked, now what?
    Now you must tidy up the loose ends. Finish your war inside of two years if it's against another Catholic. If you or your target are not Catholic than you can take as long as you want. However it is not a very good idea to leave a war dragging on for a long time, so try to end it quickly. After the fighting is finished you should build the basics in each new province, give them a governor and build them up according to your plan.

    2.11 Events
    The early period starts in 1088
    The high period starts in 1205
    The late period starts in 1321
    The Mongols invade in 1230
    The game finishes at 1453 (1066 for the Viking campaign)
    The compass is invented in 1170
    Gunpowder is discovered in 1260

    NB: When the compass is discovered you must also wait until 1205 before you can build a shipwrights guild. You also need a cannon foundry before you can build the shipwrights guild, the reason for this is unknown, as it is not listed on the tech tree or in the game.

    1.12 Crusades and Jihads
    A crusade requires the Pope to still be alive, so if you have conquered him you will not be able to crusade. If anything happens to the chapter house that build the crusade (i.e. it gets destroyed) the crusade will cease to exist along with all the troops in it. Every turn the crusade is active it can gain and loose troops. If it is in a province with high zeal it will recruit troops from the local armies. If it is in a province with low zeal men will desert.

    A failed crusade will cost the king who sent it influence because he just made a prat out of himself on the world stage. This can cause a hit to loyalty across the kingdom. Crusades are expensive so you will have lost a pile of cash for no gain if it fails.

    How to have a successful crusade
    1. Build up a large quantity of good troops, no mercenaries, peasants or rubbish like that, just good solid feudal or better troops. Avoid armour upgrades and any unit with more than 5 in armour, as they will be cooked under the desert sun.
    2. Build a chain of ships from a province of yours with a port to the destination. This is important as it allows you to send the crusade to its target in one turn preventing desertion and sucking up of your troops.
    3.Build your crusade marker, preferably in a coastal province with a port connected to the chain of ships.
    4.Target your crusade. Immediately put all those troops you trained in the crusade. For heavens sake, DON'T put your king in it That would cause all kinds of problems that you don't want to encounter, trust me Also don't put your heir to the throne in. Now move it to its target, which it will reach in one turn because of the ships.
    5. Kill the infidel
    It's a long build up because it needs to be. A failed crusade loses you plenty and gains you nothing. Remember crusades can hold at least 32 units so don't be afraid to build two armies worth of troops.

    Jihads are basically the same except they build quicker and don't rely on the existence of the Pope. They can also only be targeted at a province that was previously owned by a Muslim faction, even if it was only for one turn.

    What can I do about other factions crusades?
    You will be asked if you want to allow the crusade safe passage. If you agree the crusade will ramble through your empire sucking up your troops (or cash in the case of an Orthodox or Muslim faction). If you refuse the crusade will attack. Sometimes the crusade will just sit on your borders not daring to attack if you have a good enough defensive army, in this case it will slowly fade away as men desert. Generally as long as you have a good defensive army you can refuse crusades without too many problems. Be aware that fighting a crusade acts as a declaration of war on its home faction. To lower the number of your units joining a crusade if you let it into your empire you should lower zeal in all your provinces. To do this place an inquisitor in your province and leave him to burn your population (he will do this automatically, zeal will increase at first but as soon as you get the message about the inquisition spiralling out of control zeal will drop rapidly).

    If you are the target faction your choice is much more simple, you can kill the crusade or let it kill you

    Crusader knights
    Crusader type knights are only available in crusades - you cannot build them like the other units. Knights Templar, of Santiago, Hospitaller, Teutonic, Order foot Teutonic sergeants are crusade specific units. To get these units build a crusade and set its target province. Units will appear in your crusade and there is a chance some of those units will be amongst them. Each Catholic faction has a set of knights that are common to it, for example the Spanish get knights of Santiago. When the crusade is over and you are victorious you will be able to keep the crusade specific units and use them as any other unit with a single exception - you cannot retrain them. This means they cannot get upgrades or replace dead men, the only way to fix up your damaged unit is to merge it with another crusader unit of the same type.


    Frogbeastegg's Guide to Total War: Shogun II. Please note that the guide is not up-to-date for the latest patch.

    Members thankful for this post (2):


  2. #2

    Exclamation

    3. The battle map
    This is the most spectacular, and in my opinion, the most rewarding part of the game. The degree of realism and importance of tactics is nearly unmatched by any other game out there. The battle mode can stand alone as a whole game, which would be worth paying full price for. Unfortunately for the beginner it is even more complex than the campaign map. The first thing you should do is play the tutorials as they will give you a grasp of the basics. After you have finished all the tutorials you should play custom battles with different factions and units as both the attacker and defender. This section of my guide will give you the basic knowledge you will need to win battles. It won't teach you any really advanced stuff; there are links for that kind of thing at the bottom. I will not go into the stats behind combat, as it is too complicated for this guide. Instead I will just note bonuses and penalties.

    3.1 Basic aims
    You might think that the only aim of the battlefield is to win; if you think this then you are wrong. There are more ways to win than killing your enemy. For example you may be attacked in the campaign game by a superior army, which you cannot hope to beat. A fighting retreat will cause some damage to the enemy without getting you pulverised. As long as you cause a lot of damage without taking many losses this is a victory. The highest form of victory on the battlefield is gained without spilling a drop of blood. If you position your troops correctly and drive the enemy back by out manoeuvring them they will eventually withdraw from the battlefield - you win without fighting. However generally speaking the aim of a battle is to kill enough of the enemy to cause the army to rout off the field leaving you the victor. Whether you are attacking or defending in the battle will alter your aims.

    When defending
    When defending the main aim is to stay on the high ground, keeping the advantage and using it to defeat the enemy without taking many losses.

    When attacking
    The main aim of the attacker is to manoeuvre his army so as to force the defender to abandon their position before the fighting begins. When they have been forced onto lesser ground you should engage them and try to cause as many casualties as possible while being careful not to lose too many yourself.

    3.2 unit types
    Total War uses the old rock -> paper -> scissors style of each unit being strong against one kind and weak against another. You must learn this formula if you want to win.
    *Spears beat cavalry
    *Cavalry beat swords
    *Swords beat spears
    *Archers beat anything that is at a distance, but lose in close fighting.
    *Foot ranged units beat cavalry ranged units as they are more accurate and have a longer range.
    *Camels beat horses.
    There are very rare exceptions to this rule. For example some archers are good in hand-to-hand combat, like the longbowmen or Janissary infantry. Cavalry can beat spears if they charge them from behind and cause the unit to scatter, losing the bonus spears get from ordered ranks. Generally as long as you use common sense you will know when a unit stands a chance of beating its counter. To find out which archers are good in hand to hand fighting look at their stats in the unit tool noted in chapter 1.1, or check their entry in the unit guide. Any archer with 2 or more in attack will do reasonably in hand to hand, although you shouldn't expect wonders as melee is only their secondary job.

    Each unit type has an optimum deployment type:
    -Spear armed infantry = a minimum of three ranks deep, preferably four. All spearmen get a bonus (+1 defence, +1 charge for each supporting rank and +1 attack for every two ranks). Spearmen can only receive support from two ranks; therefore they get the full bonus only when deployed in ranks three rows deep. The forth row supplies reinforcements so the unit can take losses without losing its fighting power too quickly.
    -Pike armed infantry = they get the same bonus as spearmen, but they also get support from four rows as their weapons are longer. Therefore deploy them in ranks six men deep, five at the least.
    -All other melee infantry = deploy them two ranks deep. Only spears and pikes get rank bonuses so you get better use out of your unit by placing them in a long, thin unit where the maximum number of men can engage in combat quickly. The longer length of the line also allows the unit to wrap around its opponents flanks giving it a bonus. There are occasions where a deeper formation can be useful, mostly when your unit is about to receive a cavalry charge. Depth gives more resistance to the charge, making it harder for the cavalry to fragment your unit's formation. However these occasions are generally not something you want to be worrying about as a beginner, the information can be found in the unit guide when you want it, just look under polearms, swords etc.
    -Missile armed infantry = ideally you want these guys in ranks of two so they all get a clear shot. This increases accuracy. If the unit is in loose formation you can put them in ranks of three without receiving accuracy penalties.
    -Gunpowder infantry = Leave these guys in ranks of three. They will use a rotating formation where the front rank fires and then moves to the back to reload while the next rank fires. They will only do this if they are in three or more ranks, if they are in two or less they will fire one big volley and take forever to reload.
    -Melee armed cavalry = If your cavalry is going to be fighting hand to hand then it should be two ranks deep for the same reasons as melee infantry.
    -Missile armed cavalry = Ideally they should be in ranks of two, however this is not always practical as the purpose of missile armed cavalry is to skirmish, which is more effectively done in a compact formation. I use them in ranks of three, as it is a good compromise between accuracy and manoeuvrability.

    As for the engagement options hand-to-hand units like swordsmen should always be on engage at will, as should most melee cavalry. Spearmen need to use hold formation to keep their rank bonus, never take them off this setting. Missile units, both infantry and cavalry, can use the skirmish setting, which will pull them back from their target if it gets too close. Skirmish only works on the target not all enemy units and it can be very unreliable. At beginner level missile cavalry should use this most of the time, as their speed is good enough to get them out of the way. Just remember to keep an eye on them at all times and be ready to take over if they look like they are getting in trouble. Infantry archers are trickier. If you have them in a protected position you should turn skirmish off in favour of hold position. This will stop them leaving the protected position. If the unit is not protected you should probably leave them on skirmish, but remember that foot units are less effective skirmishers than cavalry because they are slower. Again this applies to beginner level tactics, there is quite a lot more to missile engagement modes, but you do not need to worry about that just yet. As ever the information can be found in the unit guide when you feel able to expand your horizons.

    A special note on the gunpowder troops: (hand gunners, arquebusiers and Mamluk hand gunners) don't bother The accuracy on these units is so low they will only kill 4 men out of a formation of 133 in three volleys. They are pathetic. If you want them to have a use you must mod their accuracy to be better, you can find instructions in chapter 5.3. Well I suppose they do have some uses in damaging enemy morale, but that is more advanced than this guide is aiming. I shan't repeat myself by saying tactics for gunpowder units can be found in theunit guide...oh, wait - I just did repeat myself yet again

    Javelin units also need a special mention. If you can use them effectively they are deadly, however they are one of the hardest units to use well. Javelins are short-range missiles that go straight through armour, making them one of the best-ranged units for killing heavy cavalry and generals until arbalesters come along in 1205. The short range means that any unit of javelins left on skirmish will never throw their weapon, as the range is below the safety threshold and they will pull back. So to get any results you need to take them off skirmish and put them on hold formation (engage at will tends to send them into melee fighting before using much ammo) and control them yourself. Attacking head on is not a good idea, you will only get one throw, and if you are against cavalry you won't even get that. Instead you must send the unit around the enemy's flanks once they are engaged with your melee infantry and order them to throw when they are behind a unit that is already fighting. You will lose some of your own men to friendly fire so don't do this if you are using expensive troops to pin the enemy in place. You can also try placing your javelin units behind your spearmen and ordering them to fire over the spearmen's heads. I find I lose more of my own men doing this than I do by flanking, but you should give both a go and see which you prefer. The key to using javelins is practise, so load a few custom battles.

    A helpful note on cavalry: To increase your cavalry's effectiveness when chasing routers don't order them to attack, order them to move Double click past the routers so your cavalry will gallop through them on their way to the destination. This will cause your cavalry to mow the routers down without stopping, increasing their effectiveness nine fold This tactic is less useful when the enemy are not routing and the effect has been toned down due to the fixing of the so called swipe bug in patch 2.1, it remains useful against routers but should not be used against anything in a position to fight back.

    To stand any chance of victory you must use a balanced army. An army of nothing but knights may look good but it costs a fortune and will be massacred by spears and pole arms, both of which are substantially cheaper. Make sure you have all four groups represented in your army: spears, swords, bows and cavalry. When you get better you can try leaving out spears in favour of something like pole arms but it takes experience to know what you can swap with what.

    For more specific and in depth information on units try looking at the Complete Total War Unit Guide.

    Morale
    Morale is the make or break factor in battle. If your morale gets too low your units will start to run. Each fleeing unit gives a morale penalty to friendly units that can see it, unless they possess the disciplined or elite status and the router doesn't. To keep morale high you should act as the tutorial showed you: keep your units together, protect their flanks, don't make them turn their back on an enemy, make sure they are winning without taking too many losses. There is more on morale in chapter 2.3.

    What are those little flags visible on each unit?

    1


    The little triangular flag highlighted by the box represents a single point of valour. The unit in the picture has four little flags so that tells you the unit is at valour 4. The single large flag in the middle is the unit's standard and represents nothing except the location of the unit's leader. If the man carrying the standard gets into a fight the rest of his unit will try to reach him, generally the standard bearer will try to keep pace with his unit so if most of the men are engaged in combat he will wander over and join in. If a unit only has the standard and no other flags this means the unit is valour 0 and easy pickings.

    Charging
    A common misconception is that you need to double click on the enemy to get your unit to charge. This is not true, all you need to do is single click and the leader of the unit will order a charge within a certain distance of the enemy. By double clicking you are ordering your unit to run, which is a different thing from charging. Allowing the unit to walk saves energy and micromanagement, so for best results just single click and let your officers do the rest.

    To charge or not to charge, that is the question. There is no simple answer to this question, there are times when you should charge and times when you shouldn't. The basic rule of thumb is charge with everything except spears whenever they are going to enter combat. This gives the unit its charge bonus and gives it a better chance of doing damage in the first few seconds of combat. Spear units are the exception for a good reason - they need to stay in ordered ranks to receive their rank bonus. Charging disrupts the ordered ranks, even if the unit is on hold formation. Worse still is the fact that a spear unit will halt its charge the moment a single man comes into contact. This means that only one man gets the charge bonus for less than one second, while the formation is disrupted causing a loss in stats. Spearmen only get a small charge bonus anyway and their job is to hold the enemy in position while other units do the killing by flanking. So basically you should charge with everything except spears, until you can recognise the times where the exceptions to this rule take place.

    3.3 The landscape
    To find victory you must use and understand the landscape. I will give a basic rundown here but if you really want to know the tiny details find a copy of Sun Tzu's 'The Art of War'. This book is the original and best guide to conducting a war; reading and absorbing its contents will improve your game immeasurably as Total War was designed around it.

    Height
    Height is critical. To put it bluntly the person with the high ground has a much better chance than the one on the low ground. Any unit on high ground gets a +2 morale bonus and attack bonuses against any unit lower than it. All ranged units gain extra range and damage. Any unit fighting up hill will receive penalties and get tired faster. No matter what you do you should never attack up hill unless there is absolutely no option. When you are defending you should cling to your hills and refuse to be drawn down off them. If you are attacking height is much more tricky. You should try flanking your opponent while remaining out of range. This can cause them to move to a less advantageous position to avoid being hit in the rear. If they don't move then you will have some slight reduction of the height penalties because you will be attacking from several sides. You should also look for any high ground nearby and try to attack from it, as you will reduce the height penalty by reducing the height difference.

    Trees
    Cavalry and spearmen are both at a disadvantage in trees. Cavalry receive a big penalty and spearmen are prevented from getting their supporting ranks bonus. Therefore you should try to engage these units in forests if you need to fight them with unsuitable units like swordsmen. You must keep your own cavalry and spears out of the forests unless you really want them to die.

    Trees also provide cover from missile fire as the trees catch the arrows. Some arrows will inevitably get through but many will be stopped. If you are fighting a missile heavy army try hiding in the woods until they use up their ammo. Putting your own missile units in forests and expecting them to do much damage is stupid.

    You can spring ambushes from trees; this is covered in the tutorials.

    Bridges
    If you are defending then a bridge is a fantastic boon. If you are attacking then it is your worst nightmare. Units can only cross bridges slowly and in single file. This makes then a big fat target for missiles. When they are coming off the bridge they are still subject to the penalties for being crowded together. This makes them easy targets for the enemy's hand-to-hand units. Crossing any bridge is a bloody job, which will cost many lives. There are ways to reduce this though.

    Firstly use units with very heavy armour, preferably above 6. This will protect them from the incoming missiles better. They will also be able to hang on in the close fighting on the other side for longer, giving you more time to get extra men across.

    Secondly you should bring your own missile weapons and try to lure the enemy onto the bridge by sending a rubbish unit like peasants out onto the bridge. When the enemy sends a unit to attack pull your men back. Hopefully the enemy will get into missile range and you can shoot them. Keep doing this until you run out of missiles.

    Thirdly you should know that in MTW the AI will only defend one bridge if there are several in the map. Send a detachment around to the second bridge to flank the enemy before you begin to cross.

    Fourthly bring plenty of troops; you will need at least 2-1 odds in your favour, probably more.

    Fifthly, on the campaign map, you should send overwhelmingly massive armies to bridge provinces to try and force the AI with withdraw without a fight. This is the only way to win a bridge battle without substantial losses.

    Defending a bridge is easy. Bring plenty of missile units and some good hand-to-hand units like men at arms. Shoot the enemy while they are on the bridge and send in the melee fighters as they are just coming off the bridge. You will hit them while they are disorganised and still crowded with a penalty and should be able to do plenty of damage before routing them. When the enemy rout you should pull back and do it again. Never be fooled into chasing across the bridge or you will be subject to the same crowding penalties and missile fire.

    Desert
    This one deserves a special mention because it provides a bonus to camels and tires any unit with more than 5 armour out much quicker than usual. Camels are deadly in the desert, especially to horses. They receive a penalty if you take then to a lush province though.

    3.4 Generals and Kings
    On the battlefield a king is always in some kind of heavy cavalry unit like royal knights or Ghulam bodyguards. A general can be any kind of unit but they usually appear in more expensive units like knights. Generals and kings both have more health than any other unit on the battlefield. It takes more than one hit to kill them. This can lead to some unbelievable situations where a king or general will fight their way out of an army single-handed. This phenomenon has been nicknamed 'Jedi Generals'. The best way to kill a general or king is to attack him with ranged units. Only two men are allowed to attack a man in melee but there is no limitation on missiles shot at a man. Therefore a units worth of arrows provides a greater chance of hitting for damage. If you can't shoot the king you should surround him with his counter unit and keep attacking, you will probably get him eventually.

    A general or king can bestow a valour bonus on his army by way of his stars. For every second star a general has all units under his command will receive a point of special valour. This valour only gives +1 attack +1 defence, it doesn't give a morale bonus like regular valour.

    3.5 When to fight and when to withdraw.
    This is something you will need to learn from experience. There are occasions where your army doesn't stand a chance so you should withdraw on the campaign map without entering battle. These occasions are often obvious e.g. you have a single unit of peasants against 12 units of knights. There are other occasions where it comes down to a personal decision based on circumstances, I can't help you there. When on the battlefield taking part in a fighting retreat or quick attack designed to damage the enemy army rather than defeat it the time to withdraw is a very delicate issue. If you pull back to soon you will not do much damage, if you leave it too late you will be run down by the enemy as you leave.

    The first thing to note is that you withdraw by pressing control+W not control+O, which is tied to rout on default. Routing is a panicked flight, which will earn your general the 'good runner' vice (not a good thing) if he uses this method personally to leave the field. All control over a routing unit is lost unless it rallies, either by itself (not helpful if you want the unit to go away as the unit will just stand there doing nothing) or by your order (not reliable so it cannot be guaranteed to recall previously unwanted units to the battle). Withdrawing is a calm process that caries no penalties. However it is slow and you lose control of your troops once the command is given unless you first order them to halt.

    Ideally you want to use up a lot, if not all, of your missile ammo before telling your missile units to withdraw. If you are fighting to cause as much damage as possible to a superior foe before leaving the field with as much of your army intact as possible it is at this point you will then send in the sacrificial melee units you bought to hold up the enemy while the bulk of your army leaves. Try to keep your melee units fighting in good order so they last longer and do more damage. Remember their job is not really causing a lot of damage; that should have been done by your missile units - anything you get from those sacrificial men is simply a bonus.

    3.6 Sieges

    Unfortunately sieges are pretty dull to fight. If you are the attacker you should bring along the best artillery you can as well as many tough, well-armoured hand to hand units. All cavalry can dismount in a siege; this is especially useful in the case of the various knights as they become powerful infantry able to slaughter the defenders en mass. Why dismount in a siege? Simple, the main use of cavalry is speed and manoeuvrability. Neither of these attributes are needed in a siege as the enemy is nicely penned up in the castle or stood around just outside. The horse just makes cavalry a bigger target in a siege. Most missile units are useless in a siege, the walls block the shots so leave them at home.

    You should knock several holes in the walls before sending anyone in to attack. Use up all your ammo before moving in; try to destroy as many towers as you can to limit defensive fire, but only target the towers when you have at least two ways to get into the castle. When you attack through the breaches do it quickly and from several directions to force the defenders to split their forces and maximise your chances of breaking through on at least one front. Send in as many men as you can, as quickly as you can, and overwhelm the defenders.

    When you are defending you should also dismount your cavalry and forget missile units for the same reasons as mentioned above for the attackers. Wait for the enemy in the centre of the castle, force them to walk past all the towers taking casualties. When they reach the centre you should try to swarm them in a cramped area, like when they come through a gatehouse or breach.

    Sieges aren't over until the last defender dies or the last attacker routs.

    3.7 Tactics and fighting styles.
    Ok, this is only going to be a basic run-through of some of the ways to fight. If I did a comprehensive list it would be longer than this entire topic I'll divide it by religion as most religions hare similar units and styles.

    Catholics
    Catholic armies are made to slug it out in a relatively conventional manner. There are not especially manoeuvrable (by this I mean that most of their units have average speed for their type) and most of their units really suffer in the desert due to their heavy armour. You should always use a core of infantry to hold a stable centre and launch other attacks from. A line of spears with archers behind and swordsmen on the flanks is a very versatile formation, especially in early before the appearance of polearms. Place your general in the middle or on a flank at the back where he will be protected and can provide a morale boost to many units at once. Cavalry should go on the wings. For example:

    2


    The whole thing should be able to move forward together, keeping everyone well covered. The cavalry can easily detach to charge around an enemies flank or intercept a flanking attempt. The spearmen will engage the enemy in a line and the melee infantry are positioned to flank the enemy easily when the spears are holding them in place. The ranged units are protected and will be able to fire continuously, however in some circumstances you may find it beneficial to send the archers forward so they are in front of the rest of the army. Times where you may want to send your archers forward include when you are expecting heavy incoming missile fire (let the cheap archers take the damage, rather than more expensive units), when you will be shooting at units with a significant height advantage (if the enemy are much higher up their ranged units will have a very significant range advantage over yours, sending your missile units forward lets them absorb the damage, and also allows them to advance far beyond your army to conduct the missile duel without endangering your better units), or when you have many missile units and want to lay down a rain of arrows (stick some missiles in front of your army and some behind the spears), or when you do not mind more micromanagement and wish to give your archers the best possible view of their targets (deploy the missiles out in front, let them shoot and then manually pull them back behind the spearwall at the last possible moment. This takes practise and experience to do well, as you have to know how long it will take your men to fall back, and how long it will take the enemy to reach you). This formation can handle both attack and defence. Most factions can use it successfully as long as they can provide spearmen, heavy cavalry, melee infantry and archers.

    The ultimate in Catholic defensive formations is the half-sexagon:

    3


    (NB: The formation is viewed from a slight angle, the long line made up of two units of spearmen is the front) This shape is formed with four spearmen. A unit of men at arms or other melee infantry is placed behind each set of spearmen and archers. Ranged units are placed behind the spearmen and need to be on hold position and hold formation to stop them moving. A group of cavalry is placed on each flank. Spare units can be placed in the middle of the formation for protection and later deployment. For best effects you should place it so the open edge is next to an impenetrable barrier like a cliff or the edge of the map. The spearmen should all be on hold position and hold formation. Don't ever tell them to do anything other than stand there. The enemy will approach while being shot up by the archers. They will charge the spearmen who will not move and will receive the full rank bonus. Unless the enemy is a sword type they will not win the fight, they will take losses from the spearmen even though they haven't been told to attack. The melee infantry can move out through the spearmen to engage the enemy or can be sent running around to flank. The cavalry is already positioned to flank the enemy the moment they are engaged. Generally the enemy will rout within a minute. This formation is very handy for when you are out numbered and desperate. It is only for defence; using it to attack will get you shredded. Other factions can use this formation but it is highly dependant on well-armoured spearmen, they need to be able to hold out with few losses for a long time. Using lighter spearmen will result in heavy casualties and a mass rout. Be warned that once a tiny part of this formation crumbles the whole thing will collapse very quickly - you will either win and survive or be crushed messily. Fortunately the formation is exceptionally resilient so it should hold together unless swordsmen kill your spears or your enemy has a large advantage in terms of technology.

    From high era this formation can be tweaked with new unit types to expand the principle and become far more flexible, like so:

    4


    Several of the changes are immediately obvious, but some of the other implications are only visible to the more experienced eye. Firstly the spears are gone, completely replaced by polearms, in this case halberdiers. Secondly the shape of the formation is now slightly different, the four halberdiers make up a single straight row instead of the half-sexagon shape the spears made, the sloped flanks are now made up of chivalric foot knights, another polearm unit. Why? Simply put halberdiers have poor morale and need their flanks protecting and guarding well or they risk routing. Chivalric foot knights have sky-high morale and excellent fighting capacity, so they make perfect anchors for the formation's flanks. Remember also that most of the heavy fighting and morale sapping penalties will hit the flanks, as the enemy try to hit you at the weak point flanks often represent. Therefore the foot knights will both survive the worst penalties and ensure the halberdiers get a chance to stand and fight for a long time. Please note that you do not have to use foot knights to anchor the flanks, any infantry unit with high morale and good fighting power will do, however foot knights are the best of the best for the Catholics and can be obtained quite easily in a manner that makes your army more versatile - simply build chivalric knights and dismount them when you reach a battle where this formation is more use than the speed and mobility of cavalry. The longer frontline provided by the four halberdiers in a line also makes it harder for the enemy to swarm your formation. You may notice that the halberdiers are in three ranks, rather than the two ranks that will allow them to wrap about enemy units and cause more damage. This is because I am assuming (pretty much inevitable given the nature of this formation) that they will be receiving a lot of charges by both infantry and cavalry, therefore three ranks will give them a better chance of resisting the devastating effects of a strong charge on a thinly spread unit. Another immediately obvious change is in the position of the missile units - they are now deployed in front of the formation by default. This is because the appearance of the crossbow and arbalest has forced a change in tactics, unlike bows these weapons can only fire in a straight line, so no arcing shots over the heads of units in front. These crossbowmen benefit from being on hold position/hold formation so they do not move, ever. Instead of withdrawing them as the enemy get close you will take advantage of the polearm unit's lack of rank bonuses and charge them forward - unlike spear units polearms have no bonus that is best maintained by standing still. It takes a bit of practise and experience to learn precisely when to start your men running forward (double click the target, remember this is not ordering a charge, just a run to get the men out to fight quicker) so they hit the enemy before your missiles get engaged in melee, but without moving too soon and losing valuable shooting time. The swordsmen, general and heavy cavalry are all in the same positions and serve the same purposes as they did in the spear-based version of this formation.

    With the dawn of late the pike becomes available and a new type of formation along with it.

    5


    The core, and real fighting power, of this army comes from the 6 units of pikemen right in the centre. They will be doing most of the work; everyone else is just there to support them. This formation replies on several key things, and if any of them fail you are in a bad situation. The good news is that this formation works equally well for both attacking and defending and can be quite devastating when everything goes well. It all focuses on the pikes and how they work, keep them in a position where they can do their job and you should be fine. What do the pikes need to do their job? Protection, [purely and simply their flanks must be guarded at all times and they must stay in tight, orderly formation as all the pike units advance and fight together in a wall. Reach unit of pikes needs to be in a minimum of 6 ranks, and deployed as close as possible (but not so close the units automatically start to move away from each other) to their neighbour on each side. Leave no gaps, make sure the line is straight, only move as a group and keep that formation dressed Always but always make sure your pikes are in hold formation, don't order them to run (as that will increase the chances of them losing formation and even a slight disruption really matters here), and try to let them stop frequently to redress their formation. The unavoidable flanks at the far ends are protected by a unit of swords (or polearms, or another unit of high morale and good combat power infantry) and a unit of heavy cavalry. They present a strong force that discourages the enemy from harassing your flanks, as well as being strong enough to see off most flanking attempts before they pose much of a threat to the pikes. They can also move forward to engage the enemy's flanks when the pike wall has engaged the main enemy body. The general's unit and the third unit of swords are there to plug any gaps in the main line, or to go fight at trouble spots; in essence they are your reserve. In front of the pikes you can see two units of arbalesters, they will do as much damage to the enemy as possible before the pikes reach contact. If you wish you can swap the arbalesters for gunpowder units, but this is not advisable - there are other units that are more disposable in this army and your arbalesters are practically required to handle any serious missile requirements. Gunpowder units will not be able to cause damage like arbalesters can, but with a lot of careful usage and some good luck they can cause severe morale damage to the enemy and encourage them to rout far quicker. I would say no more than two units of guns if you are absolutely determined to play with fire, swap two of the heavy cavalry units (the ones at the back in this formation) for the guns, and deploy your guns on the flanks of the pikes just in front of your swords. When the pikes engage the enemy let the guns fire into the enemy flanks at close range, they will do a tiny bit of damage and start causing big morale penalties in any unit they shoot - including yours, so do be careful of friendly fire If those two units of cavalry are so disposable you may wonder why I included them, simply they provide mobility and extra protection for those oh so critical flanks, as well as being a highly mobile reserve and a ace in your sleeve as most heavy cavalry (particularly knights, and let's face it if you are playing Catholic you will be using knights rather than the other types of heavy cavalry) will dismount into great infantry. Gothic or chivalric foot knights really pack a punch. This formation really does need flat and clear ground, as you may imagine hiking up and down hills or through trees disrupts the line, and then the enemy will start to exploit those gaps making your pike wall crumble to dust. If you can use Swiss armoured pikemen for this formation you should leap at the chance, as they are the best pikes in the game. Swiss pikemen are a tolerable substitute, generic pikemen are rather lack lustre and should be heavily upgraded in all possible fields (attack, defence, morale, armour) before you consider using them.

    What do you do when your faction has many types of spear units but not many other unit types (for example many factions in the Viking campaign)? The spear wall is a good solution.

    6


    The spear wall is a bit of a pain really, it forces you to break those neat rules for optimising your spear's fighting prowess and to faff about keeping exceptionally well dressed ranks at all times. It is quite similar to a primitive version of the pike wall above, in that you must deploy your units as close together as possible, in a very neat and straight line, and with the flanks protected exceptionally well. The example of the spear wall in this diagram is from the Viking era, using the Saxons. It is set up to attack, if this army was defending it would be beneficial to make a larger version of the half-sexagon defensive formation outlined above, with the archers placed firmly in the centre. In the early Catholic formation shown above the archers are deployed behind the spears, even when attacking except in very limited circumstances. In this formation that is not the case - it is only in rare circumstances that the archers go behind the front line of spears. This is mostly because of the second line of spears you can see forming the reserve. When you need those reserve spears to get into the fight you need them there quickly, if they have to push past archers to get to the fighting their formation will be disrupted and it will slow them down, a small thing indeed but it can prove disastrous. The huscarles and other non-spear units can push their way past archers a bit faster (well it seems that way to me) and they don't need to keep their formation immaculate to receive a rank bonus. That is the crucial difference in deciding where to deploy the archers. You may be wondering why the spear units forming the reserve and on the flanks are labelled as high morale spears, this is because the average spear unit has poor morale and is therefore prone to routing when flanked or moving in to support a damaged and possibly fleeing army. Most factions in the Viking era can access a spear unit with good morale, but somewhat poorer stats for straight up fighting. In this diagram armoured spearmen form the fighting core, while Fyrdmen with their high morale/low armour support them. If you swapped the unit's roles around your fyrd would take heavier casualties and rout even with their high morale, whereas the armoured spearmen would be wasting their combat power and fleeing as soon as the fyrd begin to waver, making their function as a reserve useless. Unless you manage to tempt the enemy into charging at you as you advance to attack you will have to charge your own spears and risk losing that all important rank bonus. The best you can do if forced to charge yourself is to walk to contact keeping that line and the individual units well formed up, before assigning individual targets you your units when very close to the enemy and letting the unit's officers order the charge. Running or advancing piecemeal will only hasten and exaggerate the collapse of your ranks. However where possible you should concentrate in advancing just short of the enemy lines, and shooting them with your archers until they move to attack you, then let your spears stand firm on hold position and take the charge. This formation can handle rough ground, but trees, steep hills, and mountains will cause no end of trouble.

    Catholics in the desert.
    If you need to fight in the desert you should use troops with less than 5 armour. Don't use armour upgrades and you will be able to take the entire feudal line of units into the desert with few problems. There are also kerns and gallowglasses that fare especially well in the desert, so try to capture Ireland before leaving for hotter parts. The English and French can also build hobilars; powerful light cavalry that perform well in most conditions so take advantage of them if you are heading to the desert as either of these factions.

    Cheetah has pointed out that the Catholics do have at least one type of ranged cavalry each, so it is possible to create a more cavalry heavy army in the same style as the Muslim and Orthodox factions. Personally I prefer the infantry route but you should try both and make up your own mind.

    Muslims
    The Muslims are built more towards fast cavalry and missile attacks than toe-to-toe slugging matches like the Catholics. You need to play them with a more hit and run style. They should have more cavalry in the armies than the Catholics, especially cavalry archers. You can base an army around a line of six or so spear types which will hold a centre your cavalry can work from and retreat to.

    7


    The ranged cavalry are at the front, while the heavier cavalry and the general are protected behind the spear wall awaiting a chance to flank. Send out groups of ranged cavalry to pepper the enemy with arrows. If they charge you should pull back and see if they follow. If they do follow you should jump the unit with several of your own and destroy it before help can arrive. Keep doing this until the enemy is so warn down you can crush them in hand to hand. Always use your camels against horses, as they are highly effective.

    The Turks deserve a special mention for their Janissary troops. In the late period they can form an effective army consisting of a main line of Janissary heavy infantry with ranged support provided by Janissary archers and infantry. This allows them to fight in a similar manor to the Catholics, as Janissary heavy infantry is probably the best melee unit in the game, able to crush most opposition.

    The Almohads are also a special case. At the beginning of the game they don't have much cavalry. Instead they have the best Muslim infantry unit until the Janissaries start to appear - the Almohad urban militia. They are very strong swordsmen, equipped just like the Catholic feudal men at arms. You should use these guys to form the bulk of your army, let them attack anything that isn't on a horse. Bring along whatever spearmen you can build to take on the cavalry.

    8


    Here the units of Almohad urban militia hold a front line (they should be in ranks two deep but I had to deploy them in threes to get them to fit in the picture) with a unit of spears on each flank. Directly behind the militia are some archers. Reinforcements and the generals unit are at the back protected until they are needed. The Almohad urban militia can kill cavalry if they gang up of them, especially if you use a unit to hit from the rear. You should also consider placing your men in forests if you are fighting on a map that has them, this makes the militia into deadly killing machines that can take out almost any early period unit, as the militias counter units become weak in the trees.

    Orthodox
    The Russians should be played in a similar manor to the Muslims as they share the same emphasis on skirmishing and ranged units. The Byzantines however can be played similar to both the Catholics and the Muslims due to their superb Byzantine infantry and selection of cavalry. A 50-50 balance between infantry and cavalry is good as it takes advantage of all the Byzantines special units, for example this army has 7 units of cavalry (including the general) and the rest is assorted special Byzantine infantry:

    9


    The line of Byzantine infantry with a few Trebizond archer and Varangian guards to support can slowly advance while the Byzantine cavalry skirmishes. Once the melee is joined units of Kataphraktoi and Pronoiai Allagion/Byzantine lancers can be sent to flank. The Varangian guards can be used to support weak spots or attack particularly dangerous units, as well as providing a high morale, reliable reserve force. The Byzantines need to balance their speed and power to be truly effective. In this diagram the archers are deployed ahead of the infantry line, this is because Byzantine infantry have comparatively fragile morale and casualties combined with the morale penalty for being shot at will make them easier to rout before they even get into melee combat. For this reason it is better to let your archers take the arrows in their place.

    4. Moving to intermediate.
    If you have mastered everything I have covered in this guide then you are ready to move on to intermediate. Congratulations

    You should start by looking at this
    table of contents as it contains a lot of advanced information. You should also consider reading the forums on the two sites mentioned at the start of this guide, as there are many helpful articles and interesting ideas on them. You need to continue practising to get better but you are over the hardest part now so things are smoother from this point on.

    For information and tips for any of the units in Shogun, medieval and Viking Invasion look at the Complete Total War Unit Guide

    5. Appendix
    Here's some useful information that doesn't fit anywhere else.

    5.1 Hotkeys
    Battlemap
    P = pause
    G = Group
    Backspace - Halt (cancel the given order)
    R - Rally (use this to avoid hitting the wrong button on the interface - rout is right next to it)
    C - Close formation
    L - Loose formation
    W - Wedge formation
    S - Skirmish mode (apply for skirmish troop)
    F - Hold Formation
    E - Engage at will
    H - Hold position.
    A - Fire at will (apply for skirmish troop)
    Control+W = withdraw
    Control+R = rout
    SHIFT + DOUBLE CLICK = waypoint with the unit running.
    Alt+hold right mouse button = Change troop facing
    Multiple units selected and Alt+RMB = Change facing for all units while maintaining formation.
    Multiple units selected and ALT+left click = Move all units while keeping formation, spacing etc
    - and + on numpad to change camera angle
    Mouse wheel to zoom (camera elevation).
    Press Escape while dragging out a formation will cancel the action.

    Campaign map
    V = display sea zone status
    C = hide castles
    Shift = display province loyalty
    Space = skip tour
    Mousewheel = zoom
    1 and 3 keys on the numpad to zoom if you don't have mouse wheel
    M = merge armies/merge units
    Escape = main menu
    Enter = end turn
    Ctrl + A works on the camp map to select all units in the unit review panel

    5.2 Multiplayer
    I don't play multiplayer so you can thank Cheetah for this section.
    Eleven do's and eleven not to do's of MP

    DO'S
    · Always respect the rules the host set forth. If you don't agree with these rules don't join the game.
    · Always ask if you don't know something, and always help if someone ask something from you.
    · Always communicate with your allies.
    · Always help your allies.
    · Always tell your allies when you are going to attack.
    · Always count the number of units in the opposing army.
    · Always study carefully the composition of the opposing armies. You can learn a lot this way.
    · Always group your units according their tasks: archers, melee infantry, reserve cavalry, etc.
    · Always pick your army according the climate. Don't bring heavily armoured troops into a desert battle, etc.
    · Always buy valour to your fighting troops to avoid the my soldiers did not fight syndrome. Morale is the most important part of the battle; valour 0 troops run too easily.
    · Always pick a good general, usually an elite troop with high base morale (for example: chivalric knights, Ghulam cavalry)

    NOT TO DO'S
    · Never flame your allies or your opponents. Even if he/she picked a wrong army, made a wrong move, was routed off quickly, etc.
    · Never leave alone your allies. An ally worth more than any hill or nice terrain feature.
    · Never stay put. Don't be afraid to move.
    · Never rush in the first 5 seconds of the game. Always take your time to survey the deployment of the opposing armies and that of your allies.
    · Never put your money in a few überunits (for example, v3 or v4 chivalric knights). Try to spread your investment evenly amongst your melee units.
    · Never buy an army composed of only one unit type (i.e. only infantry, only cavalry, etc.). Under most of the circumstances a mixed army of ranged units, melee infantry and cavalry out performs any of the one-unit type armies.
    · Never buy siege engines like Mangonels, ballista, etc.
    · Never lead the attack with your general.
    · Never attack one by one, attack in groups.
    · Never chase a cavalry with your spear units.
    · Never focus your attention on one unit. Try to rotate your attention between the different parts of your army as frequently as you can. Keep an eye on the unit icons. There should be no idle units.

    5.3 Modding the missile units.
    DISCLAIMER: You mod your game at your own risk - if something goes wrong don't blame me. I have given these instructions according to what I did with my own game so they should be accurate, however this does not give you the right to blame if you mess up. If something does go wrong you should be able to use your back up file (which I tell you to create before you do anything) to repair everything, if that doesn't work come to the org and ask one of the many modders for help. END DISCLAIMER.

    Since my old link to a topic on this broke I've written this appendix to replace it. This section is intended to be a simple guide to modding the missile unit to make them more accurate, deadly and generally more useful. It only covers altering the projectilestats file so you won't find out how to add new units or anything complex like that, try the org's Dungeon if you want to do that.

    Firstly you will need to download the Gnome editor from the org, you can find it here. The file is called Gnome editor V2.0 by Lord Gnome. Secondly you will need either the Viking Invasion add-on or the 1.1 MTW patch - if you don't have one of these you will not be able to mod the projectilestats file. Before you start you should create a backup of the unaltered projectilestats file in case you mess up or wish to revert back to the original. To do this go to your MTW main directory and look for a text file labelled PROJECTILESTATS, it looks just like this example. Right click on it, select copy and then right click on your desktop (or in another file away from MTW and the editor) and select paste. Voila, one backup

    Now you are ready to begin so install the gnome editor and start it up. Click on Load file on the bottom bar. Then choose PROJECTILESTATS from the list and click OK. The projectilestats file will now open and you will see a long list of each type of projectile (e.g. shortbow, longbow) along with its various statistics. I will now walk you through altering the longbow to be more accurate.

    - Locate longbow on the far left hand list (it's number 2), now look across it's statistics until you find the column headed 'accuracy' (column 6) and click on the box. This will highlight the boxes containing the words longbow and accuracy so you can check that you have the right statistic selected. As you can see longbows have a default accuracy of 0.6, it is very important that you do not alter these numbers too drastically as you can make missile units so deadly they make every other unit obsolete and ruin game balance so badly you won't want to play. Never take an accuracy stat up to whole numbers, even 0.90 is far too much for serious gameplay.

    - Now that you have the longbows accuracy selected all you need to do is edit the numbers in the same way you would edit text. For this example hit backspace once to delete the 6, you should leave the number at 0. for now. We want longbows to be slightly more accurate so type 78 in to replace the 6, the final result should look like this 0.78 and that's it, you are done Simple wasn't it?

    - Now to save your work, click on save file as on the bottom tool bar and type in a name in the save as box. Make sure to call it something different to the default files and your back ups or you will overwrite them and put yourself in a bad position. I recommend calling the file beginner mod so you know what it is, I shall refer to this file as beginner mod from now on for ease of reference.

    - Installing your mod is just as easy. First copy beginner mod to your desktop using the same method you used to create the back up at the start of this guide. Now right click on your copy and choose rename, you should call it PROJECTILESTATS - exactly the same as this, capitals and all or else it will not work. After renaming the file right click on it and select cut, now open up your MTW main directory and select paste when you are in the same folder as the original PROJECTILESTATS file. Right click in the folder and select paste, if you have named your mod correctly and you are putting it in the correct location you should be asked if you want to overwrite a file with this name that is already in that location. Choose yes. Now all you have to do is test your mod, so load up the game and try out your unit. If you feel the accuracy still needs tweaking you can come back to the editor, open up your original beginners mod file (this is why you created a copy before installing the mod) and edit away. Editing other missile units is exactly the same as editing the longbows so you can play with their accuracy too, don't touch any of the other statistics apart from accuracy as they are too advanced to fiddle with in this guide. If you want to alter range etc take a look at the projectilestats topic in the orgs dungeon here

    frogbeastegg's recommended accuracy stats
    The following list is the accuracy stats I use in my frogmod, they are better than the defaults but at the same time they do not make the missile units over powered. All of the missile units retain their original uses and none of them become obsolete when you get access to newer units so gunpowder has a use but it does not replace crossbow types or normal bow types. I DID NOT WRITE THE GUIDE BASED AROUND A MODDED GAME so don't worry about any of the advice being wrong.

    Longbow 0.73 (Used only by Longbowmen)
    Shortbow 0.62 (Used by most normal archers)
    MountedLongbow 0.58 (Used by all mounted archers)
    Arquebus 0.30
    Handgun 0.10
    Ninjastar 0.50 (Not used in the game so I left it)
    Javelin 0.15
    Grenade 0.03
    Crossbow 0.68 (Used by infantry x-bows and mounted x-bows)
    Arbalest 0.75

    I haven't modded any of the siege engines or castle defences as they function nicely in the defaults.

    frogbeastegg's other missile related mods
    I altered some of the other missile unit stats as well here's a list. You edit them in the same way you edited the accuracy stats so if you want to make your game match mine....

    Javelin = Range to 2500 (This enables the AI to use javelins effectively while keeping their short range.)
    Crossbow = Reload to 10 (This gives them a slight advantage over arbalesters giving them a purpose)

    5.4 Unit size chart
    This chart shows how many men there are in each type of unit on each of the unit size settings in MTW.

    On small size: Bodyguards 20 cavalry 20 infantry 30 spears 50
    On default size: Bodyguards 20 cavalry 40 infantry 60 spears 100
    On medium size: Bodyguards 20 cavalry 53 infantry 80 spears 133
    On large unit size: Bodyguards 33 cavalry 66 infantry 100 spears 166
    On huge unit size: Bodyguards 40 cavalry 80 infantry 120 spears 200

    5.5 Cheat codes and command lines
    These are included for reference; sometimes cheating is the best way to test out ideas if you are short of time. It can also be fun, not all cheats make your game easier.

    Cheat codes must be entered exactly as they appear here - including the full stop before and after the code. You must enter them on the campaign map screen.

    Cheat codes
    .worksundays. = fast build mode. Must have all your build queues empty for this to work.
    .badgerbunny. = all buildings and units are available. You can still only build the units relevant to your faction, even though you appear to have all types available.
    .deadringer. = gives 1 million florins
    .conan. = take control of the rebels
    .matteosartori. = reveal the whole map
    .viagra. = puts iron in all your provinces
    .mefoundsomeau. = puts gold in all your provinces
    .mefoundsomeag. = puts silver in all your provinces
    .mefoundsomecu. = puts copper in all your provinces
    .kidsmode. = makes the AI very easy
    .nuttermode. = makes the AI aggressive
    .unfreeze. = produces an heir for your faction. The heir will be born as you hit 'end turn'.

    command lines for MTW
    These are not exactly cheats; instead you add them to your MTW or VI shortcut. Right click on your shortcut, and then choose properties. In the target box you should see something like:
    F:\Program Files\Total War\Medieval - Total War\Medieval_TW.exe
    if you have plain MTW or
    F:\Program Files\Total War\Medieval - Total War\Medieval_TW.exe -strictserver
    if you have both MTW and VI. To add a shortcut you must leave one space after the mark, then enter the command line. To use multiple command lines just leave a space between each one and remember to include the - at the start of each successive line. Choose to save your changes and exit the properties box. Then start the game with the shortcut.

    -ian - debug mode, runs in a smaller screen, you can move the camera about more in the battle maps to get close up views, you can disable the AI or switch factions using the number keys. The A key allows you to put the game on auto run.

    -loyalty:X - sets the auto tax to maintain X loyalty where X is the number you want. Always use more than 100 at the very minimum unless you want a lot of rebellions. I recommend 120 for a reliable income and reasonably reliable loyalty or 180 to maintain very high loyalty and rarely see a rebellion.

    -strictserver - a multiplayer related command that is on by default for all VI installations. Just leave it alone.

    -green_generals - for VI only. When a general dies his replacement won't be identical to him in stats, vices and virtues. Instead the new man will be slightly weaker.

    6. Credits.
    In alphabetical order:
    adi for some suggestions.
    ah_dut for some suggesions.
    Apache for some suggestions.
    Celtlan for some suggestions.
    Cheetah for loan of his armies and suggestions, also for the multiplayer section.
    Gregoshi for pinning the entrance hall version of this guide.
    Inigo Montoya for pointing out the need for a guide like this, and some suggestions. Inigo also edited pictures 2, 3, 7, and 8.
    jaggy for some suggestions.
    jaren for some suggestions.
    Kristaps for some suggestions.
    Louis de la Ferte Ste Colombe for some suggestions.
    Ludens for some suggestions.
    magnatz for pointing out open office.
    Monk for some suggestions.
    motorhead for some suggestions.
    Old Bald Guy for some suggestions.
    o_loompah for some suggestions.
    Pdifolco for some suggestions.
    pdoan8 for supplying the list of hotkeys.
    Quokka for some suggestions.
    RabTheRab for posting the unit dismount guide and saving me hours of research.
    Razor1952 for some suggestions.
    Simon Appleton for pointing out an error and some suggestions.
    Swordsmasterfor some suggestions.
    TosaInu for increasing the size of this topic so I could add in a lot more information. He also provided the host for the pictures (along with the org), and encoded the HTML version of this guide.
    Total War.org for hosting this whole thing.
    Tricky Lady for converting this guide to PDF.
    WarHawk1953 for some suggestions.
    Yoko Kono for some suggestions.


    Frogbeastegg's Guide to Total War: Shogun II. Please note that the guide is not up-to-date for the latest patch.

    Members thankful for this post (2):


  3. #3

    Default

    Can someone sticky this or something? It answers every question I have ever seen asked by new players, along with some that aren't asked because people don't know that the option even exists. It should help a lot of newbies, especially those who have been requesting a guide like this.

    I can update it as necessary to add new information, correct errors (I hope there are none ), add new information as requested.

    Over twelve hours of solid typing and over 69,000 characters, is that some kind of record? I'm going to sleep now, so tired....
    Frogbeastegg's Guide to Total War: Shogun II. Please note that the guide is not up-to-date for the latest patch.


  4. #4
    Member Member Dukezer0's Avatar
    Join Date
    Jan 2003
    Location
    The other end of the bridge
    Posts
    99

    Talking

    Bloody hell

    How big. Suffice to say its a great post IMO. Though it took me about 30 mins to read, rome wasn't built in a day, so to speak.

    Excellent advice for a beginer, you should post it in the EH also.

    An innacurate paradox of random variation.

  5. #5
    Senior Member Senior Member econ21's Avatar
    Join Date
    Oct 2002
    Posts
    9,651

    Default

    Really nice post, frostbeastegg.

    One minor point - arbalesters still appear on high in the SP game, unfortunately (it's ahistorical and makes crossbows redundant in the game).

    Also, your advice for Muslims seems geared more for the Turks (only ones who can get JHI) and not so relevant to the Almohads. The Almohads are rather short of cavalry (only Saharan and bodyguards for a long time) and on early should presumably rely on their magnificent AUM instead.

    I have one point of disagreement on choice of faction - I think for many VI factions, the VI campaign is rather tougher than the main campaign so I would not recommend it for a newbie. I'm not quite sure why - maybe because you can't rely on trade and the economy to triumph; or maybe those nasty Vikings themselves.

  6. #6
    Member Member Crash's Avatar
    Join Date
    Jun 2003
    Location
    Maryland
    Posts
    449

    Default

    Oh my God, Froggy, what have you wrought?

    It's great, thank you for all your hard work.


  7. #7
    Member Member Razor1952's Avatar
    Join Date
    Jun 2003
    Location
    Sydney
    Posts
    441

    Default

    Congrats Froggy a great post,

    The only thing I would suggest added is the the effect of morale, valour and discipline, particularly when choosing a general (to give added valour) and also when choosing a province which has a bonus for a certain type of troop and building bonuses for these.

    Looking at your link to the units stats from the Clan Berserk will quickly show how important these factors are in battle.

    I wish your guide had been around earlier when I started
    Such is life- Ned Kelly -his last words just before he was hanged.

  8. #8

    Default

    Oh...my...God. Great post And to think that I asked some of the original stupid questions that prompted this. I hope TPTB will sticky this somewhere - like maybe here and in the EH, so future TW idiots will have a good basic resource to the game that's easy to find and understand.

    Well done, FBE. Good luck finishing Thief.

    IM
    "You keep using that word. I do not think it means what you think it means."

  9. #9

    Default

    Corrected and expanded. I can't believe I missed the whole elite/valour etc thing; I must have been really tired.

    Thanks for the feedback, if there is anything else I got wrong or didn't include just mention it here.

    I'll go and create a copy in the entrance hall now.

    The whole thing now weighs in at 74194 characters I've nearly hit the post limit
    Frogbeastegg's Guide to Total War: Shogun II. Please note that the guide is not up-to-date for the latest patch.


  10. #10
    the goldfish Senior Member tootee's Avatar
    Join Date
    May 2001
    Location
    Singapore
    Posts
    1,987

    Thumbs up

    Excellent.
    tootee the goldfish,
    loyal roach of Clan S.G.

  11. #11
    Senior Member Senior Member Ser Clegane's Avatar
    Join Date
    Jan 2003
    Location
    Escaped from the pagodas
    Posts
    6,606

    Thumbs up

    Great job frog

    Thanks for the fantastic effort

  12. #12
    Nur-ad-Din Forum Administrator TosaInu's Avatar
    Join Date
    Jul 2002
    Posts
    12,326

    Default

    Konnichiwa frogbeastegg san,

    I haven't time to read it at the moment, but it looks very good and I'll read it. Perhaps it should be made a static html page too, pictures maybe?

    Thanks for the great work.

    The postlimit can be increased.

    Edit: increased to 100 kb max.


    Ja mata

    TosaInu

  13. #13
    Silent Ruler Member Dîn-Heru's Avatar
    Join Date
    Mar 2003
    Location
    Bergen
    Posts
    1,200

    Default

    DAMN

    Exellent job Miss frogbeastegg
    Patience is the companion of wisdom.
    --St. Augustine

  14. #14

    Default

    Thanks TosaInu (and others)

    Adding pictures would really improve the strategy section, I could slap in a couple of pictures of formations instead of those crappy text diagrams. Unfortunately I've no idea how to do this and I have nowhere to host the pictures. If you can make it possible I'll leap at the chance. If you want to make it a static part of the org (wow, I'm honoured ) I've no objections. You would need to teach me how to alter it though; I've never worked on the net outside of posting on forums. (Just saw you increased the topic size, thanks )

    As long as there is a demand and enough space I will keep expanding the guide. I have put a duplicate in the entrance hall as suggested, if you don't like it Mods, feel free to take it down (not that you need my permission of course). Having this topic repeated does increase the chance of newbies finding it though.

    Inigo Montoya I found your offer of help after I'd finished the whole thing, thanks anyway 
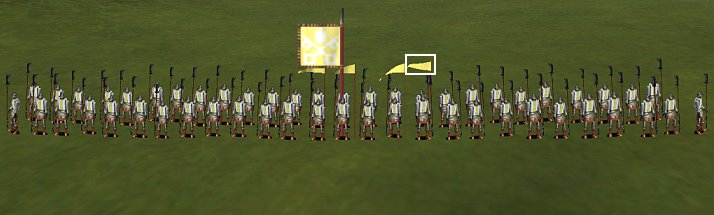
. If you think I've missed something just ask. On your idea of a in-depth guide to the battle field:
    :frog clutches her head and screams:
    Oh god That would take forever I couldn't do that myself, there are too many strategies I don't use, units I don't like, ideas I've never thought of

    However if I got the ball rolling with a basic guide covering my own tactics etc and other people chipped in with their own ideas it might work. If it was illustrated and static like TosaInu suggests for this guide then it would be handy.

    :frog mutters to herself "I must be crazy, so much work, so much time and all for free" froggy starts to phone the local mental asylum:

    You know this was supposed to be my summer holiday
    Frogbeastegg's Guide to Total War: Shogun II. Please note that the guide is not up-to-date for the latest patch.


  15. #15
    Nur-ad-Din Forum Administrator TosaInu's Avatar
    Join Date
    Jul 2002
    Posts
    12,326

    Default

    Pictures will be hosted by this server. There's surely someone to assist with making the HTML pages (I can do that too when the text and images are supplied).

    Images can be made by pressing the F2 key (works in battles and campaign). The pictures are stored in MTW\TGAs and named like 00000000.tga. TGA files are huge, you may crop and/or resize them a bit and at least convert them to gif.

    There are quite some graphic programs that can do this and it's fairly simple. This Guideline provides some ideas for making pictures http://www.totalwar.org/Downloads/Guideline.shtml

    Image editor

    Here's the website of http://www.jasc.com/ . But a search on http://www.tucows.com should result in some good free image editors too.

    A great idea to have other people add tactic bits too.

    P.S. only undertake such things when you enjoy doing it please.


    Ja mata

    TosaInu

  16. #16
    Moderator Moderator Gregoshi's Avatar
    Join Date
    Oct 2000
    Location
    Central Pennsylvania, USA
    Posts
    12,981

    Default

    My jaw just hit the floor. Fantastic work frogbeastegg Pinned it shall be
    This space intentionally left blank

  17. #17

    Default

    Ok I've taken 4 screenshots, cropped them, shrunk them to 85% of the original size and converted them into JPEGS between 52.8KB and 55.8KB. Now what? Shall I email them to you in a zip file? I'll need to rewrite the relevant tactics sections to get rid of the poor art and explain the pictures, I'll do this when the pictures are hosted and ready to go up.

    BTW: The entrance hall version of this topic is now sticky Drinks all round

    Don't worry, I enjoyed doing this guide. At the very least it gives me something to do while I wait for my neighbor to finish his very noisy DIY. Anyway I've used plenty of fan written guides myself over the past few years so I guess it's time I put something back. I always enjoy studing the theory etc of Total War so most of this is just typing up facts I've known for a while.
    Frogbeastegg's Guide to Total War: Shogun II. Please note that the guide is not up-to-date for the latest patch.


  18. #18
    The Breath of God Member Divine Wind's Avatar
    Join Date
    Sep 2001
    Location
    Guarding the Shores of Japan
    Posts
    1,317

    Default

    Bravo Froggy. Very good read for the new chaps
    "To fight and conquer in all your battles is not supreme excellence; supreme excellence consists in breaking the enemy's resistance without fighting.
    -Sun Tzu, the Art of War


  19. #19
    Nur-ad-Din Forum Administrator TosaInu's Avatar
    Join Date
    Jul 2002
    Posts
    12,326

    Default

    Yes, you can e-mail them to me in a zip: tosainu@totalwar.org
    I'll post the images and send you the URLs so you can add them to this Guide.
    Ja mata

    TosaInu

  20. #20
    Senior Member Senior Member Cheetah's Avatar
    Join Date
    Dec 2001
    Location
    Hungary
    Posts
    2,085

    Thumbs up

    Very nice work froggy
    Lional of Cornwall
    proud member of the Round Table Knights
    ___________________________________
    Death before dishonour.

    "If you wish to weaken the enemy's sword, move first, fly in and cut!" - Ueshiba Morihei O-Sensei

  21. #21
    Senior Member Senior Member Cheetah's Avatar
    Join Date
    Dec 2001
    Location
    Hungary
    Posts
    2,085

    Default

    Very nice work Hey froggy, what is a beast artillery? (under the siege section)

    A few remarks about army types. IMHO there are no attacking or defending armies just suboptimal armies and emergency situations For me an optimal army would consist 3-4 ranged units, 6-7 meele infantry (FMAA, milserg) and the rest cavalry, preferably with 2 cav archers. As you see I leave my spearmen at home, unless I expect a cav (camel) heavy opponent such as the GH, turks or egyptians. Javelin infantry can do a good work, especially in early era and usually they are quite cheap. As far as the reinforcements concerned, IMHO cav units are the best, I prefer to have at least 2 cav archers in reserve.

    About fighting styles: catholic armies are not very manouverable and suffer in desert. Hm, it depends on your army choice All of the catholic factions can build cav archers or mounted x-bows so it is really up to you whether you build an inf heavy army or more mobile cav heavy armies. Also there are a number of catholic units that can do pretty well in desert, such as feudserg, milserg, archers, cav archers, not to mention some specail unit types such as the hobilars or turcopoles. Of course, all without armour upgrades. So, basically you have to have a troop producing province without armoury if you plan to embark on a desert campaign.
    Lional of Cornwall
    proud member of the Round Table Knights
    ___________________________________
    Death before dishonour.

    "If you wish to weaken the enemy's sword, move first, fly in and cut!" - Ueshiba Morihei O-Sensei

  22. #22

    Default

    FBE - I can help you with pictures, if you would like me to. I have lots of graphic editing software (my job) - so I can take screenshots, add labels and pointers (for example), and save them in a size and format suitable for framing - or posting, as the case may be.

    I'm glad you're getting a lot of encouragement on this. You deserve all the kudos. Please keep up the effort, and let me know anything I can do to help. e-mail is innigo_montoya@yahoo.com.
    "You keep using that word. I do not think it means what you think it means."

  23. #23

    Default

    TosaInu, you should have mail.

    Inigo, thanks for the offer. I may expand the tactics section with some more tactics and screenshots. I might do some illustrating how to do flanks attacks etc which would benefit from labeled pictures. A labeled diagram of a unit that shows exactly what I'm talking about when I say flanks, rear, ranks etc may make it in as well. When the first batch of pictures are added I'll start taking some new ones and get back to you. Are there any particular tactics you think should be illustrated? After all this was (kind of) your idea

    I never thought for one second that my guide would attract all this interest and praise. What has really made it worthwhile was stumbling across someone in another topic who said they had read the guide and had all their questions answered. It gives me a warm, fuzzy feeling
    Frogbeastegg's Guide to Total War: Shogun II. Please note that the guide is not up-to-date for the latest patch.


  24. #24
    (Insert innuendo here) Member Balloon Bomber Champion DemonArchangel's Avatar
    Join Date
    Jan 2003
    Location
    Washington D.C
    Posts
    3,277

    Default

    NICE Good job frog beast egg
    Quote Originally Posted by Louis VI the Fat View Post
    China is not a world power. China is the world, and it's surrounded by a ring of tiny and short-lived civilisations like the Americas, Europeans, Mongols, Moghuls, Indians, Franks, Romans, Japanese, Koreans.

  25. #25

    Default

    Edited to include pictures and to correct a few errors. I've added a section on javelins, Cheetah's army suggestions and clarified a few points in the Catholic section where I wasn't clear enough. The guide now has pictures (if you didn't notice you must have scrolled past pretty quickly), savour the Technicolor special effects Are they clear enough? Can you clearly tell what soldier belongs to what family (ie can you tell which are spears, swords bows etc), if not say so and I'll get them labelled. I’ve also added a credits section.

    A beast artillery fires angry animals (well you'd be angry if you got shot out of a catapult ) into the enemy camp to cause mayhem. They are a prototype for the flaming pigs and stompy elephants in Rome; Total War.

    Can anyone tell me why the guide has now gone fat? It's so wide it doesn't all fit on my screen. It's not like that in the post or edit interface
    Frogbeastegg's Guide to Total War: Shogun II. Please note that the guide is not up-to-date for the latest patch.


  26. #26

    Default

    Edited to include pictures and to correct a few errors. I've added a section on javelins, Cheetah's army suggestions and clarified a few points in the Catholic section where I wasn't clear enough. The guide now has pictures (if you didn't notice you must have scrolled past pretty quickly), savour the Technicolor special effects Are they clear enough? Can you clearly tell what soldier belongs to what family (ie can you tell which are spears, swords bows etc), if not say so and I'll get them labelled. I’ve also added a credits section.

    Can anyone tell me why the guide has now gone fat? It's so wide it doesn't all fit on my screen. It's not like that in the post or edit interface The pictures all fit on the screen in one piece with room to spare.
    Frogbeastegg's Guide to Total War: Shogun II. Please note that the guide is not up-to-date for the latest patch.


  27. #27

    Default

    FBE - It's gone wider in my view screen as well. I imagine that it's resized to fit the absolute pixel width of the images you inserted.

    This was in no way my idea... I merely suggested that you put your three great answers to me all in the same place. I am in awe of the enormous amount of work you have done (and the incredibly short time in which you've done it). As this topic grows and you get more ideas of the pictures, etc. that you'd like to add to it, I imagine it's going to get a little cumbersome to carry it on in the present form. I can give you some help with basic HTML if you would like. Nothing extravagant like Clan Berserke, but a simple frame-based setup that might be a little easier for you to manage.
    "You keep using that word. I do not think it means what you think it means."

  28. #28
    Senior Member Senior Member Cheetah's Avatar
    Join Date
    Dec 2001
    Location
    Hungary
    Posts
    2,085

    Default

    Froggy, thank you incorporating my suggestions Do you play MP?

    IMHO the pictures need to be labeled. Although I can guess what is what (especially after reading your text ) but it would be great help.
    Lional of Cornwall
    proud member of the Round Table Knights
    ___________________________________
    Death before dishonour.

    "If you wish to weaken the enemy's sword, move first, fly in and cut!" - Ueshiba Morihei O-Sensei

  29. #29

    Default

    Nope, never done multiplayer in my life The closest I've got is dropping an army of units on a map in Age of Empires 2 and letting the AI take a swing at some units picked by my boyfriend. The AI acts like a complete idiot and my boyfriend is an elephant addict so it doesn't work very well as you might imagine

    All being well the pictures will be more professionally edited and labelled by an expert so that should sort things out. If not I'll try to botch something together.

    I was hoping someone like you would pop up with some mobile army strategies. As you have probably guessed this isn't my style of play so I'm not all that qualified to give advice for it. You've helped me fill a gap or two. Maybe some other players will offer advice I can add.

    Does anyone think the guide needs a short multiplayer section? How many complete newbies play multiplayer anyway? If someone provides some basic (and I mean basic, no long treatises on the evils of choosing too many units or anything like that) advice on choosing armies etc I can incorporate it (with credit of course ) near the end.
    Frogbeastegg's Guide to Total War: Shogun II. Please note that the guide is not up-to-date for the latest patch.


  30. #30
    Senior Member Senior Member MonkeyMan's Avatar
    Join Date
    Sep 2002
    Location
    UK
    Posts
    1,206

    Default

    Good work frogbeastegg

Page 1 of 8 12345 ... LastLast

Bookmarks

Posting Permissions

  • You may not post new threads
  • You may not post replies
  • You may not post attachments
  • You may not edit your posts
  •  
Single Sign On provided by vBSSO