


DIVINUS ARMA'S ILLUSTRATED GUIDE TO BASIC TACTICS
!!WARNING!! These are textbook applications. Use these as foundation of knowledge and modify them liberally and often as necessary.
Introduction:
The purpose of this guide is to present some basic information for beginning or intermediate player seeking a little advice on basic battlefield tactics. While this guide is in no way an ultimate authority, it may help those who need it in some basic warfare. This guide will primarily focus on Roman tactics, first addressing the republican army before advancing into the army of the Empire. To faciliate a beter understanding of this, I will present a little hsitory and include phalanx tactics. An understanding of tactics as it developed historically will aid the warfighter in quick decision making on the battlefield. After all, most plans fall apart in the beginning; the successful general is able to make rapid changes before the enemy does.
This guide is intended to support the hard/hard setting of Rome: Total War or greater without necessarily relying on pause to slow down the action. There have been comments made by members about the kill rate and slowing down game speed as much as possible. I do not seek to argue the choice in this, instead offering some methods I have useful in seamless uninterrupted game-play. It is important to point out that until you MASTER the tactics, use pause. After all, armies of antiquity drilled for a lifetime to get their tactics right. So why shouldn't we spend a little time drilling ourselves?
Historical Reference Note:
I encourage all those who have an affinity for this time period to do there own research on the topic at hand. There is a wealth of information available, and that information will in fact make you a better gamer. Much the information in this guide will be supported by historical fact where available as provided by the works of Lawrence Keppie, Professor of Roman History and Archaeology at the University of Glasgow. Most references will be made to “The Making of the Roman Army: From Republic to Empire” (Keppie, 1998). Enough! On to the good stuff…
********************PART I********************
THE PHALANX ARMY OF THE OLD REPUBLIC
The Creative Assembly was absolutely correct in their creation of the Republican army. The failure is in the lack of immediate access to all unit types. The Sixth King of Rome, Servius Tullius, (580-530 b.c.) is credited with the initial formation of the Republican Army organization as we are familiar with it today. The ‘Servian Constitution’ broke the populace into centuries for voting purposes as well as to establish classes for military service. The highest class comprised the Equites, followed by five classes of non-equestrian class, and a bottom class, the capite censi, who without property were exempt from military service. It should be noted that during this time, military service was seen as a duty, responsibility, and privilege. It was actually during this time that the Roman Army embraced Greek hoplite style tactics, which the Romans claim were borrowed from the Etruscans with whom they shared the peninsula. In 390, the Gaullish invasion, and loose fighting order began to show up weaknesses in the hoplite style fighting used by Rome. It was Livy who wrote of some of the first recorded introduction of the Hastati, Principes, and Triarii in his account of the year 340 in the later stages of war against the Samnites.
I think it is important to note that during this time period of the introduction of the HPT (Hastati, Principes, Triarii) style army, Rome favored using equally sized contingents of Socii (allies) to compliment their forces. These forces gradually assumed the Roman style of fighting until they were virtually indistinguishable and became completely absorbed. More on that later. Anyhow, the creation of the HPT republican army signaled the close of the roman hoplite era and hailed the emergence of maniple tactics.
Before I continue, I will give a brief description of phalanx warfare. Those players who favor Greek factions may like to take note. Either way, it is important to understand from all perspectives, since phalanx warfare is a major component of this game.
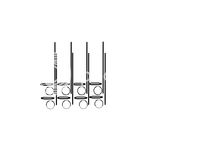
Figure 1 details the concept of a basic phalanx unit:
FIGURE 1
As you can see from the illustration, the phalanx is made up of plates and seams. The phalanx was dominant throughout ancient Greece, the Peloponnesian War, the expulsion of Persia, and before. In the beginning of phalanx warfare, there were no horses. The phalanx armies fought each other face to face. As you already know, the phalanx, comprised of overlapping shield and tightly packed men created a strength on one side and weakness on the other. Figure 2 illustrates this:
FIGURE 2
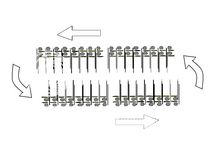
Now, as is known, the ancient Greeks simply hammered at each other in these formations until one called it a day or was destroyed. During the fight, the two formations would rotate in battle, as the men on the left tried to shift right and under the protection of his neighbor. This was made worse by the fact that the lead troops on the right were always trying to destroy the enemy’s left, as shown in Figure 3:
FIGURE 3
As you can imagine, the importance of maintaining unity and reducing vulnerable seams was made more important with the size of the army. While I cannot recall the specific battle, it was during the Peloponnesian War that one army was split in half and destroyed by the enemy. It is easy to see how. The strength of the phalanx is also its weakness.
Long after the war, when Macedon would make its play to power, the Sarissa and Echelon formation were introduced. The Sarissa gave the using army a distinct advantage in the number of spear brought to bear against the enemy. The echelon, illustrated in Figure 4, allowed for an aggressor to secure a distinct advantage. The echelon exploits the weakness of a “static defense”.
FIGURE 4
Because the defense is usually in a tactically advantageous position either on high ground or locked on side to a natural barrier, they are static. The echelon exploited this by turning the weak-side away, thinning the ranks there slightly and using those men for depth on the right flank. Thus, when battle was engaged, the attacking army secured the initiative and exploited critical vulnerabilities.
Now, enter cavalry during the time of the phalanx. You can imagine how devastating a cavalry charge to one side would be! This is where Alexander excelled. Some have called it the “hammer and anvil” or “hold and strike”, either way the concept is the same: Hold the army with your phalanx and strike with the cavalry. There are two way that I will cover this for this portion of the manual: #1: The flanking strike with a frontal engagement (F.S.F.E.) and #2: The Echelon with the Gap exploitation (E.G.E).
Figure 5 illustrates the basic F.S.F.E.:
FIGURE 5
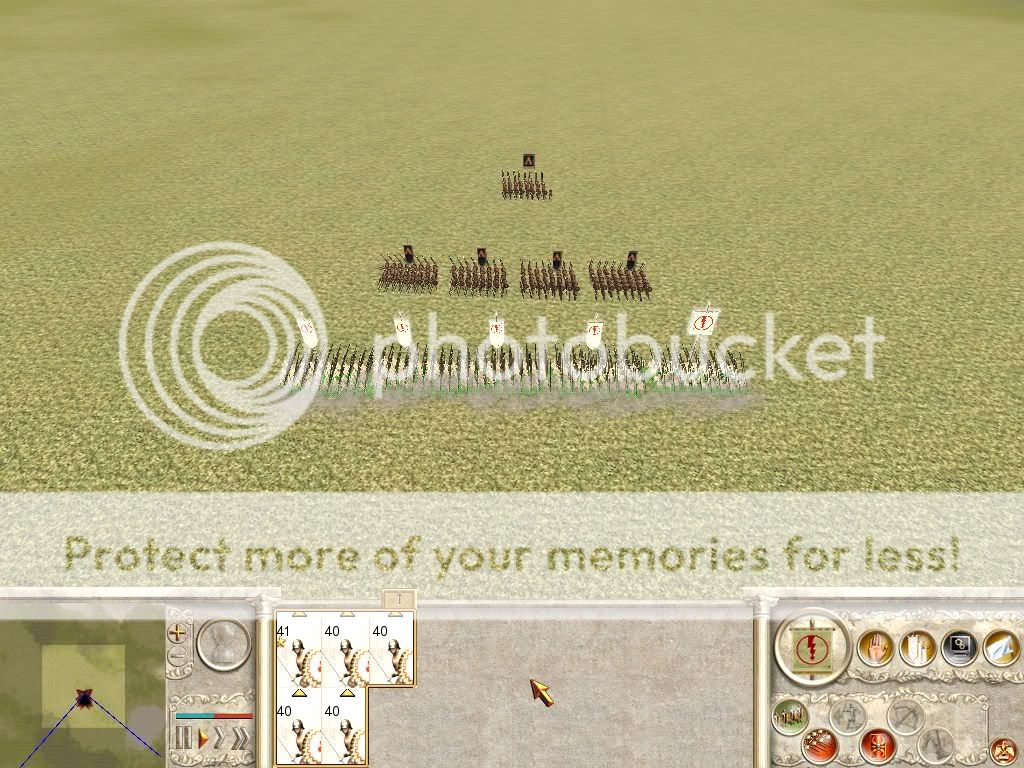
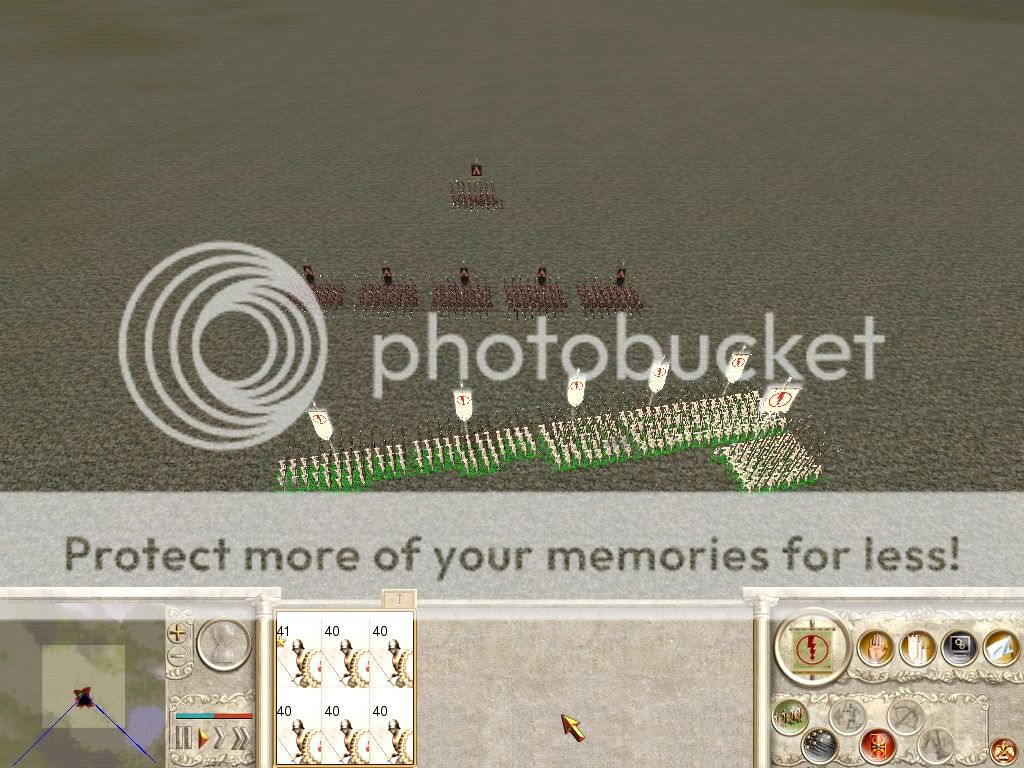
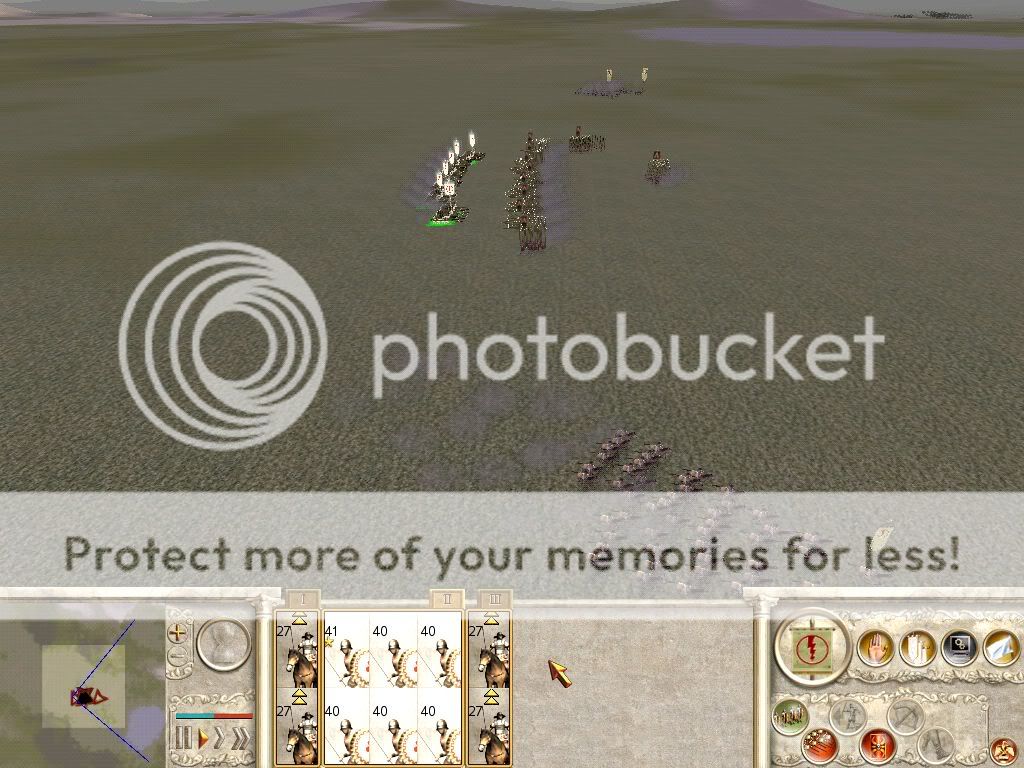
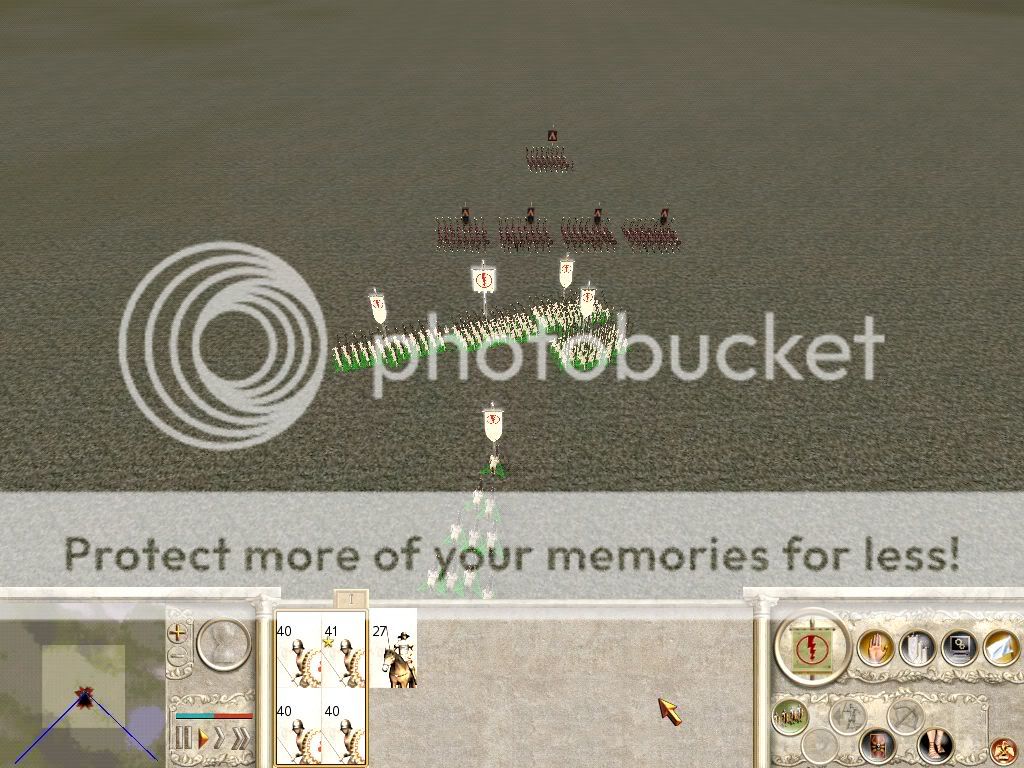
Screenshots:
One Historian whom I read on Alexander called the lines of Cavalry “Dragon’s Teeth”. They were a line of cavalry units each placed in wedge formation. This provided maximum penetration over a wide area, as opposed to standard formation, which would not have been as disruptive. I have used it in commanding Greeks factions and found it effective.
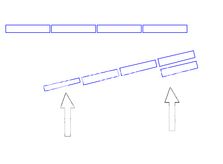
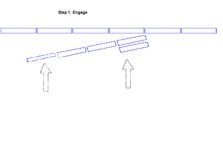
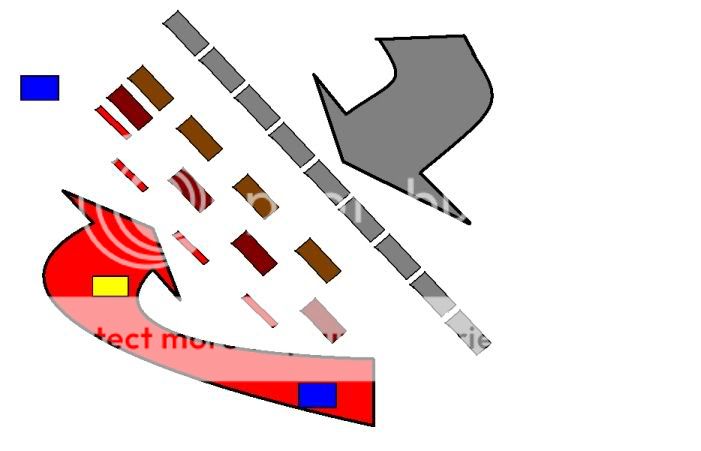
Figure 6-8 details the E.G.E., Echelon with gap exploitation. I believe Alexander used this against Darius in Persia, although I am not entirely sure. One thing is certain, this tactic is best used against much larger armies where flankning would be difficult or impossible.
FIGURE 6
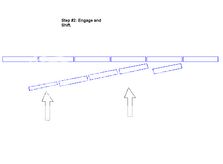
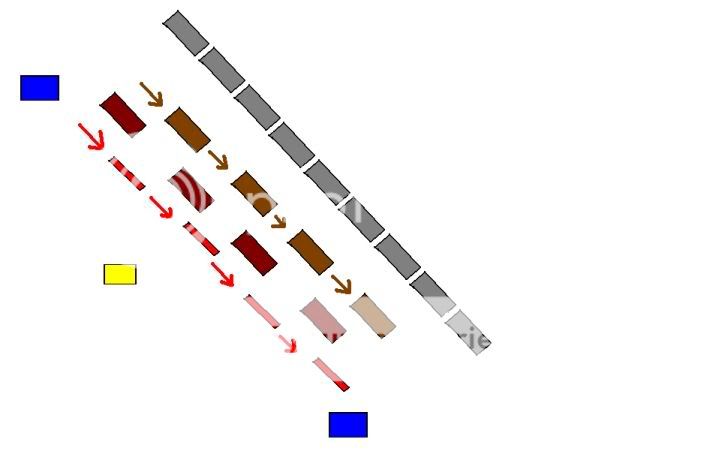
As figure 6 details, you must first engage at echelon. I recommend engaging at the point where the enemy General is. The goal is to take him out and route the enemy, not destroy the enemy by attrition. Figure 7 shows one option for creating the gap in you r enemy’s line. I am sure I will get some flack for this one. It is just one option of many; the key is to break your enemy’s unity by separating to plates to expose a seam. You must be Johnny on the spot to get it right. Practice will help. Use pause during practice until you have this down.
FIGURE 7
FIGURE 8
This leaves the enemy with a HUGE dilemma: Turn and protect the rear, or continue fighting the enemy in front? Either way they are screwed because you are going to kill the general and then decimate their routing army.
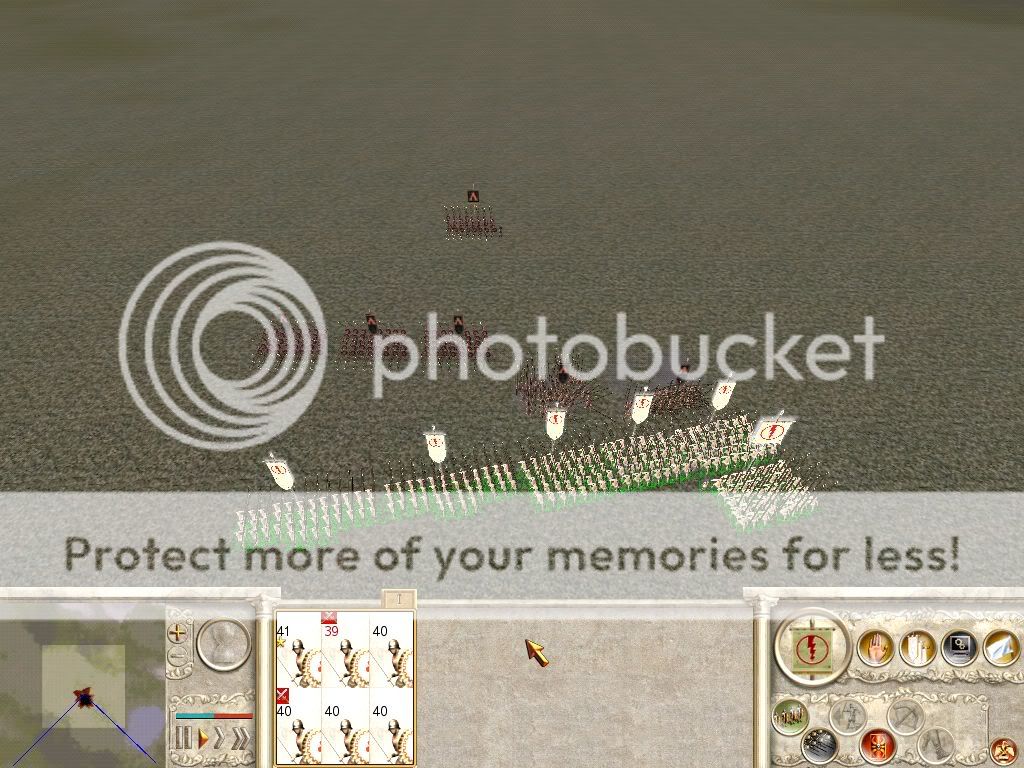
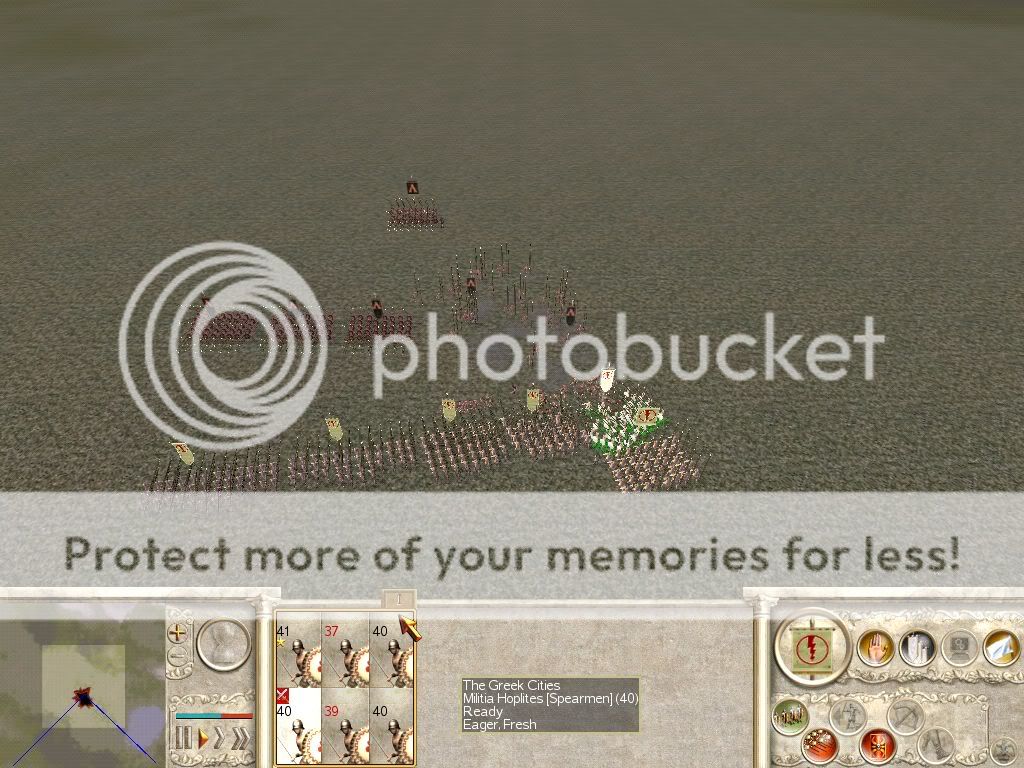
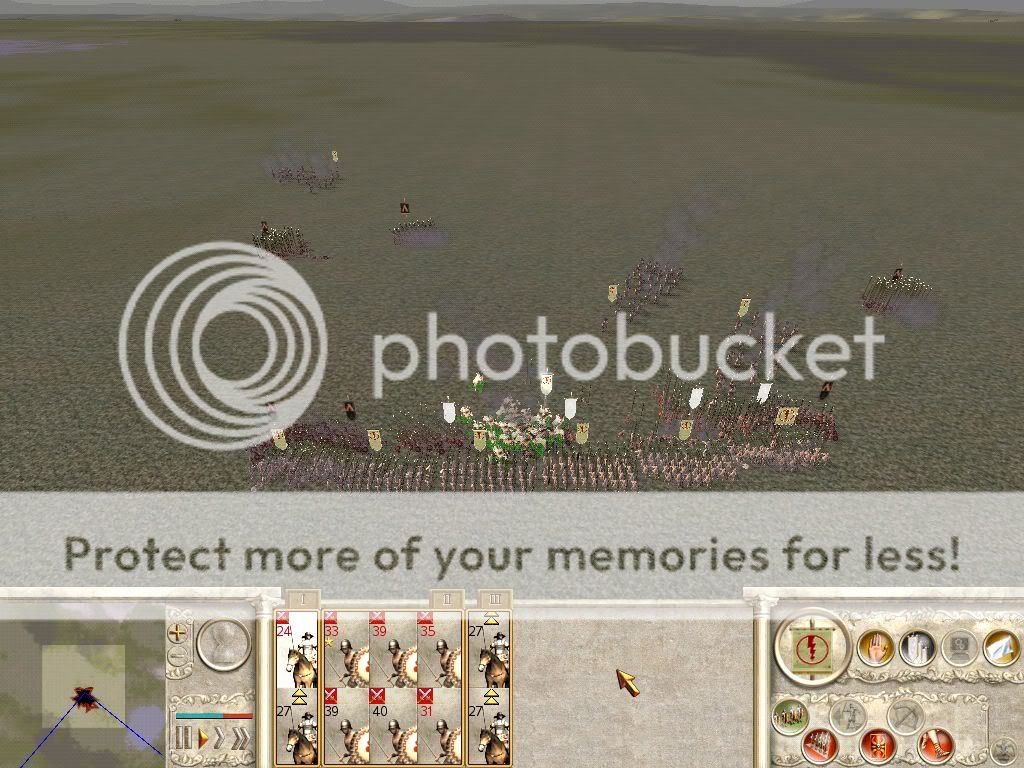
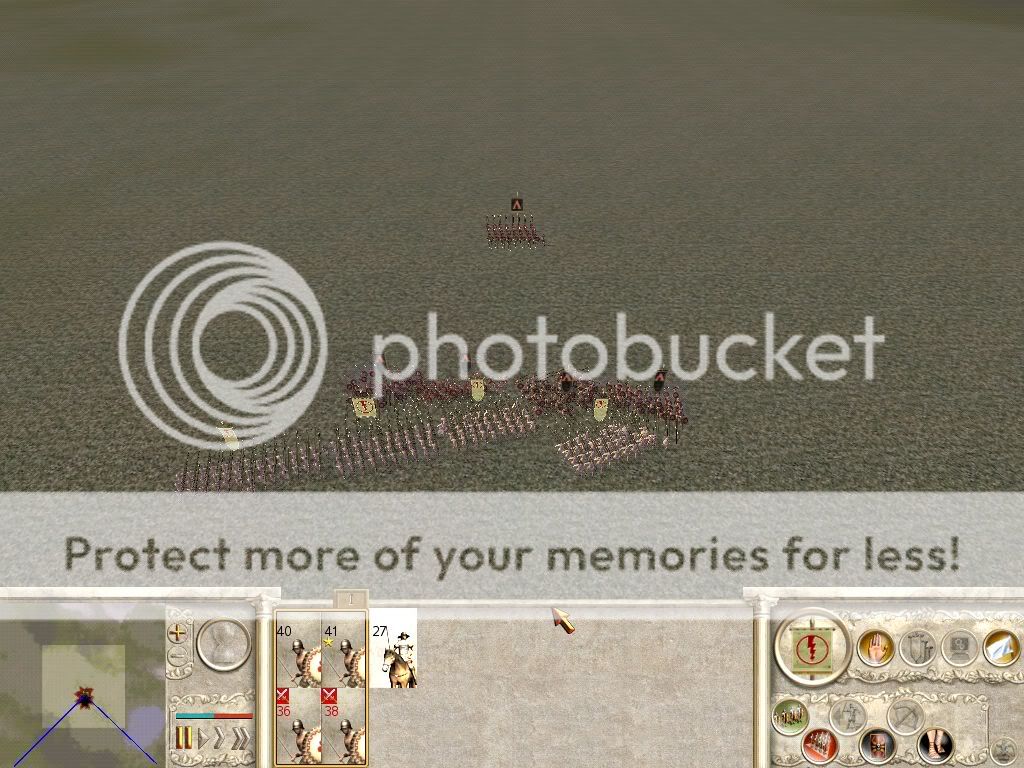
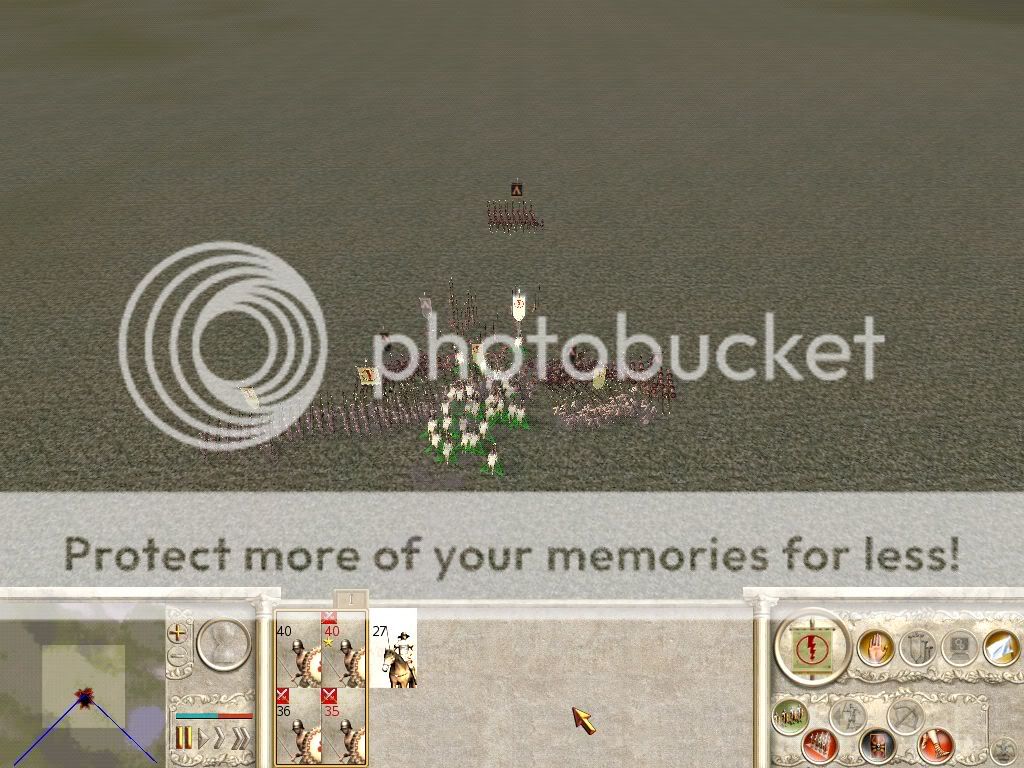
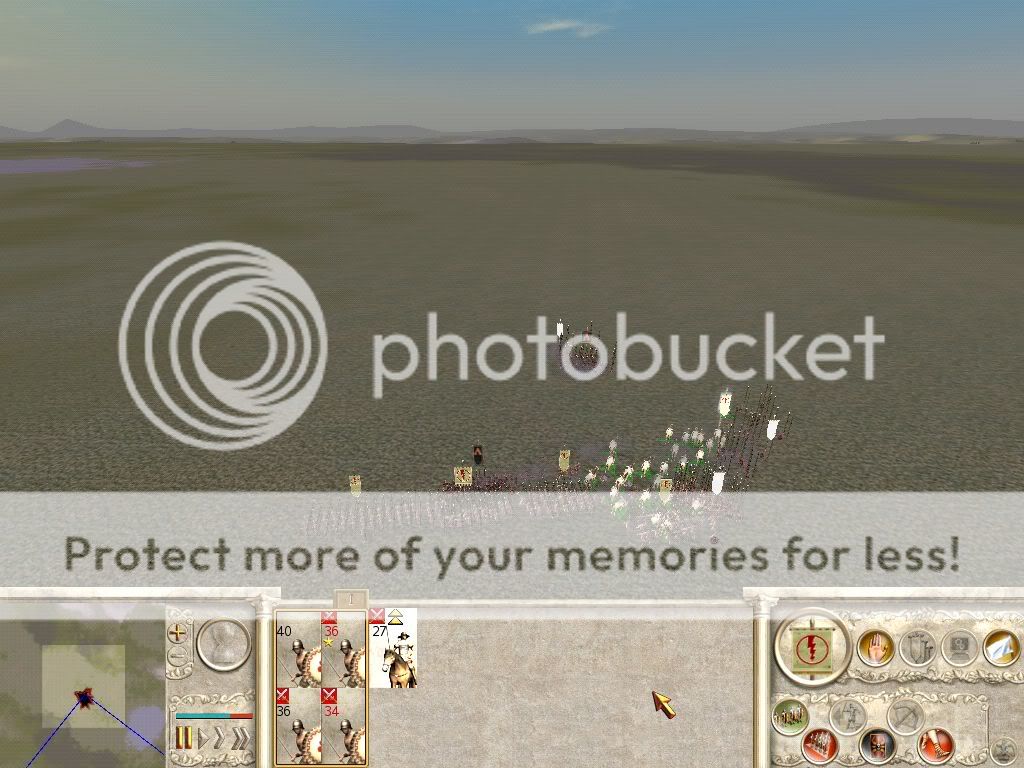
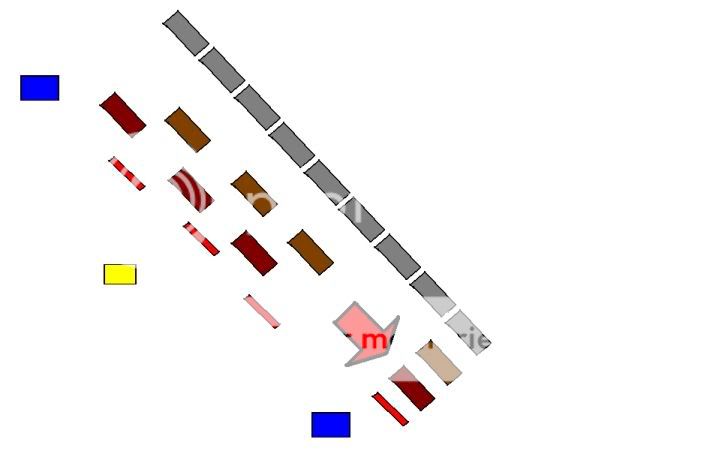
Screenshots:
LOOK AT THE OPENING IN THE LINES IN THE SCREENIE BELOW! THAT IS AN EXPOSED SEAM BETWEEN TWO PLATES:
CHARGE!
While each of these tactics is useful, the successful general will know when to make a change and when to stay put. You must be able to rapidly adapt. The tactics as illustrated and demonstrated in this guide are textbook. It usually won't go this well.
********************PART II********************
TACTICS UNDER THE SERVIAN CONSTITUTION
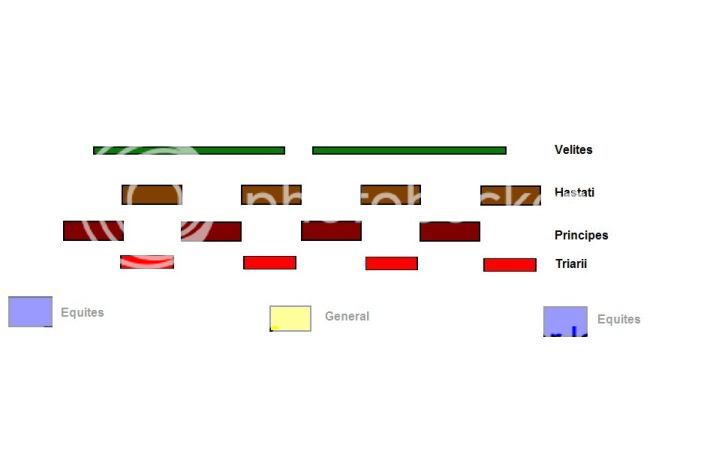
Prior to the reforms ascribed to Marius, the army of the Roman Republic was comprised of the “ala sociorum, equivalent in size to a legion of Romans” (Keppie, 1998, p.22). The ala sociorum was comprised itself of cohort-contingents, and these each of maniples of hastati, principes, and triarii. Thus, the cohort was a small version of the ala sociorum as a whole.
The early Republic legion, or ala sociorum, was comprised of 4200 men. This was divided as follows: 10 maniples of Hastati (each maniple of 120 men), 10 maniples of Principes (each maniple of 120 men), 10 maniples of Triarii (each maniple of 60 men), 10 maniples of Velites (each maniple of 120 men, though these maniples were largely organized together as a screen before the main advance), and 10 turmae (30 men) of Equites also referred to as Extraordinarii.
So now that we have the historical background, let us delve into the game application and put use to the histories that Polybius has provided us. As it applies to RTW, we have equal maniples of each troop type, with 5 troop types total. Limited to only twenty units within our RTW army, we must make some exceptions. This is completely open for your personal adaptation to serve the tactics I will outline ahead. At the very minimum, if you seek to be historically accurate, I recommend losing one unit of Velites to be replaced by your general. I prefer a minimum of velites and a minimum of equites, adding the extra units to my inantry. The choice is yours of course.
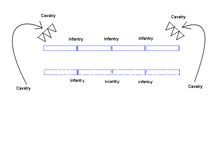
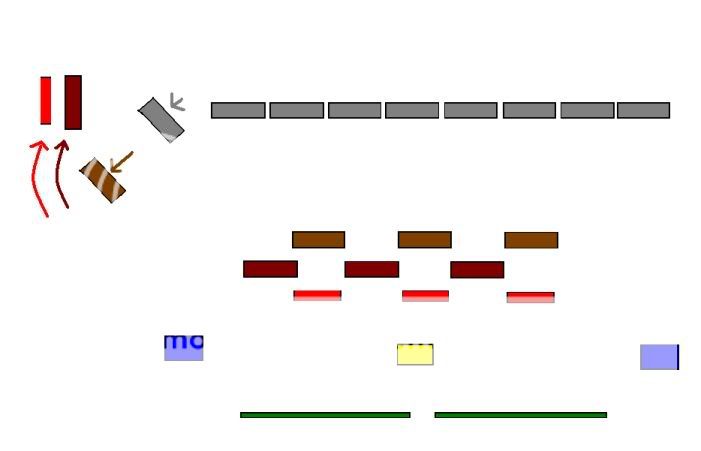
As the armies approached, the Roman lines were formed in what has been referred to as the quincunx, lines of maniples with gaps of equal length in between them. The equites are not spoken of much, though these were probably used most to chase down routing enemies or to protect the flanks. Figure 9 provides the historically accurate tactical base configuration as applicable in RTW.
Figure 9: The Servian Foundation
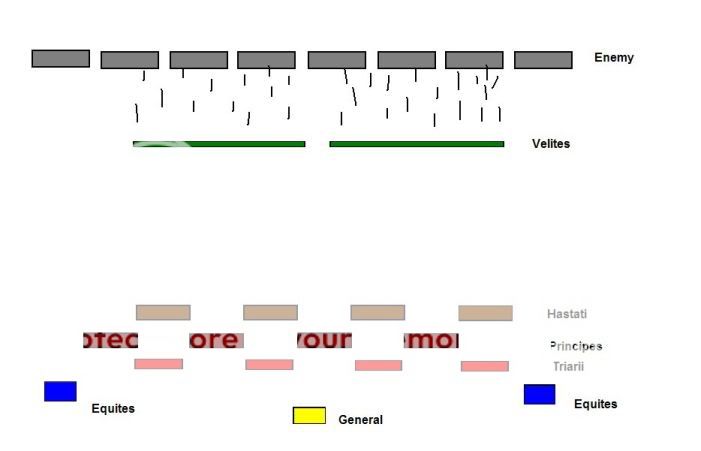
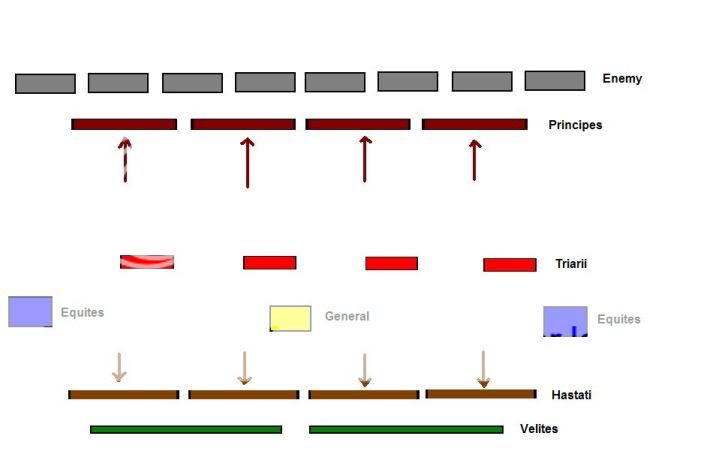
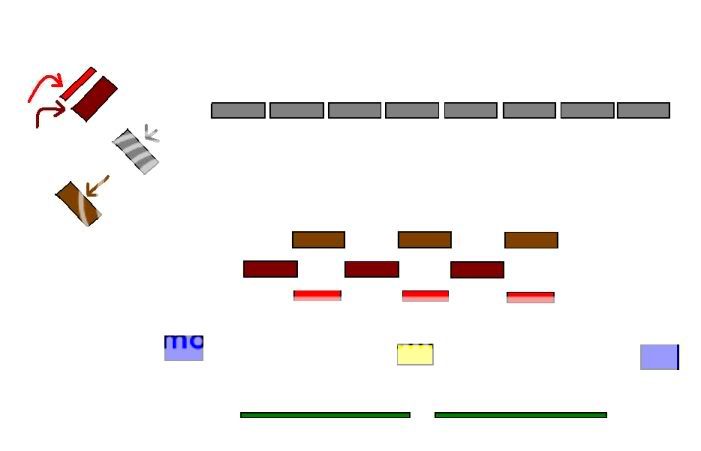
It is debatable whether or not the lines engaged with these gaps, since they would create a critical vulnerability for the Republic army, simply because of the obvious ease for the enemy to flank from within the line. More likely, and this is the commonly held belief, the lines of engaging troops would extend upon engagement, filling the gaps. First the Velites would engage the enemy, ahead of the main force, as Figure 10 illustrates:
Figure 10: The Velite Screen
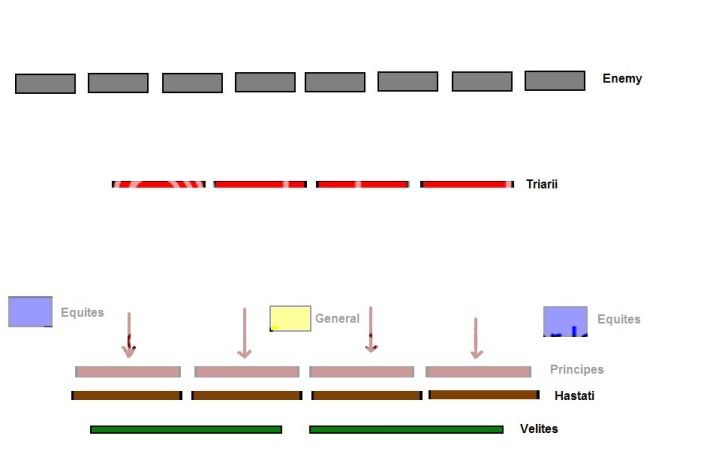
Following this engagement, the Velites would retreat behind the legion through the gaps in the lines, and the Hastati would extend their lines to meet the enemy. Figure 11 shows this:
Figure 11: Retreating Velites and Closing Hastati
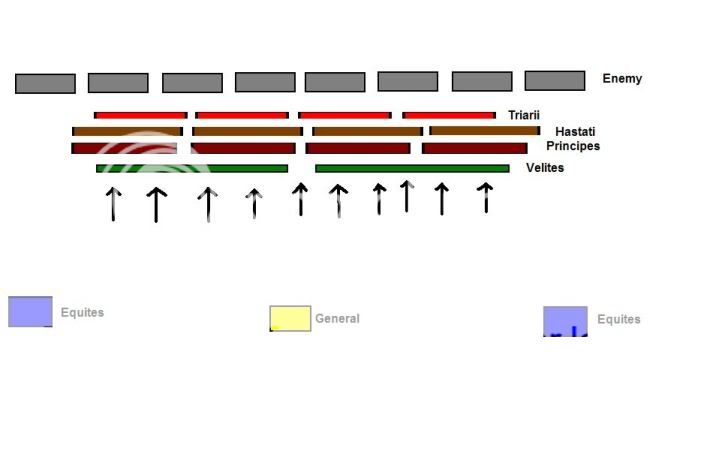
The process would be repeated again between the hastati and principes. It is important to note that historically, the hastati did not route first or fight until destroyed, they simply retreated when worn out enough. This is important in RTW, because if you intend to use the same tactics, you should allow your hastati to retreat long before they reach 50% casualties. You will find that this happens pretty darn quick. As Figure 12 shows, the hastati would retreat between the open ranks of principes and triarii before the principes would extend to cover their gaps.
Figure 12: Retreating Hastati and Closing Principes
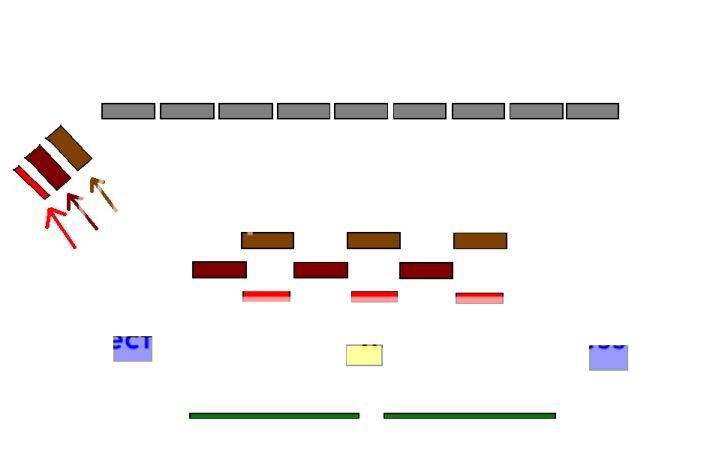
If the principes were unable to finish the job, they too would retreat between the open gaps. The triarii, who fought in closed ranks as in a phalanx with the hasta spear would represent the final push, and be supported by the remaining hastate, principes, and velites. This process is detailed in figures 13 and 14.
Figure 13: Retreating Principes and Closing Triarii
Figure 14: The Final Push Together
**HISTORICALLY RETARDED!**Since RTW is not a historically perfect game, I recommend staying away from the quincunx. After all, the gaps are unnecessary, so why make it harder on yourself? Just fill the gaps ahead of time and have your maniples in line already. Further, I have found that retreating causes a route, so the concept is somewhat ineffective unless you retreat your hastati almost immediately. Instead, send your principes in to back up your hastati shortly after the hastati engage. Better yet, screw the hastati. Use two lines of principes instead. Whatever. It's not like you have to deal with the class society of ancient rome with different levels of property ownership. Just build the freakin' principes instead of the hastati. But like I said: whatever.
Moving on:
280 saw the year that manipular tactics would be tested against phalanx tactics, when Roman expansion in southern Italy brought the Republic into conflict against Pyrrhus of Epirus, from Greek origin. It is critical to note that phalanx tactics at this time were at their peak, benefiting from the trials and successes of Alexander’s success in Persia. According to Keppie, “Pyrrhus had fought in the wars of Alexander’s successors and was familiar with the latest refinements of military thinking” (p.23). Thus it could be said that the first engagements between the Republic and Pyrrhus represent the passing of the torch from Hellenistic domination to budding Roman domination. At first, Pyrrhus saw success, with a route of the Roman army. Early into the campaign, however, the costs of success proved too great, and Pyrrhus was subsequently forced to withdraw from Italy. This opened the door to the wars with Carthage.
What development in tactics could be so great as to prove superior to the phalanx at the peak of its development? What army could directly face down ranks upon ranks of sarissa pressing forward with absolute purpose and deadly weight? None… so long as the phalanx maintains its formation and fights upon its preferred ground. Thus, it is the disruption of the phalanx that enabled the Romans to conquer.
The Romans did not charge directly upon the phalanx army with a force of equal size; they instead divided their own army, with a contingent to fight, and a contingent in reserve, using their cohort and maniple in such a way as to create a dilemma for the phalanx. This dilemma subsequently caused the critical disruption of the phalanx formation.
As Polybius (Trans. Shuchburgh, 1889, p.226-230) wrote in the Second Century BC: “Now, whether the phalanx in its charge drives its opponents from their ground, or is itself driven back, in either case its peculiar order is dislocated; for whether in following the retiring, or flying from the advancing enemy, they quit the rest of their forces: and when this takes place, the enemy's reserves can occupy the space thus left, and the ground which the phalanx had just before been holding, and so no longer charge them face to face, but fall upon them on their flank and rear.”
For us in RTW, the first thing we must do is establish and send out this cohort to engage, while leaving our reserve. Tis is illustrated in figure 15:
Figure 15: The Initial Cohort against the Phalanx
From here, we push our cohort to an angle as illustrated in Figure 16:
Figure 16: Angle the Cohort.
This creates the dillema for our phalanx opponent. Shall he divide his army to meet the threat, or will he turn the entire army? The first choice is detailed in Figure 17. If he does so, move your principes and triarii further to the flank.
Figure 17: The Enemy Breaks Formation
Now, as the enemy drives forward against the hastati, retreat your hastati and draw the phalanx out as detailed in figure 18. Engage with principes and triarii to the flank. If he goes for the principes and triarii, engage with the hastati. Either way, that unit of phalanx is screwed.
Figure 18: The Bait is taken
Now, the other option is if the enemy tries to negate the flanking threat by moving the entire force. If he does so, you must move your entire force as well, retreating to the original line. This is detailed in Figures 19-21.
Figure 19: Ready to engage the flank.
Figure 20: The Enemy moves in response, the Republic retreats to original position in a new location
Figure 21: Shift your units and find your battle line again
Now you are essentially in the same position as you were before. Do it again from the opposite flank. Rinse and repeat.
Figure 22: Shifting to engage from the opposite flank.
**HISTORICALLY RETARDED!** Using this tactic with a Hastati, Principe, and Triarii cohort against a large army of Phalanx Pikeman or better is stupid! You will get your butt kicked! Sure Rome did it against the best of post-Alexander military tactics, but so what... the game is screwed up on this one. How the hell does a phalanx turn around in less than a second? Answer: It doesn't unless it is historically retarded! That said, you must match equivalent troops against equivalent troops. This is an effective tactic when you employ Republic infantry against Levy Pikeman, Militia Hoplites, and Hoplites. If you plan to stand against large forces of Spartans, Phalanx pikeman, Royal Pikeman, or Silver Shield; you absolutley must use a post-marius equivalent. Period. And you will still die if you go face to face no matter what. Phalanx are just good for that kinda thing.
COMING NEXT: Screenshots, resizing of current pics, and a modification of the listed tactics to further compensate for the historically retarded.
ALSO: Part III- Tactics of the Post-Marius Republic, followed by Part IV- ?wait and see.
References:
Keppie, L. (1998). The Making of the Roman Army: From Republic to Empire. Oklahoma Press: London, England
Polybius, The Histories of Polybius, 2 Vols., trans. Evelyn S. Shuckburgh (London: Macmillan, 1889), pp. 226-230.
Updated on 13 April, 2005:
Added Screenshots.
Made text changes.
Last Updated on 18 April, 2005
Added most of Part II


 Reply With Quote


Bookmarks