Results 1 to 30 of 34

Thread: Interactive History: Arnhem, September 1944

Hybrid View

Previous Post Previous Post   Next Post Next Post
  1. #1
    Guest Stig's Avatar
    Join Date
    Sep 2006
    Location
    At the bar
    Posts
    4,215

    Default Re: Interactive History: Arnhem, September 1944

    The fighting is getting more intense by the minute. You’ve send one of your staff officers into Arnhem in the hope he will bring good information on the situation there. What’s more important is that he needs to find Lathbury, most likely the brigadier is with either the 1st or the 2nd Battalion, but you haven’t heard from him yet.
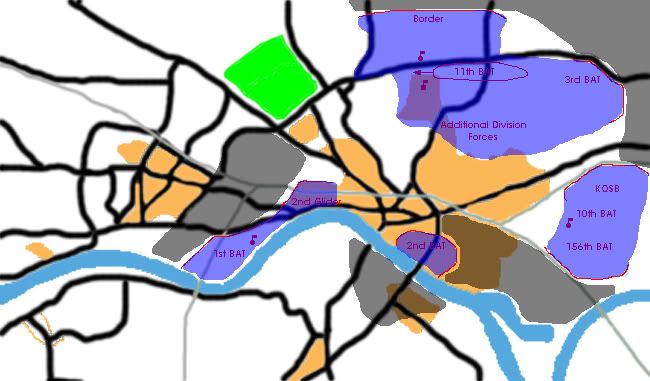
    The 3rd Battalion is moving all over the place, originally headed for Den Brink they are now at the complete opposite of Arnhem helping the KOSB taking the landing zone for the 4th Brigade, which should come in sight any minute now. It’s 15:43 and the drop is scheduled for 16:02.
    More importantly the LZ ‘S’ is still in your hands. The Border Regiment managed to fight of a second wave of German troops and has formed a strong defensive line on the north end of the landing zones. With the South Staffordshire’s arriving this afternoon too, you should be able to close of Arnhem from the Germans.

    You’re waiting impatiently on your staff officer to return. He left 2 hours ago, which means he could be back any minute. The bridge might be 20 minutes away, 30 max, if you need to take a detour. In those 2 hours little has happened.
    Most likely DZ ‘Y’ is in British hands now, but little is known from that area. Only the information a messenger from the KOSB told you, that there was heavy fighting, but that the Germans, after losing their tanks retreated.
    The second wave coming down the Apeldoorn road managed to break through the left flank of the defensive line the Border Regiment formed, but thanks to precision fire by the howitzers of the Airborne Artillery Regiment they were fought back. In the heavy fighting however, two 17-ponders and one 6-ponder were destroyed, but using gammon bombs and piats the Borders were able to destroy most of the tanks. The Germans now have started attacking your defensive positions with mortar attacks, and snipers have taken up positions in the trees. Though doing little damage, they make sure that it’s almost impossible to move in that area.

    In the far distance you can here the first planes coming. In no more then 2 minutes they come insight. Fighters first, but after a couple of minutes the first gliders are coming in for the landing of additional supplies on LZ ‘Z’, to the east the 4th Brigade is beginning to jump over DZ ‘Y’ and the South Staffordshire’s should arrive any minute now. It looks like the Germans expected this second drop and far more planes are getting shot down then in the first drop. Mainly the supply planes for LZ ‘Z’ are taking heavy damage, but for now it’s hard to tell what’s getting damaged, even though their aircrafts are on fire pilots want to do everything to deliver their cargo.
    “Sir, sir!”
    “Yes, what is it Harold?”
    “Captain Winterbourne returned from Arnhem, he’s already started making a map in the barnhouse.”
    “Thank you Harold, ask Brigadier Hicks and Colonel Mackenzie to join us.”

    What Captain Winterbourne has to tell you isn’t all good news. The 2nd Battalion doesn’t have the entire bridge. They managed to reach the south end, but were driven off it minutes later, when the Germans counterattacked.
    What’s more important however is that the 1st Battalion has lost many men trying to break through to the railway bridge. Armoured cars, nebelwerfer and mortars caused loads of casualties and Dobie therefore decided to retreat into Arnhem and they are now defending a couple of buildings at the east of the St. Elizabeth’s Hospital. Since they now have been reinforced by the 1st Company of Glider Pilots Dobie is planning a new attempt to breakthrough.
    What’s worse however is that Brigadier Lathbury has been wounded during battle and in hospital. Since the brigade has no-one in command now, it is even harder to coordinate it’s movement. It’s completely scattered all over the place, and it might be good to reunite it as soon as possible.
    Good news however is that the road to the bridge is still open, atleast when Winterbourne used it. The Recce Squad and the 2nd Company of Glider Pilots were in heavy fighting with what looked like a company of Panzergrenadiers. Most likely they won, as on the way back the road was still open, and there was no fighting to be seen or heard.

    Even more distressing news came from LZ ‘S’. The South Staffordshire’s didn’t arrive. Most likely the lack of undamaged aircraft was beginning too pay. The more American divisions in the south are more important in the beginning of battle, so when any aircraft for them would be damaged, that would mean less aircraft for Arnhem. This causes a big problem. The South Staffordshire’s would have been send to take the Supply Drop zone, but since they have not arrived they cannot be send in that area. This means another unit has to be taken from it’s own destination and be redirected to the Supply Zone.


    So:

    1. 1st Para Brigade, who will take command
    A. Lt. Colonel Dobie, commander of the 1st Battalion and most senior commander in the Brigade
    B. Lt. Colonel Frost, commander of the 2nd Battalion, and seen as the best commander in the entire division
    C. Lt. Colonel Fitch, commander of the 3rd Battalion, though in age the oldest of the Brigade’s colonels, he has only been battalion commander for 4 months. He however is one of most initiative commanders.

    2. LZ ‘S’
    A. Send in the 3rd Battalion anyway, even though already tired down you need to take it. Plus when it will get there it will be able to link up with the 1st Battalion.
    B. Send in the KOSB, it’s less tired down through fighting and it gives it a change to swap the objectives for the second day with the South Staffordshires.
    C. Send in the 11th Battalion of the 4th Brigade, they are still fresh. The KOSB will then come under the command of 4th Brigade and the 11th Battalion will take it’s place in the 1st Airlanding Brigade.
    D. Send in the 2nd Company of Glider Pilots, they are worse fighters, but they only need to defend that zone until the South Staffordshire’s come tomorrow afternoon.

  2. #2

    Default Re: Interactive History: Arnhem, September 1944

    1. 1st Para Brigade, who will take command

    B. Lt. Colonel Frost, commander of the 2nd Battalion, and seen as the best commander in the entire division

    2. LZ ‘S’

    C. Send in the 11th Battalion of the 4th Brigade, they are still fresh. The KOSB will then come under the command of 4th Brigade and the 11th Battalion will take it’s place in the 1st Airlanding Brigade.
    Friendship, Fun & Honour!

    "The Prussian army always attacks."
    -Frederick the Great

  3. #3
    Senior Member Senior Member Yeti Sports 1.5 Champion, Snowboard Slalom Champion, Monkey Jump Champion, Mosquito Kill Champion Csargo's Avatar
    Join Date
    May 2005
    Location
    Vote:Sasaki
    Posts
    13,331

    Default Re: Interactive History: Arnhem, September 1944

    1.

    a

    2.

    c
    Quote Originally Posted by Sooh View Post
    I wonder if I can make Csargo cry harder by doing everyone but his ISO.

  4. #4
    Magister Vitae Senior Member Kraxis's Avatar
    Join Date
    Feb 2002
    Location
    Frederiksberg, Denmark
    Posts
    7,129

    Default Re: Interactive History: Arnhem, September 1944

    1:
    Tough one, I would like to send Frost, however what I know about the man doesn't fit the scenario. He tried to gain the bridge once, then he stopped all movement and put up a strong defensive position. Good choice if the bridge had been in his hands.
    Also, sending him might cause some stir in the command. So I have to go with the more senior commander.
    A

    2:
    Less obvious choice, but one thing is certain 3rd is not to be sent. They shuold be pretty tired, and they have been involved in fighting. They should simply stay put.
    The pilots are too few and too weak to be of any use other than as a reserve.
    The KOSB are holding a vital position as it is, to send them might be good initially, but could cost us a lot of ground later. It is little gain for a large risk.
    That leaves us the until now unknown 11th. They seem to be in good shape, so they should be ready for a fight, which might just happen. The bad side is that they can be needed elsewhere, while guarding a place that isn't attacked. However, that is what we must risk. Without the LZ, we will lose.
    C
    You may not care about war, but war cares about you!


  5. #5
    Guest Stig's Avatar
    Join Date
    Sep 2006
    Location
    At the bar
    Posts
    4,215

    Default Re: Interactive History: Arnhem, September 1944

    sorry that the update is taking so long, but I'm quite busy atm. I'm trying to make a overview map for the new chapter, and need to calculate some losses (I use Close Combat 2 for that)

  6. #6
    Guest Stig's Avatar
    Join Date
    Sep 2006
    Location
    At the bar
    Posts
    4,215

    Default Re: Interactive History: Arnhem, September 1944

    Finally have been able to do another update, sorry guys

    You look at the your watch, 20:47 PM. It has been one hell of a day, literally, and it weren’t just the Germans who caused that hell. The fighting would be normal for a normal day in the war, but all the other things that seem to come with them are causing problems. Radio problems, the division being all over Arnhem, more Germans then estimated and those were just the little problems. The 2nd Battalion of South Staffordshire’s didn’t arrive at all, which meant that the 11th Battalion needed to be taken from Hacket’s Brigade. Hacket, being easily-flammable, replied immediately. His Brigade was like of band of brothers, build stone by stone, ready to work together at any time. It was his pride, he lived for it, and he wouldn’t want to see it go. Knowing Hacket you could prepare for this, of course giving him the KOSB didn’t fully satisfy him, but he at least kept quiet. He agreed to the fact that the KOSB should be held in reserve for the time being, they were exhausted. They had been in heavy fighting from early in the morning till now. They have had the toughest opposition of all the battalions and they also had the most losses. They were out of ammo and supplies till the 4th Brigade was dropped, this could re-supply them, but what was meant for only 3 Battalions now needed to be given to 5, as the 3rd Battalion was also stationed nearby. Speaking of the 3rd Battalion, they were exhausted too. Not due to fighting, as they only did light fighting, but they had been moved all over the operation theatre today. Their first task was to secure Den Brink, but they were called back to aid the Border Regiment and even after that they were send to aid the KOSB. Doing this they had to move under heavy mortar fire, due to this they were unable to connect to the KOSB in time to help in the fighting, but still they had many casualties.
    How it was with the two Battalions in Arnhem was unknown again. It was hard to contact them by radio, and you haven’t been able to speak to either Dobie or Frost, a messenger has been send to inform Dobie that we is now in command of the Brigade, but this messenger did not return yet. The resistance was trying to do what it could, but it was hard to contact the fighting-zones, most telephones didn’t work, and those that did work could be intercepted by the Germans. Only the special telephone line was safe to use, but the phones connected to them weren’t located in the fighting-zone.

    “Sir, we got the casualty-reports of the first day!”
    “Yes, show them to me Brown.”
    “Well sir, both the KOSB and the 3rd Battalion had most losses, KOSB lost 107 of its 765 men. The 3rd Battalion lost 89 out of 588. The Border Regiment has had less losses 65 of their 788 men are now either dead, wounded or missing.”
    “Do you have any news about the battalions in Arnhem?”
    “Well we know that the 1st Battalion has had heavy losses trying to make for the railway bridge, we don’t exactly know how many, but we estimate about 100-150 men.”
    “And Frost?”
    “We don’t know, the last time we heard about the units at the bridge was when a Dutch resistance fighter informed us of the fact that Frosts second attempt to take the bridge failed. The resistance fighter said that he thought about 20 men were lost in that one attempt alone.”
    “Thank you, Brown.”

    These reports made you think, you don’t know if any bridge is taken, and if no bridge is taken the battle with be lost anyway. Tomorrow Sosabowski will land directly south of the bridge, so that means that the bridge needs to be taken in order to let Sosabowski’s men pass and head to Oosterbeek. If the bridge isn’t taken Sosabowski will land in the middle of a German area, which will be full of German troops.
    Also it’s important to get into contact with the 1st Battalion, is the railway bridge taken? And if it’s not would they need extra support, next to the Glider Pilots that are already there.
    Where are the German troops exactly, it will be important to know where there main strength is located and what roads they use. Now you only know the plain overall view which isn’t clear, it’s hard to tell where the Germans are and the division is scattered over Arnhem, it will be important to get it linked up again, but you also still need to secure important high grounds.
    As visible on the map the Germans mainly come from the East, using the bridges over the IJssel to send in troops to Arnhem, with Hacket’s Brigade dropped directly between them you might be able to encircle them and destroy a pretty large force now pushing for the bridge. However doing this you have to leave the high grounds Hacket landed on and you won’t be in a good defensive position anymore. This to will put the KOSB into action again, as they are exhausted and have fighted all day, it might not be good for morale.
    Furthermore it’s important to redirect the 3rd Battalion into Arnhem, they have been on the move all day, and taken casualties even when they weren’t fighting. However they are currently in the front line and have digged themselves in on the higher ground North-East of Arnhem.


    grey: german positions
    purple: your positions
    red lines: front lines
    dots with flags: HQs


    So what will you choose:

    1. The 4th Brigade
    A. Keep them going for their targets as they are now, this means that (when looking at the map) the KOSB will retreat into Arnhem, the 10th Battalion will take over their position and link up with the 3rd Battalion. The 156th Battalion will try to push through to the Rhine set up a line from North to South.
    B. Try to cut of the Germans, this means that the KOSB will stay where they are, still in the front line. The 10th Battalion will try to break through to the IJssel and will try to either take or destroy the railway bridge there. The 156th Battalion will clear the area between the 2nd Battalion at the Bridge and the IJssel.

    2. Goes with question 1.
    A. Let the 4th Brigade operate this night, darkness will come within the next hour.
    B. Let the 4th Brigade begin its operations at sunrise tomorrow morning, U-hour will be 6:34.

    3. The 3rd Battalion
    A. Keep them were they are, the front line needs to stay intact, even though they have been on the move all day, darkness will come soon and the Germans will most likely not attack and regroup as well.
    B. Steadily pull them back to Arnhem, but let them do a defensive retreat, which means that they will pull back for the imaginative line between the Brigade HQs of Hicks (1st Airlanding) and Hacket (4th Brigade).

    4. Goes with question 3.
    A. Let the 3rd Battalion operate this night, darkness will come within the next hour.
    B. Let the 3rd Battalion begin its operations at sunrise tomorrow morning, U-hour will be 6:47.

  7. #7

    Default Re: Interactive History: Arnhem, September 1944

    Thanks for the update Stig. I've been holding off on my reply and decisions in the hopes of someone else doing the deciding for me. But it looks like it ain't happening, so I better get into deciding then.


    1. The 4th Brigade
    A. Keep them going for their targets as they are now, this means that (when looking at the map) the KOSB will retreat into Arnhem, the 10th Battalion will take over their position and link up with the 3rd Battalion. The 156th Battalion will try to push through to the Rhine set up a line from North to South.

    This seems like the safer and better option to me.

    2. Goes with question 1.
    A. Let the 4th Brigade operate this night, darkness will come within the next hour.

    Lets operate at night. Overall the Germans won't expect us to operate at night, because well simply the Allies didn't attack during nights.

    3. The 3rd Battalion

    B. Steadily pull them back to Arnhem, but let them do a defensive retreat, which means that they will pull back for the imaginative line between the Brigade HQs of Hicks (1st Airlanding) and Hacket (4th Brigade).

    4. Goes with question 3.

    A. Let the 3rd Battalion operate this night, darkness will come within the next hour.


    Oh well, I hope my decisions are good.
    Friendship, Fun & Honour!

    "The Prussian army always attacks."
    -Frederick the Great

Bookmarks

Posting Permissions

  • You may not post new threads
  • You may not post replies
  • You may not post attachments
  • You may not edit your posts
  •  
Single Sign On provided by vBSSO