Results 1 to 30 of 34

Thread: Interactive History: Arnhem, September 1944

Hybrid View

Previous Post Previous Post   Next Post Next Post
  1. #1
    Shaidar Haran Senior Member SAM Site Champion Myrddraal's Avatar
    Join Date
    Feb 2004
    Location
    UK
    Posts
    5,752

    Default Re: Interactive History: Arnhem, September 1944

    Can anyone contribute to these? If so, here's my 2 cents.

    I agree with 1A and 3B

    However, the 3rd batallion are exhausted, and parts of the 4th even more so. We have a bit of a dilema here. I think that doing the above would give us a stronger position, especially if the railway bridge is taken or destroyed, but theres a long fight ahead, and so far we've had very few units kept fresh. So I'd say the safest option for the long run is to rest for the night now, and begin operations in morning. I think if we keep going tonight, the men won't be able to stand up long.

    So 2B, 4B

    For your interest http://www.bbc.co.uk/history/worldwa...i_arnhem.shtml
    Last edited by Myrddraal; 12-05-2006 at 12:23.

  2. #2
    Magister Vitae Senior Member Kraxis's Avatar
    Join Date
    Feb 2002
    Location
    Frederiksberg, Denmark
    Posts
    7,129

    Default Re: Interactive History: Arnhem, September 1944

    1B...
    We have a fairly strong German presence in our flank. That is never good, especailly not when they harass the forces trying to take a bridge.
    We have a fairly fresh brigade on their flank. That is always good, especially when it can 'easily' cut the Germans' supplyline. And thst can be crucial since the Germans are likely to have a lot of supplies and ammo with them. They haven't expected this, and aren't prepared to fight with no supplies like our troops are. It is worth the risk in my opinion.

    2A...
    Of course we use the night. As said the Allies didn't use the night much (surprise-effect for the Germans), but we have experienced and elite paras, some of the few Allied troops that have regualrly used the night in combat. Lets use that pool of experience.

    3A...
    Well, if we attack the Germans and try to link up with 3rd Bat, then those troops should stay where they are, or else we run the risk of 4th Brig being turned, or at least being isolated. And we can't have more troops being isolated right now. 3rd Bat is tired, but dug-in infantry is hard to dislodge, and Germans don't like to attack at night against undetermined enemies. If they do it is going to be a cakewalk for the paras. So I expect the 3rd will be able to rest throughout the night in their current positions, while moving them back will leave them tired for the next day.

    4A...
    Since we don't so anything really, I would say that we use the night... In any case it is important that we don't just let 4th Brig hang out there.
    You may not care about war, but war cares about you!


  3. #3
    Guest Stig's Avatar
    Join Date
    Sep 2006
    Location
    At the bar
    Posts
    4,215

    Default Re: Interactive History: Arnhem, September 1944

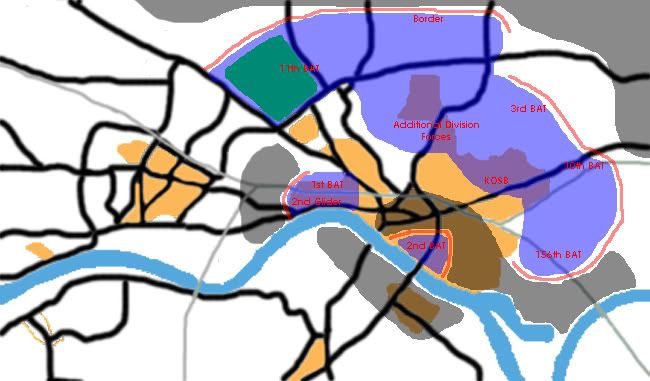
    It’s night and it should be dark, but the German mortars prevent it from becoming dark, in the direct area of your HQ one house is ablaze and this is just the hinterland, this isn’t the front. You already received messages from the Border Regiment and the 11th Battalion that they are under heavy mortar fire. No word has come from Hacket or the 3rd Battalion, as they should be on the move. Hacket is trying to reach his objective with two instead of three battalions, the 156th will have a hard task trying to break through to the Rhine and the 10th will have to hold a large front, though that front will be smaller then originally as the 3rd Battalion will pull about half a mile back into the direction of Arnhem. The KOSB will become the divisional reserve and they might come in use tomorrow, well today already, when the area between the bridge and the front formed by the 156th has to be cleared.
    While all this happening on the Eastern Front things on the Western front are very different. The 11th Battalion still has to take the Supply Zone and it’s uncertain if the railway bridge is already in your hands. Word however has come from the resistance that the railway bridge has been blown and that Dobie has decided to pull the 1st Battalion back into Arnhem since it was unprotected and under heavy mortar and nebelwerfer fire.
    No news has come from Frost, he might already have been cut-off, but it’s hard to lead operations at night. Knowing Frost he might use the night too, to attempt another go at the bridge, if he doesn’t already have it.

    Slowly natural light was coming back, the house that was ablaze has been fully destroyed this night, but apart from that one the direct area of your HQ has been safe. Now it was a good time to look at the maps again and see where everyone was. The messenger you send to Dobie last night has finally returned, but with bad news, the railway bridge has indeed been destroyed. Dobie had withdrawn his men under the cover of dark, though sometimes under heavy fire, into Arnhem again, and he was preparing to make for the bridge so that he would be able to cross it and make for the 1st Brigades objective of securing an area south of the bridges. He also informed you that Dobie wanted to keep the 2nd Company of Glider Pilots for the time being, so that he could use them instead of the 3rd Battalion, the 3rd could then be put into divisional reserve and rest for a couple of hours.
    Word from the 11th Battalion told you that they had been able to take the Supply Zone which was totally clear of Germans, and they had formed a line between the Supply Zone and the Border Regiment. With the coming of the Poles and the South Staffordshire’s this afternoon that line could easily be strengthened and defended.
    The South Staffordshire’s can replace the 3rd Battalion that will become a reserve and the Poles will form a line from the 11th Battalion to the Rhine at Oosterbeek.
    However for now too, there are still some important tasks, currently the 1st Battalion (with the 2nd Glider Pilots) is preparing to move for the bridge, unknown of the situation in the rest of the division they will leave the entire western flank unprotected, they however will help to get Frost out of the encirclement.
    Also it might be wise to put the KOSB into action again, after moving out of the front they have been able to rest for three hours and, though three hours isn’t very long, they have been able to recover a bit from exhaustion. Since the 156th hasn’t been able to break through to the river they might do well in a supporting role by advancing over the 156th western flank. With the Poles coming this afternoon it’s important to secure the bridge. Most likely the Germans have a pretty big concentration of troops at the southern end of the bridge, and it’s important to have them cleared in order to have a safe landing for the Poles.


    1. 1st Battalion
    A. Keep them going as Dobie is preparing, let them make for Frost and secure the bridge.
    B. Order them to make a frontline where they are now. The Poles will then cross this line and form their own frontline in Oosterbeek after which the 3rd can cross the bridge and form a line there.

    2. KOSB
    A. Put them into action again and let them make for Frost at the bridge. Once they made contact with Frost they can advance to the 156th Battalion.
    B. Put them into action again and let them support the 156th Battalion. After that they can turn and head for Frost.
    C. Keep them in reserve for the time being.

  4. #4
    Magister Vitae Senior Member Kraxis's Avatar
    Join Date
    Feb 2002
    Location
    Frederiksberg, Denmark
    Posts
    7,129

    Default Re: Interactive History: Arnhem, September 1944

    1A and 2A

    We need to get into contact with Frost again. If we can do that, then we might be able to take the bridge (if it isn't already taken) with more forces. Currently Frost is really in trouble, he can't move much and he must be getting low on active infantry.

    We are paratroopers, we need to act, for if we delay we will just delay the inevitable. Defensive positions are good, but not when they are not enough, that is when we need to do something.

    Even if we don't break through to Frost, our attacks might just be enough to take the pressure of him, so he can take the bridge. And even if he doesn't it can be vital for the Poles when they land that the Germans are occupied with Frost. So when they land they can support from the other side.

    All in all, pressure where it is needed, right away. We can't afford to stand still right now. If we don't take our objectives fast we don't ever take them, since we are neither heavy infantry or in supply.
    You may not care about war, but war cares about you!


  5. #5

    Default Re: Interactive History: Arnhem, September 1944

    1A and 2A like Kraxis said.
    Friendship, Fun & Honour!

    "The Prussian army always attacks."
    -Frederick the Great

  6. #6
    Shaidar Haran Senior Member SAM Site Champion Myrddraal's Avatar
    Join Date
    Feb 2004
    Location
    UK
    Posts
    5,752

    Default Re: Interactive History: Arnhem, September 1944

    I agree that we must regain contact with Frost at the bridge, and it seems to me (from my limited historical knowledge) that we're in a much better position to do so than was historically the case.

    Clearly sending both the KOSB and the 1st battalion would be the best way to re-establish contact. BUT, sending the 1st battalion leaves the approach from Oosterbeek completely undefended. The poles should be landing on the south side of the river, south of Oosterbeek right? If the Germans move into Oosterbeek the poles will be completely isolated and fairly vulnerable. Fighting in the town won't draw the Germans away from the Polish landing zone because the Germans near the landing zones would need to cross the bridge to get to that area of the town.

    So I'd say we send KOSB to try to join up with Frost, and keep the 1st holding the Oosterbeek approach. The KOSB will surely attract all the attention of the Germans in the town, if they get bogged down, we can always move in with the 1st later, when the Germans in that area will be fully occupied already. I think sending in the first now will make the Polish drop too dangerous.


    EDIT Hang on I may be mistaken here. The Polish drop is planned to occur South of the road bridge in Arnhem in LZ 'K', but accidently happened south of Oosterbeek. Is that right? In which case, the same may not happen, and it would be wrong to assume it will. In which case it is much more important to take the road bridge. So

    1A and 2A
    Last edited by Myrddraal; 12-09-2006 at 18:44.

  7. #7
    Guest Stig's Avatar
    Join Date
    Sep 2006
    Location
    At the bar
    Posts
    4,215

    Default Re: Interactive History: Arnhem, September 1944

    Quote Originally Posted by Myrddraal
    EDIT Hang on I may be mistaken here. The Polish drop is planned to occur South of the road bridge in Arnhem in LZ 'K', but accidently happened south of Oosterbeek. Is that right? In which case, the same may not happen, and it would be wrong to assume it will. In which case it is much more important to take the road bridge. So

    1A and 2A
    Aye the Poles will here be dropped almost directly south of the Bridge, in real Market Garden this was changed to be south of Oosterbeek, as the bridge then was already lost. But you guys choose for something completely different

Bookmarks

Posting Permissions

  • You may not post new threads
  • You may not post replies
  • You may not post attachments
  • You may not edit your posts
  •  
Single Sign On provided by vBSSO