


The battle for Bern, 1330
This thread is to resolve the player vs player battle for Bern. DO NOT POST IN THIS THREAD. Please use the OOC thread for queries, comments etc.
On one side (the Swabian loyalists), Factionheir will control Hans and his Swabian Ducal Army while Privateerkev controls Jan and his Catholic Crusader Army.
On the other side (the Swabian rebels), GeneralHankerchief will control Dietrich von Dassel and his Army of Light while Stuperman will play the role of Hugo Merode, the acting general who leads the Lutheran Army of Truth.
No other players should advise them or communicate with them during the battle.
I will umpire the battle - all communication regarding the rules, orders etc. should be sent to me. The battle will be governed by my discretion rather than fixed rules, although this post will indicate the general principles and guidelines that I will follow.
Background
Duke Hans decided not to assault Bern in 1328 in order to wait for the arrival of Jan von Hamburg and a makeshift army of Catholic “crusaders”. However, Alexander Luther was not idle. From within Bern, he sent word out calling on true believers to come to his aid. A second scratch army - this time a Lutheran one - is racing towards Bern to reinforce it. The battle of Bern begins on the day that both the Catholic and Lutheran supporting armies arrive outside the huge city.
The situation appears balanced: both Hans and Dietrich’s professional armies are roughly comparable, as are the less well trained “crusader” armies of the Catholics and Lutherans. Dietrich has the considerable advantage of defending city walls, but the loyalists have more experienced and accomplished generals - including the mightiest the Reich has ever known.
However, both Hans and Dietrich face difficult dilemmas. The makeshift Lutheran relief force could surely be defeated if Hans concentrated his army against it. But if Hans’s army is caught between the relief force and a sally by Dietrich’s army, it would surely be defeated. As students of military history, both generals are only too aware of the parallels with the siege of Alesia. Can Hans, the greatest general in the Reich, match Caesar’s victory? Or will Dietrich do what Vercingetorix could not and destroy the besiegers?
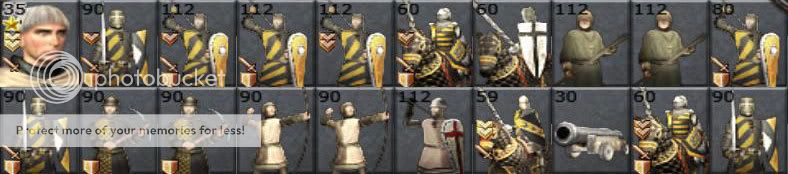
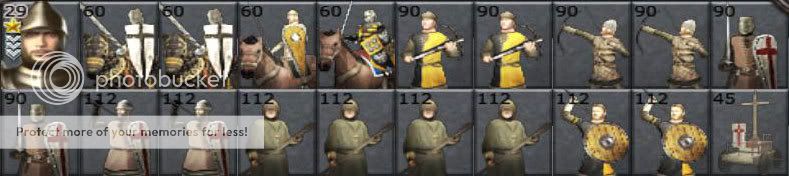
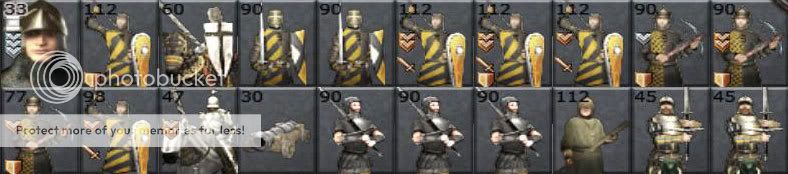
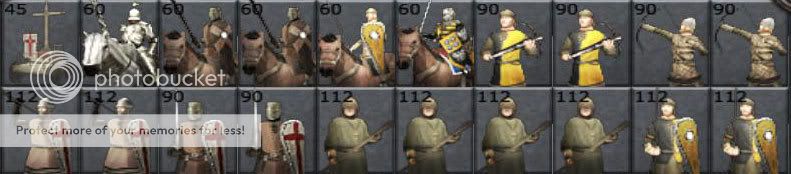
The Armies
The units (regiments) in the four armies are listed in Bern.units.doc contained within the bern_units.zip file:
http://www.totalwar.org/patrons/pbm/Bern_units.zip
The armies can be seen here:
Spoiler Alert, click show to read:
The Lutheran Relief force is under the acting command of a recruitable general, Hugo Merode, who will be played by Stuperman. After the battle, Hugo will retire to a quiet life of contemplation - in this world or the next - and so will no longer be in the campaign.
A medieval general could not personally direct all regiments under his command. To model this, the armies must be divided into divisions and orders given to divisions. A general would not normally try to micromanage individual regiments within a division - that is the divisional commander’s job. So just give broad orders to the division, do not try to micromanage individual regiments unless they are being ordered as detachments (see later). The number of divisions a general may have is decided by their command stars.
Hans - may command each regiment individually.
Jan - may command 9 divisions/give 9 sets of orders
Dietrich - may command 5 divisions/give 5 sets of orders
Hugo - may command 5 divisions/give 5 sets of orders
The armies are motivated by religious zeal and the desperation of a siege assault/defence. However, Hans and Jan's traits make them particularly inspiring to their men. All rebel units will be given an additional four levels of experience; all loyalists will be given an additional six levels of experience.
Details in spoiler.
Spoiler Alert, click show to read:
The map
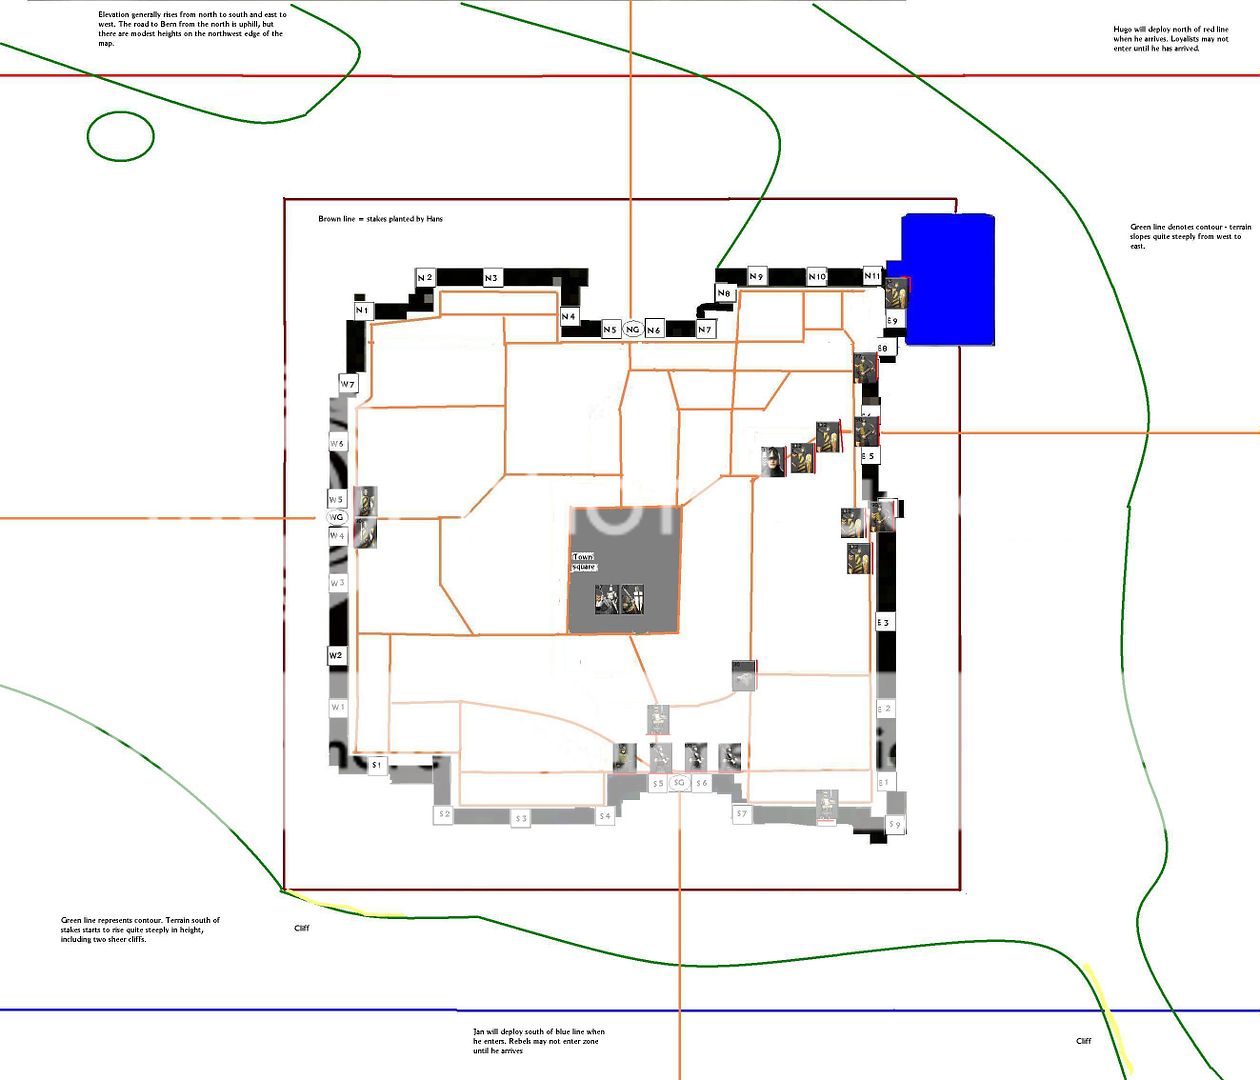
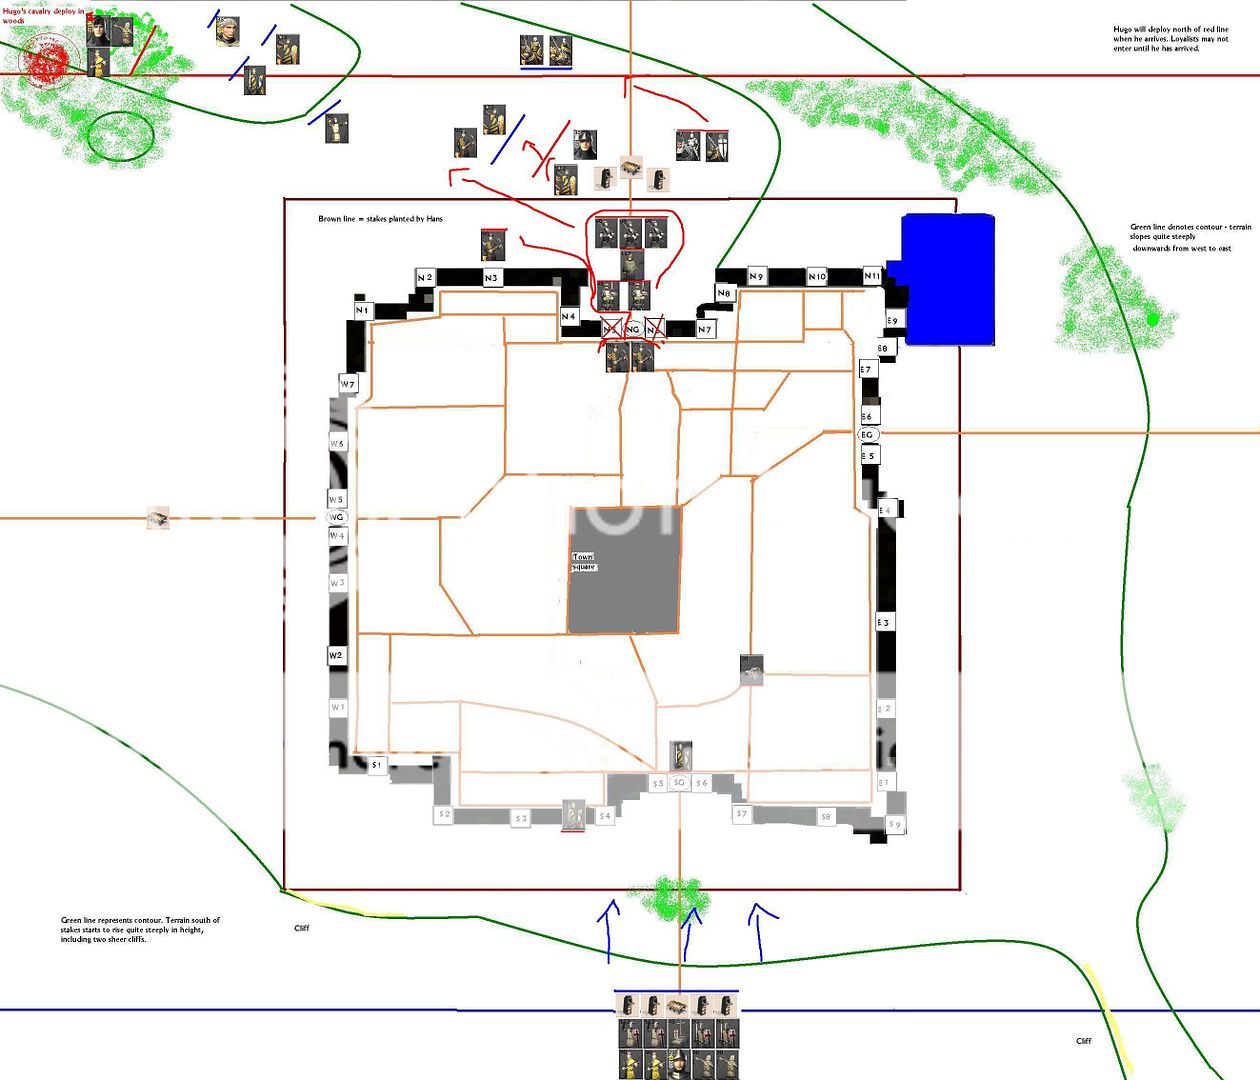
The terrain is that visible in the Swiss Alps custom battle map for M2TW with a Huge City. I have sketched a simplified representation of the map and the city:
Spoiler Alert, click show to read:
The numbered points are the towers (N1 = first north tower). NG is north gate etc. The blue splodge is a mini-lake.
Light brown tracks are the roads. In the city, melee may only occur on roads, walls or the town square. (Buildings cannot be entered.)
Dark brown lines are abatis planted by Hans. These function like stakes in M2TW - they mean cavalry charges across them (from either direction) will be very costly. However, they are not serious obstacles and cavalry may walk across them if given time and not in combat.
Green lines are rough indicators of height contours. The map is an Alpine map and so has high hills and some steep slopes. Generally, the map slopes down south to north and west to east. It is particularly steep south of the southern line of abatis and towards the eastern map edge.
There are also some outlying fields and cottages in the "no-mans" land between the city walls and the abatis, but these are not significant enough features to be factored into planning. They may prevent nice unbroken lines of battle, however.
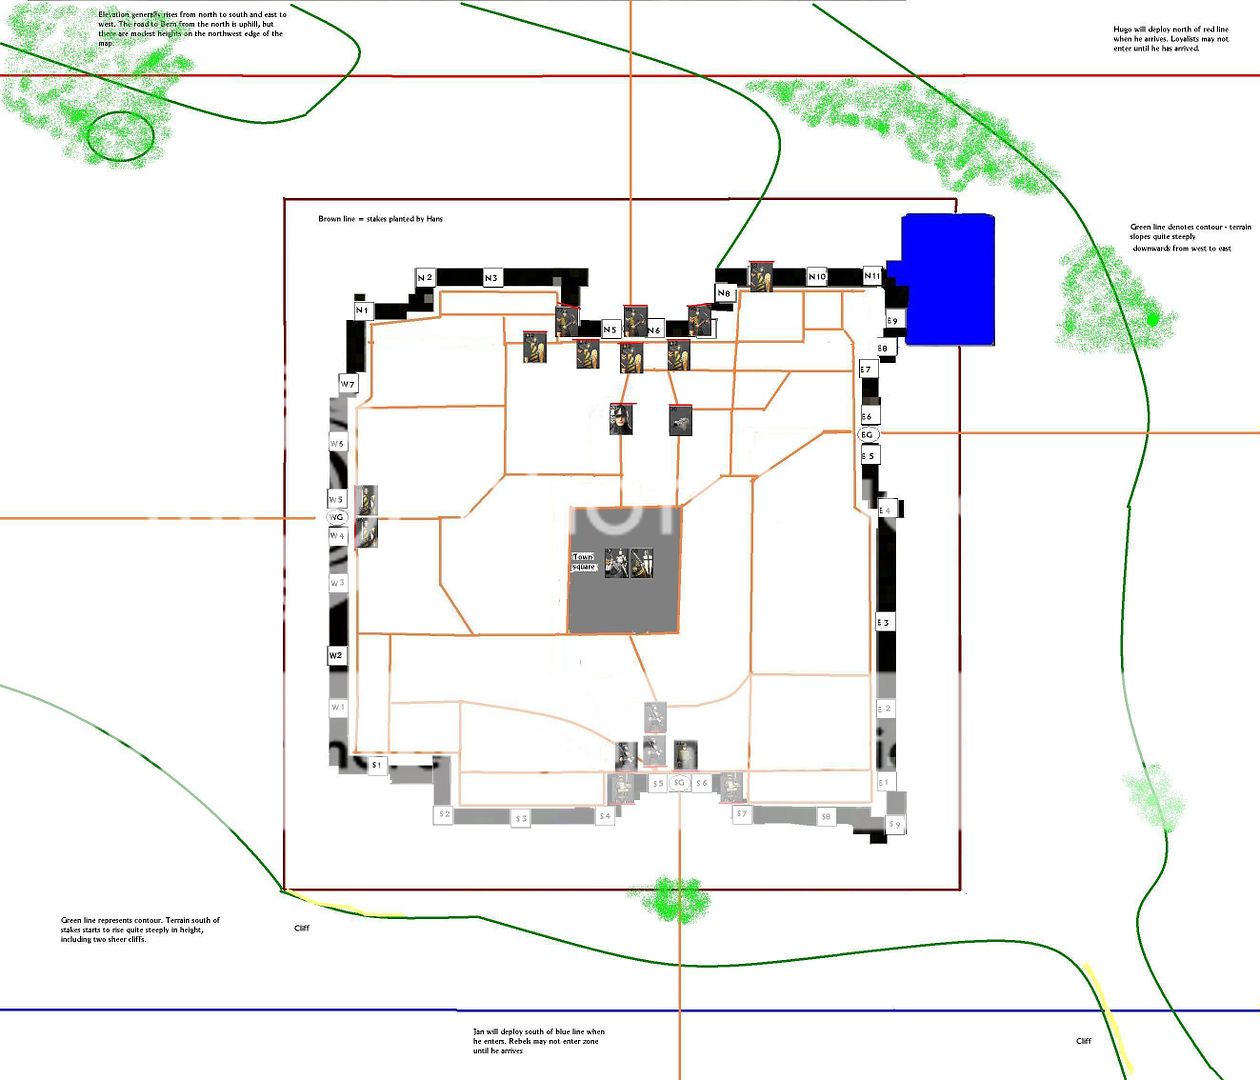
Deployment
Dietrich and Hans will deploy blind, simultaneously. Dietrich may set up anywhere within the city. Hans may set up anyway beyond the abatis, but south of the red line where Hugo will arrive. Both generals should paste your unit icons from the Bern_units.doc onto the jpg map. No orders should be given at this stage, nor are any notes required (you can provide them at the start of the early morning turn). Just show the location of your units. Upload the map and PM me the link.
Dietrich should inform me of the whereabouts of Luther - he may either ride with you or stay in the city.
Hans has 593 build points and can use those to construct whatever mix of rams (50 points) and siege towers (65 points). Please deploy those siege engines on the map.
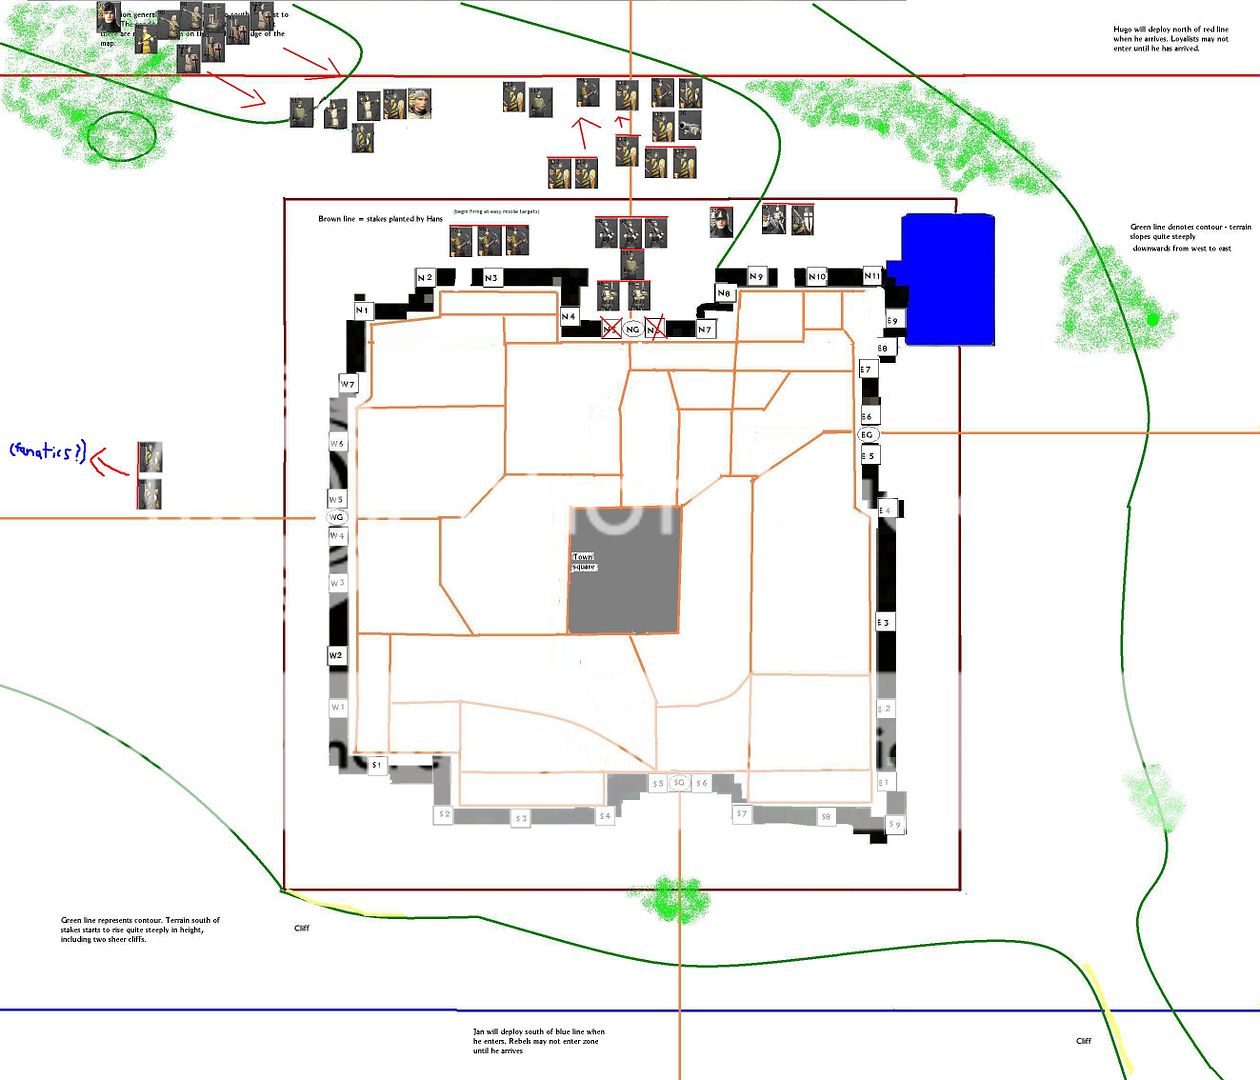
Jan and Hugo will arrive on the map at random times, but almost certainly before midday. Jan will arrive to the south, deploying south of the blue line on the map. Hugo will arrive north, deploying north of the red line on the map. Actual deployment will not be decided now, but rather on the turn they enter the battlefield. On the turn they arrive, they will be free to deploy anywhere in their deployment zones, but may not shoot or charge. Their enemies cannot shoot nor charge them in that turn either, nor can they enter their deployment zones until after the advance guard has arrived.
Both Jan and Hugo should divide their armies into two halves - an advance guard and a rear guard. The advance guard will arrive one turn before the rear guard. There can be no more than 10 regiments in the advance guard and divisional integrity must be maintained - it is highly recommended that the HQ is included in that 10. The players should PM me now with the list of divisions in the advance guard. [On that turn, you may place units within a deployment zone but will not be able to fire or move that turn (nor will you be able to be fired upon or charged.)]
Battle length
The battle will have 7 daylight turns:
Turn 1: early morning
Turn 2: mid morning
Turn 3: late morning
Turn 4: early afternoon
Turn 5: mid-afternoon
Turn 6: late afternoon
Turn 7: evening
Exactly how far units can move and how much they can fight each turn is variable.
Combat in M2TW is quick and bloody, so decisive outcomes can normally be expected within a turn. However, if units have to march far before getting into combat, they may be locked in combat and the outcome decided next turn. Generals can indicate in their orders if they wish a more cautious attack, otherwise I will implement attack orders as all out attacks and try to get a decisive result.
Missile units would have ammunition to fire for about two turns. (They may be resupplied over night.) Cavalry could move the length of the map in one turn if unopposed - infantry half that. However, that pertains to “march movement” - e.g. moving out of fire and out of danger from enemies. For tactical movement - when in battlefield formation, ready for combat - these distances would be at least halved.
If the battle is inconclusive, there will be a night turn and second day turns.
Players may try to break off the battle at any point. Disengaging from an undefeated enemy is a very dangerous manoeuvre. The battlefield situation and in particular, the relative amounts of cavalry in the respective armies will determine exactly how dangerous. Generals may wish to conserve cavalry for victorious pursuits or to permit retreats.
Communication issues.
Players may send one message per turn (including the deployment phase) to their comrade general. This will arrive at the end of the turn. Dietrich and the relief army can only communicate via smoke signals until an open line of communication is established. To reflect this, they can communicate only very basic messages - they would know if they are being attacked, could ask for help etc, but no attempts at micromanagement. If during any turn, two friendly generals end the turn adjacent, they may freely confer (without going via me or waiting for the end of the turn). I will inform the players when such open communication is possible.
In the chaos of battle, there is a chance that orders will go astray or not be implemented due to confusion or the local commander’s discretion. I will roll a dice for each order and if a “1” is rolled, the order will not be implemented. Instead, I will use my discretion about what the local commander would do - typically leading to inactivity. If a general starts adjacent to unit, the order will be implemented. Only two regiments can benefit from being adjacent to the general.
Siege mechanics
Siege engines will work as in the normal M2TW game. A turn is long enough for an engine to reach a wall/gate and the contest for the wall/gate to be decided (within reason).
Hans’ grand bombard may smash down city gates instantaneously. However, city walls or towers are more durable targets. The grand bombard may destroy two towers or wall sections each turn. It will not be possible to enter any breaches during the turn they are destroyed and defenders on the walls will have time to evacuate before the walls collapse. The turn after a wall is knocked down, the defending general will be notified and will have time to rush men to the breach. There will be ammunition limits for all units (the grand bombards have ammunition to destroy as many walls/towers as they can in a custom battle - overnight resupply will be possible).
Towers will function as in the game - they will provide covering fire if there are nearby defenders.
Gates and walls will provide the same defensive benefits as they do in the game - attackers will be at a disadvantage (particularly coming off a siege engine onto a defended wall).
Other rules
The battle will be fought on similar principles to the battle for the Flemish crossroads.
Players should act like historical army commanders and not try to micro-manage too much. Orders may get lost and things may slip up. The position of the general will be particularly important in determining the outcome of any fine maneouvring - if he is far away or locked in combat, he may not be able to control events. (Best avoid the bad habit of using your general as a spearhead.)
Please draft your orders in character, as if given by a real general. They should be clear and simple. The more confused or complicated, the more likely the divisional commander will mess up. You can allow for some contingencies, but if the orders are too complex, the divisional commander may become confused or feel constrained from acting on his own initiative. You can trust your divisional commanders to execute their orders in a competent way (you don’t need to micromanage them and tell them how to fight – I may let the AI control them to see how a division vs division fight would play out). But they will have limited initiative to respond to new developments.
What orders should cover:
- where to move, inc. facing
- which formation to engage or screen (this will help me determine facing)
- for missiles: whether to fire at will or who to target
- for melee units: whether to charge or prepare to receive a charge
- whether to pursue or hold ground once in place
- if attacking, whether (a )to attack all out to get a decisive result this turn; (b) to attack cautiously, committing to a serious assault but trying to withdraw if the combat starts to look unfavourable; (c) to feint or try to pin the enemy, minimising losses but attacking if a good opportunity arises.
- if defending, whether (a) to hold at all costs; (b) defend, but try to withdraw if the combat looks unfavourable; (c) to try to screen an enemy advantage - holding it up, but trying to avoid combat and fall back before it.
- issues of sequencing (e.g. do you soften up the enemy with missiles before charging? do you wait till the enemy are committed before executing a flank charge etc)
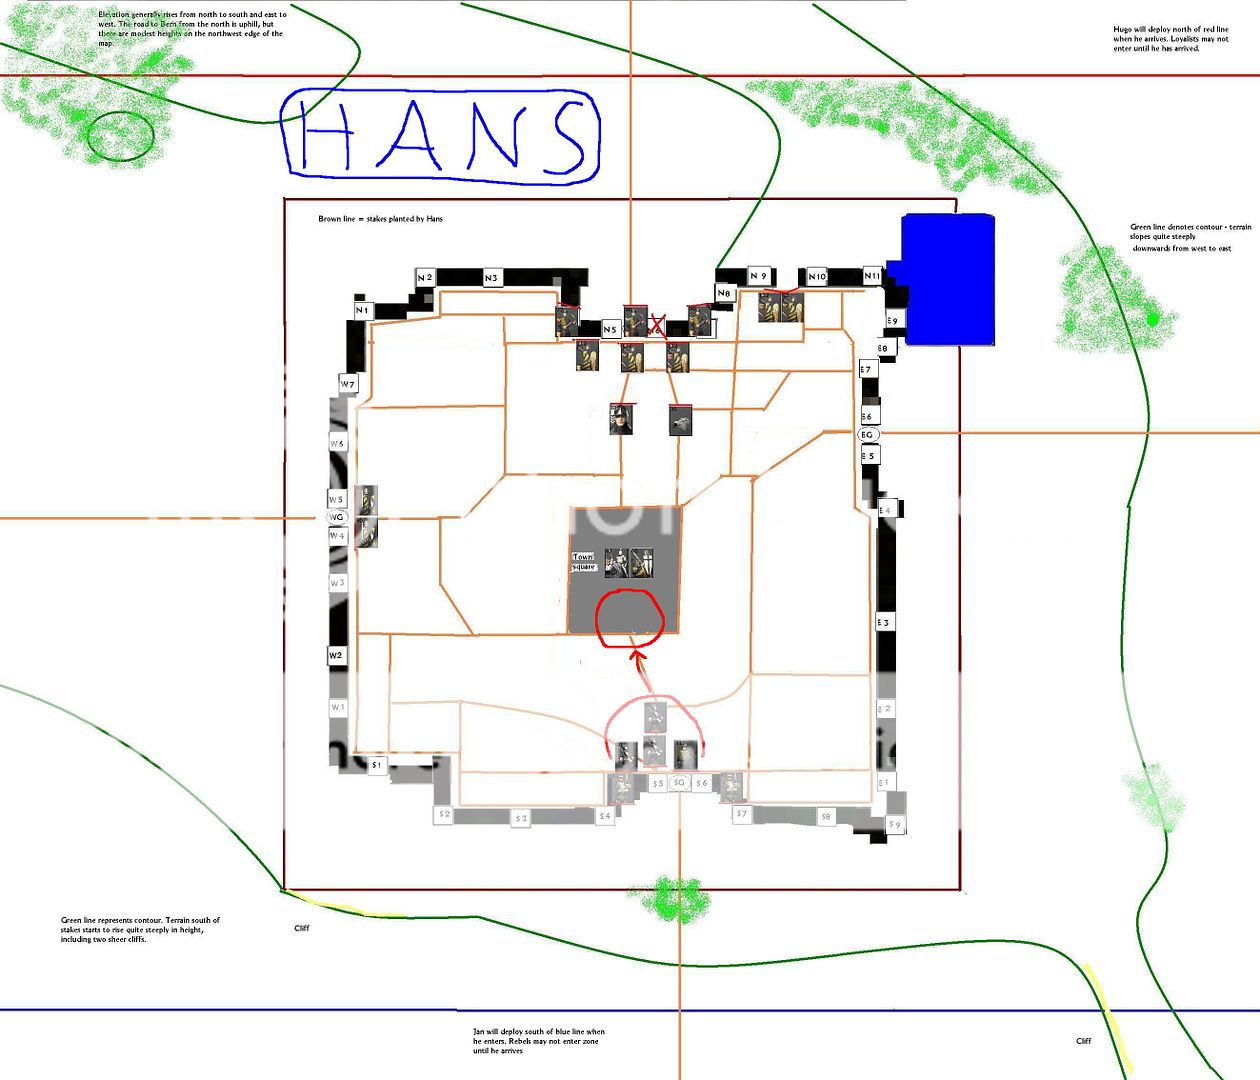
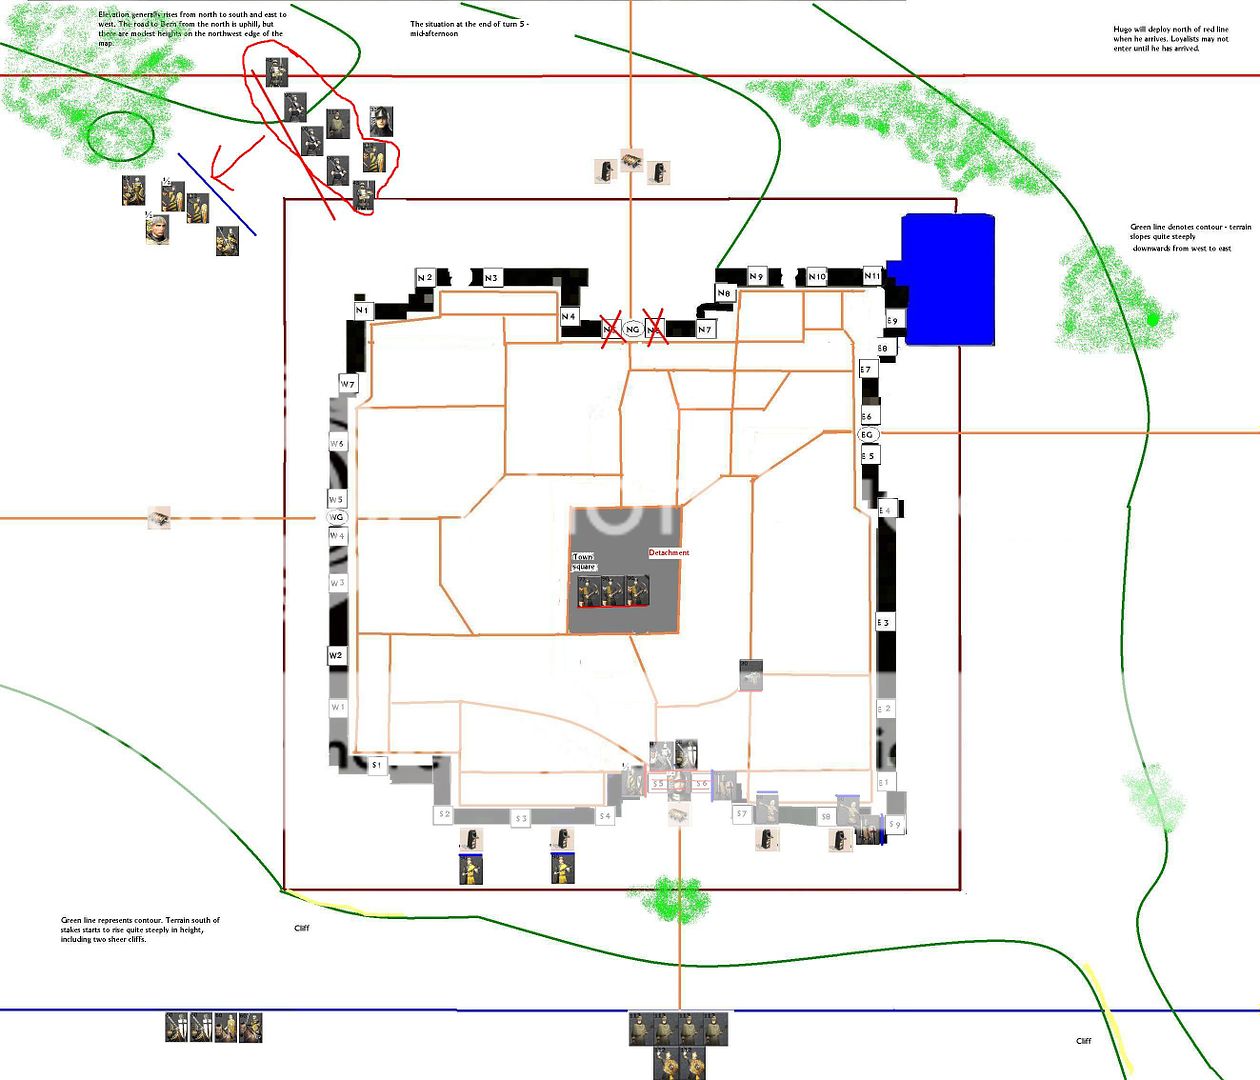
The best way to clarify your orders is to represent on a map where you expect your units to be at the end the turn. Indicate facing by drawing a coloured line for the front side of each unit icon. Units may be able to change their facing autonomously so if you want a flank attack, make sure you pin the enemy first. Units next to a general may be able to do even more in reaction to an enemy move so make sure you place your general where he needs to be to control things.
You may provide OOC notes to clarify your in character orders and map, but these should be for my guidance only. I will not be able to execute them in precise detail - my method of resolving conflicts typically involves custom battles vs the AI and the AI is not controllable. Your IC orders will be treated as your instructions to me - I will refer to your OOC notes to understand how to implement your instructions, but I will not regad them as binding or trumping IC orders. I will show some favoritism in implementing orders in favour of players who provide the most in character orders (this is to avoid rewarding players who try to unrealistically micromanage).
I will put the orders together. Execution of movement will be simultaneous, so I will work out the result of any clashes arising based on my judgement - informed by common sense, unit stats, history and experience of M2tW. Typically, I will break combats down into small groups and play them out in custom battles with the AI - playing both sides and forming a judgement based on rough averaging. However, this may be particularly difficult with siege combat, so do not expect my adjudications to match what could be achieved in a custom battle with mathematical precision.
On the realism of fog of war - a general can only see through line of sight. He does not have a helicopter or interactive total war style map laid out. Once the lines have met in combat, I doubt he could see much - particularly on level ground. He would have to use riders to keep in touch with his divisions, but riders can be lost, reports garbled and orders can be misunderstood (think Balaclava). Placing the general on height or on a wall will permit better perception of the battle. Generals trapped in squares or racing off down the flanks will have very limited abilities to control the battle - they may not be able to issue orders. It is best to deploy your general in a commanding part of the line - ideally: safe from enemy interference, fairly central, close to a key section of the line and with a good field of view.
DEADLINE for deployment orders: 24 hours hence.
If you can get orders to me faster, so much the better. I will always allow 24 hour intervals between orders, but if I get both sets of orders sooner, I will move on sooner. If I get no orders within 24 hours, your units will be on autopilot - typically not moving except defensively. If real life issues mean that you cannot make a 24 hour deadline - e.g. if you are out of touch over the weekend - please PM me in advance and I will arrange an extension.
Executing orders will be time consuming and will typically be done in evenings (UK time).


 Reply With Quote


Bookmarks